background image

ASSEMBLY

9

MS

3615MA

ASSEMBLY
PARTS PACKED SEPARATELY 

IN CARTON


Owner’s Manual (not shown)


Upper Handle

 Right Lower Handle

 Left


Lower Handle

 Parts Bag

WARNING:  Always wear safety

glasses or eye shields while as-

sembling the cultivator.

Figure 1 shows the cultivator completely as-

sembled.
References to the right or left side of the cul-

tivator are from the viewpoint of the opera-

tor’s position behind the unit.

HOW TO REMOVE THE 

CULTIVATOR FROM THE CARTON

1. Remove the parts bag from the carton.
2. Remove the handles from the carton.
3. Remove the packing material positioned

around the unit.

4. Lift the cultivator out of the carton and

place on a hard level surface.

5. Remove the packing material from the

tines.


Figure 1

HOW TO 

ASSEMBLE THE HANDLE

The lower handles have a short bend at the

bottom and have been flattened at the top.
1. Unwind the throttle control from around

the engine. Straighten the throttle cable.

Make sure that you do not bend or kink

the cable.

2. Remove the 

locknuts

spacers

, and

screws

 from the 

tine shield

 (see

Figure 2).

Figure 2

Locknuts

Spacers

Bolts

Spacers

Tine Shield

Summary of Contents for CT20

Page 1: ...mportant information on SAFETY ASSEMBLY OPERATION and MAINTENANCE The owner must be certain that all the product information is included with the unit This information includes the INSTRUCTION BOOKS the REPLACEMENT PARTS and the WARRANTIES This information must be included to make sure state laws and other laws are followed ...

Page 2: ...rofessional noninstitutional or nonincome producing use except as herein stated All consumer product use must have been limited to the owner s residence 2 Year or 2 000 Hour 1 Year or 1 000 Hour Warranty Husqvarna Utility Vehicles 1 Year Warranty Power cutters stump grinder pole pruners and pole saws for noncommercial nonprofessional noninstitutional or nonincome producing use All 300 series trimm...

Page 3: ...PLICABLE LAW ANY IMPLIED WARRANTY OF MERCHANTABILITY OR FITNESS FOR A PARTICULAR PURPOSE ON THESE PROD UCTS IS LIMITED IN DURATION TO THE WARRANTY PERIOD AS DEFINED IN THE LIMITED WARRANTY STATEMENT HUSQVARNA RESERVES THE RIGHT TO CHANGE OR IMPROVE THE DESIGN OF THE PRODUCT WITHOUT NOTICE AND DOES NOT ASSUME OBLIGATION TO UPDATE PREVIOUSLY MANUFACTURED PRODUCTS Some states do not allow the exclusi...

Page 4: ...unit is equipped with an internal combustion engine and must not be used on or near any unimproved forest covered brush covered or grass covered land unless the engine s exhaust system is equipped with a spark arrester meeting applicable local or state laws if any If a spark arrester is used it must be maintained in effective working order by the operator In the State of California the above is re...

Page 5: ...f the owner to make sure the unit is correctly assembled The owner must carefully check the unit according to the instructions in this manual before it is first used RESPONSIBILITY OF THE OWNER The responsibility of the owner is to follow the instructions below 1 Carefully read and follow the rules for safe operation 2 Follow all the assembly and preparation instructions 3 Inspect the unit 4 Make ...

Page 6: ...eck fuel supply before each use allow ing space for expansion as the heat of the engine and or sun can cause fuel to ex pand S Fill fuel tank outdoors with extreme care Do not smoke while refueling Never fill fuel tank indoors Replace fuel tank cap se curely and wipe up spilled fuel S If fuel is spilled do not attempt to start the engine but move the machine away from the area of spillage and avoi...

Page 7: ...mpting to till too deep at too fast a rate Safe Storage S Always refer to the owner s manual instruc tions for important details if the cultivator is to be stored for an extended period S Never store the cultivator with fuel in the fuel tank inside a building where ignition sources are present such as water and space heaters clothes dryers and the like Allow the engine to cool before storing in an...

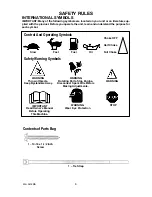
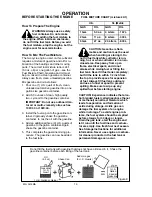
Page 8: ...pose for each symbol Control And Operating Symbols Slow Fast WARNING Thrown Objects Keep Bystanders Away WARNING Rotating Parts Stop Engine Disconnect Spark Wire Before Making Adjustments IMPORTANT Read Owner s Manual Before Operating This Machine WARNING STOP WARNING Wear Eye Protection Safety Warning Symbols Fuel Oil Choke OFF Half Choke Full Choke Contents of Parts Bag 1 Tie Strap 1 10 16 x 1 1...

Page 9: ...FROM THE CARTON 1 Remove the parts bag from the carton 2 Remove the handles from the carton 3 Remove the packing material positioned around the unit 4 Lift the cultivator out of the carton and place on a hard level surface 5 Remove the packing material from the tines Figure 1 HOW TO ASSEMBLE THE HANDLE The lower handles have a short bend at the bottom and have been flattened at the top 1 Unwind th...

Page 10: ... handles with the fasteners removed in step 7 9 Tighten the knobs NOTE To tighten the knobs hold the curved carriage bolt head against the outside of the lower handle as you tighten the knobs 10 Tighten the locknuts that hold the ends of the lower handles see Figure 4 Tighten only enough to firmly hold the handles CAUTION Over tightening the lock nuts can change the shape of the han dle and damage...

Page 11: ...ions have been completed n Check carton Make sure no loose parts remain in the carton n All fasteners have been properly tight ened As you learn how to use the cultivator pay extra attention to the following important items nn Fuel tank is filled with a fresh clean oil and fuel mixture nn Become familiar and understand the function of all controls Before you start the engine operate all controls ...

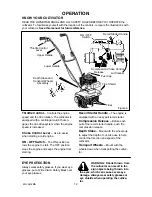
Page 12: ...ever Use to assist when starting a cold engine ON OFF Switch The ON position al lows the engine to start The OFF position stops the engine and keeps the engine from starting Recoil Starter Handle The engine is equipped with an easy pull recoil starter Compression Release Before each pull of the recoil starter handle push the compression release Depth Stake Mount with the wheels up to adjust the de...

Page 13: ...n the depth stake or depth rod until the tines are off the ground Squeeze the throttle control all the way up against the hand grip The engine is governor controlled and must be run at full throttle while tilling 3 Hold the handle firmly and slowly tilt the unit forward to begin the tilling action 4 As the tines begin to make contact with the ground hold back on the handles so that the tines will ...

Page 14: ...ture 24 1 U S SI Metric GAS OIL GAS OIL 1 Gal 5 3 oz 4 Liters 167 L 2 Gal 11 oz 8 Liters 333 L 5 Gal 27 oz 20 Liters 833 L CAUTION Gasoline is flam mable and caution must be used when handling or storing it Do not fill fuel tank while cultivator is run ning hot or when cultivator is in an en closed area Keep away from open flame electrical spark and do not smoke while mixing fuel or filling the fu...

Page 15: ... do so can result in bruised fingers and sudden equipment movement which could result in minor or moder ate injury 6 Hold the rope handle with your right hand and pull to start the engine 7 If the engine does not start do not repeat steps 5 and 6 more than three times be fore you move the choke off or on 8 When the engine starts move the choke lever to the HALF CHOKE position When the engine runs ...

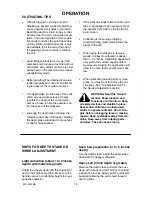
Page 16: ...for ward motion S Cultivating is loosening or digging around growing plants which allows the plants to flourish S When using the cultivator to remove weeds it is best to cultivate no deeper than 1 1 2 inches Cultivating deeper will only pull to the surface ungerminated weed seeds Raising the depth stake will allow it to move faster and till more shal low S When cultivating around plants or close a...

Page 17: ...e Power 2 Displacement 3 0 cu in 49 2 cc Gasoline Capacity 20 oz Fuel Oil Mix Ratio 24 1 Oil To Gas 5 3 oz oil to 1 gal gas use unleaded regular Spark Plug Champion RCJ 8Y Spark Plug Gap 0 035 inch Idle RPM 1700 3000 GENERAL RECOMMENDATIONS The warranty on this cultivator does not cov er items that have been subjected to opera tor abuse or negligence To receive full value from the warranty the ope...

Page 18: ...e felt wash er if it is damaged see the Repair Parts section in this manual 6 Clean and lubricate the tine shaft with a few drops of oil 7 Reinstall the left side tines 8 Remove the right side tines Check the felt washer for damage Clean and oil the tine shaft Reinstall the right side tines Figure 10 Grease Fitting Tine Shaft Air Vent Screw Felt Washer HOW TO CLEAN THE TINES Always remove dirt and...

Page 19: ...n loss of engine power and can cause excessive wear or damage to the engine If the air filter is clogged clean or replace immediately 1 Disconnect the spark plug wire from the spark plug 2 Remove the screws from the air filter cover see Figure 13 Remove the air filter cover and the air filter 3 Wipe the cover and the inside of the air filter housing with a clean cloth 4 Clean the air filter in a s...

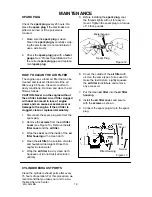
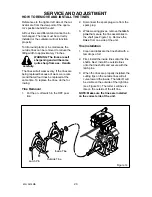
Page 20: ...ame time To replace the tines do the fol lowing Tine Removal 1 Put the on off switch in the OFF posi tion 2 Disconnect the spark plug wire from the spark plug 3 While wearing gloves remove the latch pins that secure the tine assemblies to the shaft see Figure 14 Remove the tines from one side of the unit Tine Installation 1 Clean and lubricate the tine shaft with a few drops of oil 2 First install...

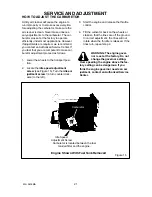
Page 21: ...n 2 Locate the idle speed adjustment screw see Figure 15 Turn the idle ad justment screw 1 4 turn counterclock wise to the left 3 Start the engine and release the throttle control 4 Tilt the cultivator back on the wheels or stake so that the tines are off the ground In correct adjustment the tines will not rotate when the throttle is released If the tines turn repeat step 2 WARNING The engine gove...

Page 22: ...horized Service Center is a good way to make sure that your cultivator will pro vide maximum performance for the next season Engine WARNING Store gasoline in a clean approved container and keep the cap in place on the container Keep gasoline in a cool well ventilated place never in the house Never buy more than a 30 day supply of gasoline to assure volatility Gasoline is intended to be used as a f...

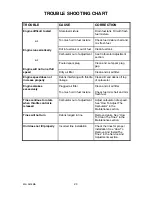
Page 23: ... not increase properly Debris interfering with throttle linkage Clean dirt and debris off top of carburetor Engine smokes excessively Plugged air filter Too much oil in fuel mixture Clean and oil air filter Check fuel mix chart and mix fresh fuel Tines continue to rotate when throttle control is released Carburetor out of adjustment Adjust carburetor idle speed See How To Adjust The Carburetor in ...

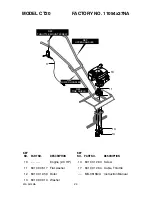
Page 24: ...REF LOWER HANDLES REF TINE SHIELD REF THROTTLE MOUNT SCREW KEY NO PART NO DESCRIPTION KEY NO PART NO DESCRIPTION 10 Engine 2 0 HP 11 601 00 06 17 Flat washer 12 601 00 19 50 Rotor 13 601 00 00 14 Washer 14 601 00 12 83 Screw 17 601 00 12 84 Cable Throttle MS 3615MA Instruction Manual ...

Page 25: ...T20 FACTORY NO 11054x37NA 25 MS 3615MA 311 300 312 310 KEY NO PART NO DESCRIPTION 300 601 00 24 64 Transmission 310 601 00 20 06 Bracket Depth Rod 311 601 00 00 69 Screw 1 4 20x1 25 312 601 00 23 18 Nut 1 4 20 ...

Page 26: ...CRIPTION 480 601 00 25 01 Shield Tine 481 601 00 12 87 Screw 1 4 20x5 50 482 601 00 00 18 Spacer Flange 483 601 00 23 18 Nut 1 4 20 490 601 00 06 02 Washer Felt 491 531 30 74 52 Tine Assy Inner LH 492 531 30 74 53 Tine Assy Outer LH 493 531 30 74 54 Tine Assy Inner RH 494 531 30 74 55 Tine Assy Outer RH 497 531 30 74 56 Pin Latch ...

Page 27: ...A 27 MS 3615MA 318852G REF DEPTH BAR ASSY 661 660 662 650 663 KEY NO PART NO DESCRIPTION 650 601 00 12 88 Wheel Support Assy 660 601 00 18 60 Clevis Pin 661 601 00 06 04 Hair Pin 662 601 00 22 57 Tire Rim 663 601 00 12 91 Push On Nut ...

Page 28: ...O DESCRIPTION 930 601 00 22 62 Upper Handle 932 601 00 22 63 Lower Handle LH 934 601 00 22 64 Lower Handle RH 941 601 00 12 94 Bolt 5 16 18x1 63 942 601 00 23 12 Formed Washer 943 601 00 00 19 Flat washer 944 601 00 06 84 T Knob 945 601 00 00 12 Nut 5 16 18 946 601 00 06 18 Hand Grip 947 601 00 12 15 Screw 948 601 00 06 28 Tie Cable ...

Page 29: ...3 824 830 826 825 831 KEY NO PART NO DESCRIPTION 823 601 00 12 96 Decal Caution 824 601 00 20 96 Decal Husqvarna 825 601 00 22 00 Decal Engine Recoil 826 601 00 11 95 Decal Hold Grip 830 601 00 24 67 Decal CT20 831 601 00 25 02 Decal Throttle Control ...

Page 30: ...MS 3615MA ...
Reviews: