background image

28

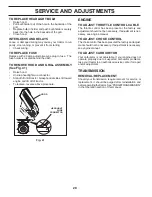
TO REPLACE HEADLIGHT BULB

• Raise 

hood.

•  Pull bulb holder out of the hole in the backside of the 

grill.

•  Replace bulb in holder and push bulb holder securely 

back into the hole in the backside of the grill.

• Close 

hood.

INTERLOCKS AND RELAYS

Loose or damaged wiring may cause your tractor to run 

poorly, stop running, or prevent it from starting.
• Check 

wiring. 

TO REPLACE FUSE

Replace with 20 amp automotive-type plug-in fuse.  The 

fuse holder is located behind the dash.

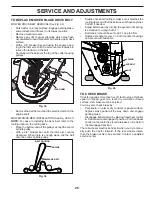
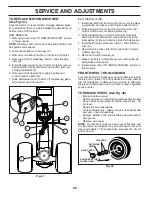
TO REMOVE HOOD AND GRILL ASSEMBLY 

(See Fig. 41)

• Raise 

hood.

•  Unsnap headlight wire connector.
• 

Stand in front of tractor.  Grasp hood at sides, tilt toward 

engine and lift off of tractor.

•  To replace, reverse above procedure.

ENGINE

TO AD JUST THROTTLE CON TROL CABLE


The throttle control has been preset at the factory and 

ad just ment should not be necessary. If adjustment is nec -

es sary, see engine manual.

TO AD JUST CHOKE CON TROL 

The choke control has been preset at the factory and ad just-

 ment should not be necessary. If adjustment is necessary, 

see engine manual.

TO ADJUST CARBURETOR


Your carburetor is not adjustable. If your engine does not 

operate properly due to suspected carburetor problems, 

take your tractor to an authorized service center for repair 

and/or adjustment.

Fig. 41

SERVICE AND ADJUSTMENTS

TRANSMISSION 

REMOVAL/RE PLACE MENT

Should your transmission require removal for service or 

re place ment, it should be purged after reinstallation and 

before operating the tractor.  See “PURGE TRANS MIS SION” 

in the Operation section of this manual.

07002

HEADLIGHT

WIRE

CONNECTOR

HOOD

Summary of Contents for GTH24K54

Page 1: ...4K54 Gasolinecontainingupto10 ethanol E10 isaccept ableforuseinthismachine Theuseofanygasolineex ceeding10 ethanol E10 willvoidtheproductwarranty Please read the operator s manual carefully and make sure you understand the instructions before using the machine ...

Page 2: ...lope Keep all movement on the slopes slow and gradual Do not make sudden changes in speed or direction which could cause the machine to roll over Use extra care while operating machine with grass catch ers or other attachments they can affect the stability of the machine Do no use on steep slopes Do not try to stabilize the machine by putting your foot on the ground Do not mow near drop offs ditch...

Page 3: ...Use extra care when approaching blind corners shrubs trees or other objects that may block your view of a child IV TOWING Tow only with a machine that has a hitch designed for towing Do not attach towed equipment except at the hitch point Follow the manufacturer s recommendation for weight limits for towed equipment and towing on slopes Never allow children or others in or on towed equipment On sl...

Page 4: ...l The instructions will enable you to assemble and maintain your tractor properly Always observe the SAFETY RULES CUSTOMER RESPONSIBILITIES Read and observe the safety rules Follow a regular schedule in maintaining caring for and using your tractor Follow the instructions under Maintenance and Stor age sections of this manual Wear proper Personal Protective Equipment PPE while operating this machi...

Page 5: ...Assemblies 1 Front Lift Link Assembly 1 Anti Sway Bar 1 3 4 O D Washers 1 Small Retainer Springs 1 1 1 4 O D Washer 1 Wheel 1 3 8 16 Locknut 1 Shoulder Bolt Mower If Equipped 2 Keys Slope Sheet Keys 1 Oil Drain Tube Mower Front Wheel Installed by Dealer Battery 1 Quick Connect 2 Hex Bolts 2 Nut Keps Brush Guard Kit ...

Page 6: ... wrenches Utility knife 1 1 2 wrench Tire pressure gauge 1 3 4 wrench Pliers 1 3 4 socket w drive ratchet 1 9 16 wrench Flashlight Whenrightorlefthandismentionedinthismanual itmeans when you are in the operating position seated behind the steering wheel TO INSTALL MOWER AND DRIVE BELT See Figs 3 15 1 SET PARKING BRAKE LEVER AND LOWER AT TACHMENT LIFT LEVER See Fig 3 and 4 Depress clutch brake peda...

Page 7: ...rd before sliding mower under tractor Slide mower under tractor until it is centered under tractor LIFT LEVER Fig 4 H FRONT MOWER BRACKET W FRONT GAUGE WHEEL X SHOULDER BOLT Y 1 1 4 O D WASHER Z 3 8 16 LOCKNUT Fig 5 Y Z W H X Fig 9 3 TURN STEERING WHEEL LEFT AND POSITION MOWER See Fig 6 Turn steering wheel to the left as far as it will go and position mower on right side of tractor with deflector ...

Page 8: ...et F Insert other end of link E into hole in front mower bracket H and secure with washer and small retainer spring J NOTE Requires deck lifting Fig 14 FRONT LINK LOCATION E G F M E FRONT LIFT LINK ASSEMBLY F FRONT SUSPENSION BRACKET G LARGE RETAINER SPRING H FRONT MOWER BRACKET J SMALL RETAINER SPRING M ENGINE CLUTCH PULLEY J H Fig 13 7 ATTACH REAR LIFT LINKS C See Fig 13 Insert rod end of rear l...

Page 9: ...operat ing your tractor for the first time Follow proper start ing and transmission purging instructions See TO START ENGINE and PURGE TRANSMISSION in the Operation section of this manual 9 INSTALL BELT ON ENGINE CLUTCH PULLEY M See Fig 6 15 Disengage belt tension rod K from locking bracket L Install belt onto engine clutch pulley M M ENGINE CLUTCH PULLEY M Fig 15 IMPORTANT Check belt for proper r...

Page 10: ...entify safety inform ation about hazards which can result in death serious injury and or property damage DANGER indicates a hazard which if not avoided will result in death or serious injury WARNING indicates a hazard which if not avoided could result in death or serious injury CAUTION indicates a hazard which if not avoided might result in minor or moderate injury CAUTION when used without the al...

Page 11: ...NTCLUTCHSWITCH Usedtoengagethe mowerbladesorotherattachmentsmountedtoyourtractor F IGNITION SWITCH Used for starting and stopping the engine G REVERSE OPERATION SYSTEM ROS ON POSITION Allows operation of mower or other powered attachment while in reverse H LIGHT SWITCH Turns the headlights on and off J CRUISE CONTROL LEVER Used to set forward movement of tractor at desired speed without holding th...

Page 12: ...DEPRESSED ENGINE Move throttle control D between half and full speed fast position NOTE Failure to move throttle control between half and full speed fast position before stopping may cause engine to backfire Turnignitionkey F to STOP positionandremovekey Always remove key when leaving tractor to prevent unauthorized use Never use the choke to stop the engine IMPORTANT LEAVING THE IGNITION SWITCH I...

Page 13: ...ions such as trimming at slow speeds may cause the cruise control to disengage Do not use the cruise control on slopes rough terrian or while trimmimg or turning With forward drive pedal depressed to desired speed pull cruise control lever J up and hold while lifting your foot off the pedal then release the lever To disengage the cruise control depress the brake pedal or tap on forward drive pedal...

Page 14: ...O OPERATE ON HILLS CAUTION Do not drive up or down hills with slopes greater than 15 and do not drive across any slope Choose the slowest speed before starting up or down hills Avoid stopping or changing speed on hills If stopping is absolutely necessary push brake pedal quickly to brake position and engage parking brake To restart movement slowly release parking brake and brake pedal Slowlydepres...

Page 15: ...mation Neveruseengineorcarburetorcleaner products in the fuel tank or permanent damage may occur TO START ENGINE See Fig 3 When starting the engine for the first time or if the engine has run out of fuel it will take extra cranking time to move fuel from the tank to the engine Besurefreewheelcontrolisinthetransmissionengaged position Sit on seat in operating position depress brake pedal and set pa...

Page 16: ...nwarmed up NOTE If at a high altitude above 3000 feet or in cold temperatures below 32 F 0 C the carburetor fuel mixture may need to be adjusted for best engine performance See TO ADJUST CARBURETOR in the Service and Adjust ments section of this manual 5 Shut off engine and set parking brake 6 Engage transmission by placing freewheel control in engaged position See TO TRANSPORT in this sec tion of...

Page 17: ...MENDATIONS The warranty on this tractor does not cover items that have beensubjectedtooperatorabuseornegligence Toreceive full value from the warranty operator must maintain tractor as instructed in this manual Some adjustments will need to be made periodically to properly maintain your tractor At least once a season check to see if you should make any of the adjustments described in the Service a...

Page 18: ... with the ignition switch in the ROS ON position and the attachment clutch engaged any attempt by the operator to shift into reverse should NOT shut off the engine BLADE CARE Forbestresultsmowerbladesmustbekeptsharp Replace bent or damaged blades CAUTION Useonlyareplacementbladeap proved by the manufacturer of your tractor Using a blade not approved by the manu facturer of your tractor is hazardou...

Page 19: ...LE PUMP FLUID The transaxle was sealed at the factory and fluid mainte nance is not required for the life of the transaxle Should the transaxle ever leak or require servicing contact your nearest authorized service center department TO CHANGE ENGINE OIL See Fig 16 18 Determine temperature range expected before oil change All oil must meet API service classification SG SL Be sure tractor is on leve...

Page 20: ...he useful life of your tractor Use compressed air or a leaf blower to remove grass leaves and trash from tractor and mower CLEANING Clean engine battery seat finish etc of all foreign matter Clean debris from steering plate Debris can restrict clutch brake pedal shaft movement causing belt slip and loss of drive CAUTION Avoid all pinch points and movable parts See Fig 20 CLUTCH BRAKE PEDAL STEERIN...

Page 21: ...er on 6 While sitting in the operator s position on the tractor re start the engine and place the throttle lever in the Fast position IMPORTANT Recheck the area making certain the area is clear 7 Move the tractor s attachment clutch control to the ENGAGED position Remainintheoperator sposition with the cutting deck engaged until the deck is cleaned 8 Move the tractor s attachment clutch control to...

Page 22: ...wer suspension arm A from chassis and rear lift link C from rear mower bracket D remove retainer springs and washers Go to other side of mower and disconnect the suspen sion arm and rear lift link CAUTION After rear lift links are discon nected the attachment lift lever will be springloaded Haveatightgriponliftlever when changing position of the lever Slide mower out from under right side of tract...

Page 23: ...TOREPLACEMOWER BLADE DRIVE BELT in this section of the manual D C Fromrightsideofmower firstinsert90 endofanti sway bar S into hole in transaxle bracket T located near left rear tire in front of transaxle NOTE Flashlight may be helpful NOTE Depending on model bracket T may be differ ent than shown but hole for anti sway bar will be in same position location ANTI SWAY BAR S LOCATION TRANSAXLE BRACK...

Page 24: ... and visually checking the appearance Readjust if necessary until you are satisfied with the results Fig 30 Fig 31 PRECISION SIDE TO SIDE ADJUSTMENT See Fig 32 With all tires properly inflated park tractor on level ground or driveway CAUTION Blades are sharp Protect your hands with gloves and or wrap blade with heavy cloth Raise mower to its highest position At both sides of mower position blade a...

Page 25: ...any dirt or grass clippings which may have accumulated around mandrels and entire upper deck surface With a 3 8 breaker bar and using the square open ing in the idler arm shift the arm counter clockwise to relieve the tension on the belt Carefully roll the belt over the top of the cutter housing pulleys Remove the belt from around the electric clutch on the engine shaft MOWER DRIVE BELT INSTALLATI...

Page 26: ...left footrest BELT REMOVAL 1 Remove mower See TO REMOVE MOWER section in this manual NOTE Observe entire motion drive belt and position of all belt guides and keepers 2 Disconnect clutch wire harness A 3 Remove anti rotation link B on right side of tractor 4 Remove belt from stationary idler C and clutching idler D 5 Pull belt slack toward rear of tractor Carefully remove belt upwards from transmi...

Page 27: ...om fuel tank and battery TO REMOVE CABLES REVERSE ORDER BLACK cable first from chassis and then from the fully charged battery RED cable last from both batteries WEAK OR DEAD BATTERY FULLY CHARGED BATTERY Fig 39 SERVICE AND ADJUSTMENTS REPLACING BATTERY See Fig 40 WARNING Do not short battery termi nals by allowing a wrench or any other object to contact both terminals at the same time Before conn...

Page 28: ...e above procedure ENGINE TO ADJUST THROTTLE CONTROL CABLE The throttle control has been preset at the factory and adjustment should not be necessary If adjustment is nec essary see engine manual TO ADJUST CHOKE CONTROL Thechokecontrolhasbeenpresetatthefactoryandadjust ment should not be necessary If adjustment is necessary see engine manual TO ADJUST CARBURETOR Your carburetor is not adjustable If...

Page 29: ...AL FUEL SYSTEMPARTSSUCHASCARBURETOR FUELFILTER FUEL HOSE OR TANK DURING STORAGE ALSO EXPERIENCE INDICATES THAT ALCOHOL BLENDED FUELS CALLED GASOHOL OR USING ETHANOL OR METHANOL CANATTRACTMOISTUREWHICHLEADS TO SEPARATION AND FORMATION OF ACIDS DURING STORAGE ACIDIC GAS CAN DAMAGE THE FUEL SYSTEM OF AN ENGINE WHILE IN STORAGE Empty the fuel tank by starting the engine and let it run until the fuel l...

Page 30: ...ing 7 Faulty ignition switch 7 Check replace ignition switch 8 Faulty solenoid or starter 8 Check replace solenoid or starter 9 Faulty operator presence switch es 9 Contact an authorized service center department Engine clicks but will not start 1 Weak or dead battery 1 Recharge or replace battery 2 Corroded battery terminals 2 Clean battery terminals 3 Loose or damaged wiring 3 Check all wiring 4...

Page 31: ...led 9 Reinstall blades sharp edge down 10 Improper blades used 10 Replace with blades listed in parts manual 11 Cloggedmowerdeckventholesfrombuildup of grass leaves trash around mandrels 11 Clean around mandrels to open vent holes Headlight s not working if so equipped 1 Switch is OFF 1 Turn switch ON 2 Bulb s or lamp s burned out 2 Replace bulb s or lamp s 3 Faulty light switch 3 Check replace li...

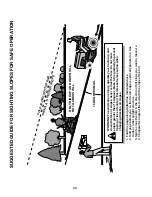
Page 32: ... never across the face Do not mow slopes greater than 15 degrees Make turns gradually to prevent tipping or loss of control Exercise extreme caution when changing direction on slopes 1 Fold this page along dotted line indicated above 2 Hold page before you so that its left edge is vertically parallel to a tree trunk or other upright structure 3 Sight across the fold in the direction of hill slope ...

Page 33: ...09 05 2011 JM ...

Reviews: