background image

Huskylock 90

31


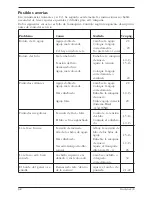
Problem

Cause

Corrective action

Page

 Needles break

Needles are bent,

Replace with new needles

     28

blunt or points are
damaged
Needles not inserted

Insert needles correctly

     28

correctly
You have forcibly pulled

Guide the fabric gently

thefabric

with both hands

Thread breaks

Threading is incorrect

Thread correctly

10 -13

Thread tension is too tight

Loosen thread tension

15 -16

Needles not inserted
correctly

Insert needles correctly

     28

Needles are bent, blunt or

Replace with new needles

     28

points are damaged

 Skipped stitches

Needles not inserted
correctly

Insert needles correctly

     28

Threading is incorrect

Thread correctly

10 -13

Wrong needles used

Use correct needles

     28

(System HAx1 (130/705H)

 Stitches are

Thread tension incorrect

Correct the thread tension

15 -16

 irregular

Thread is caught

Check threading path of
each thread

10 -13

Thread tension is too tight

Loosen thread tension

15 -16

 Seam  is

Threading is incorrect

Thread correctly

10 -13

 puckering

Thread is caught

Check threading path of
each thread

10 -13

Differential feed is not set

Set differential feed N-G

     26

 Fabric not

Upper cutter is blunt or

Replace or adjust the cutter      30

 cutted neatly

wrongly positioned

 Fabric edges

Too much fabric is within

Re-adjust the seam width

21 -22

 curl

the stitch

Trouble shooting guide

Check items below before calling for service

Summary of Contents for Huskylock 90

Page 1: ...Huskylock 90 1 1 Operatingmanual Instrucciones Huskylock 90 ...

Page 2: ...nings of sewing machine and foot controller free from the accumulation of lint dust and loose cloth Never drop or insert any objects into any opening Do not use outdoors or on wet surfaces Do not operate where aerosol spray products are being used or where oxygen is being administered To disconnect turn the main switch off then remove plug from outlet Do not unplug by pulling on cord To unplug gra...

Page 3: ...utilice la máquina o durante el mantenimiento o modificaciones mecánicas se recomienda dejar la máquina desconectada Esto se efectue tirando el cable de alimentación de la toma de corriente No utilizar la máquina como juguete Ponga atención especialmente cuando la máquina sea utilizada por niños Esta máquina tiene un cable especial del pedal Si el cable estuviera dañado cambielo por otro cable del...

Page 4: ... 28 Replacing the bulb 29 Replacing the cutters 30 Trouble shooting guide 31 Cleaning and lubricating 33 Service 33 Specification of the machine 34 Indice Instrucciones de seguridad 3 Sumario 5 Preparaciones 6 Barra telescópica 6 Porta carretes 6 Discos para bobina 6 Conexión 7 Acumulador de suciedad 7 Velocidad de costura 8 Interruptor de sguridad 8 Accesorios 8 Funcionamente 9 Volante 9 Tapa fro...

Page 5: ...Spool holder Discos para bobina Thread guide plate Guía hilos Left needle thread tensiondial Regulador de la tensión del hilodeagujaizquierdo Needle plate Placa de aguja Freearm Brazo libre Support bed Mesa de soporte Upper looper thread tension dial Regulador de la tensión del hilo de garfio superior Front cover Tapafrontal Power switch Interruptor principal Base Zócalo Conexión eléctrica Machine...

Page 6: ... use the spool holders with the large end at the top For small diameter cones use the same spool holders with the small end at the top Domestic type of thread spool Hilo de casa Porta carretes Se puede utilizar hilo industrial e hilo de familia Utilice los porta carretes con el lado ancho hacia arriba para grandes carretes industriales y para carretes pequeños coloque los porta carretes con el lad...

Page 7: ...icados coincidan con los de la red Enchufar el cable del pedal al enchufe de la máquina Después conectar el cable al enchufe de la red Al pulsar el interruptor principal se conectan la máquina y la iluminación al mismo tiempo Cuando no se utilice la máquina debe estar desconectada y el cable tirado de la toma de corriente Machine socket Enchufedelamáquina Machine plug Conexión eléctrica Power supp...

Page 8: ...rápido cose la máquina Interruptor de seguridad La máquina tiene un micro interruptor que desconecta la máquina al abrir la tapa lateral o frontal Coloque de nuevo la tapa lateral y cierre la tapa frontal antes de comenzar la costura Accessories Accessorios Foot control Pedal Safety switch Interruptor de seguridad Machine cover Cubierta de plástico Tweezers Pinzas Oiler Recipiente de aceite Spare ...

Page 9: ... you Tapa Frontal Abra la tapa frontal empujando la parte 1 hacia la derecha y tirando la tapa hacia Ud 2 La tapa debe estar cerrada durante la cos tura Using the machine Funcionamente Freearm release lever Palancade desembrague Brazo libre Abra la tapa frontal estire la superficie de trabajo y abra la tapa lateral con la palanca para enhebrar la máquina Free arm Open the front cover first Open th...

Page 10: ... se puede romper el hilo Debajo de la tapa frontal hay un esquema de enhebrado Utilice las pinzas al enhebrar Al enhebrar la máquina por primera vez proceda de la siguiente manera Looper threading Enhebrado de los hilos del garfio Open the front cover and the free arm Turn the handwheel toward you until the looper comes to the best position for threading Pass the threads through thread guide 1 and...

Page 11: ... illustration through 3 11 Continúe según el esquema 3 11 Hilo del garfio inferior Lower looper Pull out the thread end about 10 cm Raise the presser foot and place the threads under it then lower the presser foot Saque el hilo dejando un trozo de aprox 10 cm hacia atrás Levante el prensatelas introduzca el hilo y baje otra vez el prensatelas 2 3 5 4 2 3 4 5 Upper looper Hilo del garfio superior L...

Page 12: ... discos de tensión del hilo 3 1 1 2 2 3 Turn the handwheel toward you until the needles are fully raised Pass the threads through thread guide 1 continue through 2 Ponga la aguja en su posición más alta girando el volante Guie el hilo desde el porta carrete a través del guía hilo 1 y 2 Left needle thread Hilo de la aguja izquierda Right needle thread Hilo de la aguja derecha 2 2 3 3 4 6 5 5 4 8 7 ...

Page 13: ...4 5 7 Right needle Continue according to illustration through 4 9 Left needle Continue according to illustration through 4 8 Aguja derecha Continue según el eschema 4 9 Aguja izquierda Continue según el eschema 4 8 Left needle Agujaizquierda Right needle Agujaderecha 7 8 8 9 Enhebre el hilo desde adelante a través el ojo de la aguja Saque el hilo dejando un trozo deaprox 10 cm hacia atrás Levante ...

Page 14: ...end of fabric Cut the threads Introduzca la tela por debajo de la parte anterior del presantelas No es necesario levantar el prensatelas Cosa lentamente las primeras puntadas La tela avanza automáticamente Solo hay que guiarla hacia el prensatelas Place the fabric for trial sewing under the presser foot and start sewing slowly The fabric will be automatically fed Guide the fabric as you serge Colo...

Page 15: ...ire hacia una cifra más baja tensión más floja Gire hacia una cifra más alta tensión más fuerte A Left needle thread tension dial A Mando de regulación del hilo de aguja izquierda C Upper looper thread tension dial C Mando de regulación del hilo del garfio superior B Right needle thread tension dial B Mando de regulación del hilo de aguja derecha D Lower looper thread tension dial Correct thread t...

Page 16: ...ht needle thread tension is too loose Hilo de la aguja derecha demasiado flojo Hilo de la aguja izquierda demasiado flojo Tighten the right needle thread tension The lower looper thread is tight and or the upper looper thread is loose The upper looper thread is tight and or the lower looper thread is loose El hilo del garfio superior está demasiado fuerte y o el hilo del garfio inferior está demas...

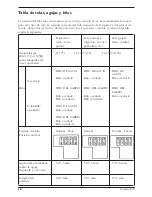
Page 17: ...System 11 75 11 14 75 90 14 16 90 100 HAx1 130 705H for home use sewing machine NEEDLE THREAD NEEDLE THREAD NEEDLE THREAD Overlock thread Overlock thread Overlock thread Overlock LOOPER THREAD LOOPER THREAD LOOPER THREAD Overlock thread Overlock thread Overlock thread Thread Non spun thread Non spun thread Rolled edge NEEDLE THREAD Overlock thread LOOPER THREAD Non spun thread Thread tension Mediu...

Page 18: ...ock Hilo no hilado Hilo no hilado Dobladillo HILO DE AGUJA enrollado Hilo overlock HILO DEL GARFIO Hilo overlock Hilo no hilado Tensión del hilo Normal Floja Normal Normal Fuerte Posición normal Ancho del sobrehilado 5 2 5 5 mm 5 2 5 5 mm 5 5 5 6 mm entre la aguja izquierda y el borde Longitud de 2 2 5 mm 2 5 3 mm 2 5 3 mm puntada La tensión del hilo más conveniente para un tipo de tela no es nece...

Page 19: ... Then re thread the needles Los hilos se pueden cambiar de la manera siguiente Corte el hilo existente cerca del porta carrete Coloque el nuevo carrete en el porta carrete anudando los fines de los hilos Ponga el mando de regulación de la tensión del hilo a 0 y levante el prensatelas Si debe cambiar el hilo de la aguja corte el nudo de hilos antes de llegar al ojo de la aguja a fin de evitar que l...

Page 20: ...illo enrollado estrecho y 5 mm girando el mando de regulación de la longitud de puntada Para overlock normal se puede regular entre 2 0 y 5 mm norma 3 mm Stitch length dial inner dial Regulador de la longitud de puntada Mando interior Reglaje de la longitud de puntada Puntada Longitud de puntada Overlock normal 2 0 5 0 mm 3 0 mm reglaje normal Dobladillo estrecho 1 0 2 0 mm Dobladillo enrollado 1 ...

Page 21: ...ndiendo del tipo de género 1 Gire el volante hasta su posición más baja 2 Abre la tapa frontal saque la superficie de trabajo y abre la tapa lateral con la palanca 3 Gire el regulador del ancho de corte hasta que las puntadas estén equilibradas correctamente Si el ancho de corte es más estrecho que el ancho de puntada se formarán lazos sobre el borde de la tela Gire el regulador del ancho de corte...

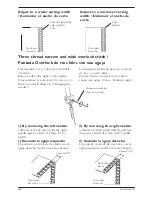
Page 22: ...dth This machine is a 3 4 thread convertible overlock Remove either the right or left needle Your machine is now ready for use as a 3 thread overlock Refer to Changing the needle La máquina está hecha para un overlock de tres o cuatro hilos Para la costura overlock de tres hilos saque una aguja Véase Cambiar aguja Puntada Overlock de tres hilos con una aguja Three thread narrow and wide overlock s...

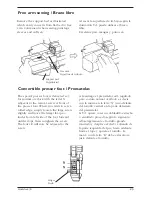
Page 23: ...ntera del prensatelas Si Ud quiere coser un dobladillo estrecho o enrollado proceda según lo siguiente Afloje ligeramente el tornillo grande ranurado y desplace el dedo saliendo de la parte izquierda del pie hacia adelante hasta el tope y apriete el tornillo La marca con la letra R debe estar ahora justo delante el tornillo The special presser foot is delivered set for normal overlock with the let...

Page 24: ...needle See page 22 4 Set the stitch length between 1 0 2 0 mm See page 20 Also ensure that differential feed is set at the N position See page 26 5 Adjust the stitch width as shown on page 21 6 If not already threaded re thread the machine 7 Place the fabric under the presser foot and start to sew Always test the stitch and the tension setting on a spare fabric before sewing on your actual garment...

Page 25: ...oser Siempre haga una prueba de costura con un trozo de tela controlando las puntadas y la tensión del hilo Cambiar los hilos según pág 18 Acordarse de reajustar el tornillo del prensatelas después de terminar el dobladillo Dobladillo estrecho Los lazos de los hilos de garfio deben estar por debajo la tela IMPORTANTE Ajustar la longitud de puntada y el ancho de corte si fuera necesario Véase La ta...

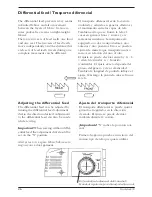
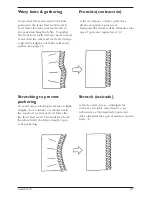
Page 26: ...tro El ajuste se puede efectuar entre S y G S stretch estirado G fruncido contraído El ajuste exacto depende del grueso del género y de su elasticidad También la longitud de puntada influye el ajuste Más largo la puntada más se frunce la tela Adjusting the differential feed The differential feed can be adjusted by turning the differential feed adjustment dial in the direction desired Adjustment to...

Page 27: ...uras en tejidos muy densos o en nylón suave el transportador posterior debe alimentar más que el anterior Ajuste hacia S For perfect flat seams in stretchy knit garments the front feed teeth need to feed faster than the rear feed teeth to prevent stretching the fabric To gather the front feed teeth will also need to feed faster than the rear feed teeth By using a long stitch length your fabric wil...

Page 28: ...ightly higher than the right one Use needle system HAx1 130 705H no 11 16 75 100 household type Desconecte la máquina de la red cuando quiera cambiar la aguja No utilizar agujas dobladas o dañadas 1 Ponga la aguja en su posición más alta girando el volante hacia Ud 2 Abre la tapa frontal y baje el prensatelas 3 Afloje el tornillo de fijación de la aguja con la llave de encastre y saque las agujas ...

Page 29: ...ulb and turn it to its position Important The machine is designed to use a 15 watt bulb Desconecte la máquina antes de cambiar la bombilla 1 Saque el tapón usando una aguja 2 Afloje el tornillo hasta que se suelte la protección 3 Tire de la protección de bombilla hacia atrás 4 Empuje y gire para sacar la bombilla usada 5 Inserte una nueva bombilla girándola hasta su posición correcta Importante Ut...

Page 30: ...r overlaps 0 5 1 0 mm from the edge of lower cutter as shown below 5 Tighten the upper cutter set screw firmly and close the front cover Desconecte la máquina de la red El cuchillo superior puede estar gastado y debe reemplazarse El cuchillo inferior esta hecho de material especial y normalmente no necesita cambiarse En caso que esté dañado su revendedor pueda cambiarlo 1 Abra la tapa frontal gira...

Page 31: ...y Insert needles correctly 28 Threading is incorrect Thread correctly 10 13 Wrong needles used Use correct needles 28 System HAx1 130 705H Stitches are Thread tension incorrect Correct the thread tension 15 16 irregular Thread is caught Check threading path of each thread 10 13 Thread tension is too tight Loosen thread tension 15 16 Seam is Threading is incorrect Thread correctly 10 13 puckering T...

Page 32: ...la aguja correctamente o cambiela 28 Puntadas saltantes Aguja doblada Cambie la aguja 28 Aguja mal colocada Coloque la aguja correctamente Mal enhebrado Enhebre la máquina 10 13 de nuevo Aguja falsa Utilice aguja correcta 28 Sistema HAx1 130 705H Puntadas irregulares Tensión del hilo falsa Controle la tensión del hilo 15 16 El hilo se ha enganchado Controle el enhebra do 10 13 La tela se frunce Te...

Page 33: ...l materials Occasionally lubricate only the points illustrated Primero desconecte la máquina tirando su enchufe del enchufe de la pared Saque todos los restos de tela con el pincel que está en la caja de accesorios Para que la máquina siempre trabaje correctamente y silenciosamente hay que lubrificar sus partes móvibles con regularidad Lubrificar una a dos veces por mes en uso normal una vez a la ...

Page 34: ...m HAx1 130 705H Dimensions Width 285 mm Depth 285 mm Height 291 mm Weight 7 kg approx 15 lbs Especificaciones Descripción Especificaciones Número de hilos 4 hilos 3 hilos Número de agujas 2 agujas 1 aguja Velocidad máxima de costura 1500 RPM Ancho de overlock 4 hilos 6 mm 3 hilos 6 mm o 4 mm Longitud de puntada 1 5 mm Elevación del prensatelas 4 5 mm Agujas Sistema HAx1 130 705H Dimensiones de la ...

Page 35: ...parts fulfils the Low Voltage Directive 73 23 EEC EMC directive 89 336 EEC and the CE Marking Directive 93 68 EEC This confirmation is based upon Certificate or Technical Construction Files performed by SEMKO The complete archive file is drawn up and maintained by VSM Group AB SE 561 84 Huskvarna Sweden Nos reservamos el derecho de cambiar el equipamiento de la máquina y sus accesorios sin previo ...

Page 36: ...uskylock 90 36 36 412 55 54 45B Printed in Sweden Copyright VSM Group AB All rights reserved 00 01 Printed on environmental friendly paper VSM Group AB SE 561 84 Huskvarna Sweden www husqvarnaviking com ...

Reviews: