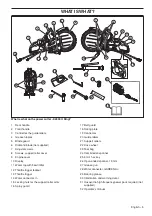
OPERATING
English
–
19
If the pipe is properly supported the end of the pipe will
move downward, the cut will open and no pinching will
occur.
Proper sequence cutting a pipe
1
First cut section I.
2
Move to side II and cut from section I to bottom of the
pipe.
3
Move to side III and cut the remaining part of the pipe
ending at the bottom.
How to aviod kickback
Avoiding kickback is simple.
The work piece must always be supported so that the cut
stays open when cutting through. When the cut opens
there is no kickback. If the cut closes and pinches the
blade there is always a risk of kickback.
Take care when inserting the blade in an existing cut.
Be alert to movement of the work piece or anything else
that can occur, which could cause the cut to close and
pinch the blade.
Pilot method
This method is recommended when attempting to cut
absolutely straight and square.
For best cutting economy, pre-cut with a power cutter
equipped with Husqvarna’s special pre-cutting blade
intended for further cutting with ring cutter.
Cutting depth
K 6500 Ring can cut up to a depth of 325 mm (12.8
inches). Making a guide cut of 50-70 mm (2-3 inches) first,
gives you better control of the machine. This means the
water disc can penetrate into the workpiece and help
control the machine. Attempting to saw the entire depth in
one run takes longer. Working with several runs, 4 to 5
when the cut is 325 mm (12.8 inches) in depth, is much
quicker.
Large work
Cuts exceeding 1 m - secure a batten along the line to be
cut. The batten acts as a guide. Use this guide to make a
marking cut along the entire length of the cut, 50-70 mm
(2-3 inches) in depth. Remove the guides once the
marking cut has been made.
Small work
First make a shallow marking cut, max 50-70 mm (2-3
inches) in depth. Now make the final cut.
!
WARNING! Never use a power cutter with
a standard cutting blade for pilot cutting.
The cutting blade produces a pilot slot
that is too thin and continued cutting
with the ring cutter results infallibly in
dangerous kickback and jamming in the
slot.
I
III
II
1 2 3 4 5
325 mm
12.8"
Summary of Contents for K 6500 II Ring
Page 30: ...30 English WIRING DIAGRAM Wiring diagram ...
Page 60: ...60 Spanish ESQUEMA DE CONEXIONES ELÉCRICAS Esquema de conexiones eléctricas ...
Page 90: ...90 Portuguese ESQUEMA ELÉCTRICO Esquema eléctrico ...
Page 120: ...120 Greek à π ø πø ÈÔ Î Ïˆ ˆÛË ...
Page 121: ......
Page 122: ......
Page 123: ......

