background image

MAINTENANCE

English

 –

 23

Blade

Check the blade for cracks or  any other damage. A 
damaged blade must always be replaced.

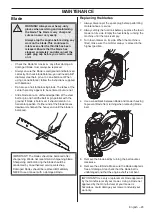
Always ensure the blade is well ground and balanced 
correctly. To check blade balance, you will need a 5/8" 
diameter steel bolt, pin, or a cone balancer. When 
using a cone balancer, follow the instructions supplied 
with balancer.

Do not use a nail for balancing blade. The lobes of the 
center hole may appear to be centered, but are not.

Slide blade on to an unthreaded portion of the steel 
bolt or pin and hold the bolt or pin parallel with the 
ground. If blade is balanced, it should remain in a 
horizontal position. If either end of the blade moves 
downward, sharpen the heavy end until the blade is 
balanced.

Replacing the blades

1

Always disconnect the spark plug before performing 
maintenance or service.

2

Always empty the fuel tank before you place the lawn 
mower on its side. Empty the fuel tank by running the 
machine until the tank is empty.

3

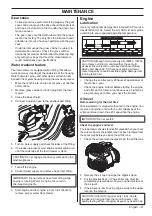
Turn lawn mower on its side. When the machine is 
tilted, make sure the air filter always is placed in the 
highest position.

4

Use a wood block between blade and mower housing 
to prevent blade from turning when removing blade 
bolt.

5

Remove the blade bolt by turning the bolt counter-
clockwise.

6

Remove the old blade. Make sure the blade adapter is 
free of damage. Also check that the blade bolt is 
undamaged and that the engine shaft is not bent.

!

WARNING! Always wear heavy-duty 
gloves when servicing and maintaining 
the blade. The blade is very sharp and 
cuts can occur very easily.

Always stop the engine before doing any 
work on the blade. This continues to 
rotate even after the throttle has been 
released. Ensure that the blade has 
stopped completely and disconnect the 
spark plug cap before you start to work 
on it.

IMPORTANT! The blades should be balanced after 
sharpening. We do not recommend sharpening blade. 
Sharpening and balancing the blade should be 
conducted by an authorized service workshop.

Damaged blades should be replaced immediately. 
NEVER use a mower with a damaged blade.

IMPORTANT! Use only a replacement blade approved 
by the manufacturer of your mower. Using a blade not 
approved by the manufacturer of your mower is 
hazardous, could damage your mower and void your 
warranty.

Summary of Contents for LC221A

Page 1: ...E E E En n n ng g g gl l l li i i is s s sh h h h LC221A Operator s manual Please read the operator s manual carefully and make sure you understand the instructions before using the machine ...

Page 2: ...ubstantial footwear with good ankle support while mowing Do not pull mower backwards unless absolutely necessary Always look down and behind before and while moving backwards Never direct discharged material toward anyone Avoid discharging material against a wall or obstruction Material may richochet back toward the operator Stop blade when crossing gravel surfaces Do not operate the mower without...

Page 3: ...vapors are explosive Extinguish all cigarettes cigars pipes and other sources of ignition Use only an approved container Never remove gas cap or add fuel with the engine running Allow the engine to cool before refueling Never refuel the machine indoors Never store the machine or fuel container where there is an open flame spark or pilot light such as a water heater or on other appliances Never fil...

Page 4: ...on of warning levels The warnings are graded in three levels WARNING IMPORTANT CAUTION STOP STOP KEEP HANDS AND FEET AWAY KEEP HANDS AND FEET AWAY DANGER DANGER S W 8 0 3 S W 8 0 3 WARNING Used if there is a risk of serious injury or death for the operator or damage to the surroundings if the instructions in the manual are not followed IMPORTANT Used if there is a risk of injury to the operator or...

Page 5: ...ADJUSTMENTS General 10 Remove the lawn mower from the carton 10 Handle 10 Grass catcher 11 Starter handle 11 Convert the lawn mower 11 Cutting height 12 Filling with oil 12 FUEL HANDLING General 13 Fueling 13 Transport and storage 13 OPERATING Personal protective equipment 14 General safety precautions 14 Basic working techniques 16 Transport and storage 16 Starting and stopping 17 MAINTENANCE Gen...

Page 6: ...s our wish that you will be satisfied with your product and that it will be your companion for a long time Think of this operator s manual as a valuable document By following its content using service maintenance etc the life span and the second hand value of the machine can be extended If you ever lend or sell this machine make sure that the borrower or buyer gets the operator s manual so they wi...

Page 7: ...rrectly and can cause serious even fatal injuries It is extremely important that you read and understand the contents of this operator s manual WARNING Long term inhalation of the engine s exhaust fumes can represent a health hazard WARNING In order to prevent accidental starting when setting up transporting adjusting or making repairs always disconnect spark plug wire and place wire where it can ...

Page 8: ...13 14 6 12 9 11 15 1 Engine brake handle 2 Drive bail 3 Starter handle 4 Grass catcher 5 Fuel cap 6 Air filter 7 Spark plug 8 Drive cover 9 Muffler 10 Wash out port 11 Rear deflector 12 Engine oil cap with dipstick 13 Cutting height control 14 Mulch plug 15 Operator s manual ...

Page 9: ...lector or springs if damaged Muffler The muffler is designed to keep noise levels to a minimum and to direct exhaust fumes away from the user Inspecting the muffler Check regularly that the muffler is complete and secured correctly WARNING Never use a machine that has faulty safety equipment If your machine fails any checks contact your service agent to get it repaired Prevent unintentional starti...

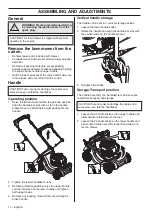
Page 10: ...both upper knobs 4 Remove any packing material from around engine brake handle Vertical handle storage The handle can be set in a vertical storage position 1 Loosen the lower handle knobs 2 Rotate the handle and align the handle bar pins with the vertical slots on the handle bracket 3 Retighten the knobs Storage Transport position The handle assembly can be folded to minimize space needed for tran...

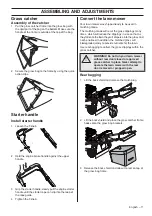
Page 11: ...er was shipped ready to be used in mulching mode The mulching mode will recut the grass clippings many times which will reduce the clippings in size so that as they fall onto the lawn they will disperse into the grass and not be noticed In addition the mulched grass will biodegrade quickly to provide nutrients for the lawn Use rear bagging to collect the grass clippings within the grass catcher Re...

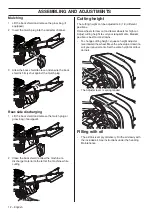
Page 12: ... material to the left of the machine while cutting Cutting height The cutting height can be adjusted to 9 1 9 different positions Raise wheels for low cut and lower wheels for high cut Adjust cutting height to suit your requirements Medium position is best for most lawns To change cutting height squeeze height adjuster lever toward the wheel Move the wheel up or down to suit your requirements Set ...

Page 13: ...lizer WARNING Running an engine in a confined or badly ventilated area can result in death due to asphyxiation or carbon monoxide poisoning Fuel and fuel fumes are highly inflammable and can cause serious injury when inhaled or allowed to come in contact with the skin For this reason observe caution when handling fuel and make sure there is adequate ventilation The exhaust fumes from the engine ar...

Page 14: ...t the operator is responsible for accidents or hazards occuring to other people or their property See manufacturer s instructions for proper operation and installation of accessories Only use accessories approved by the manufacturer The machine must be kept clean Signs and stickers must be fully legible Maintain or replace safety and instruction labels as necessary Always disconnect the spark plug...

Page 15: ...result in an imbalance and heavy vibration which results in a great risk of the blade becoming loose The brake handle must never be permanently anchored to the handle when the machine is running Place the lawn mower on firm flat surface and start it Make sure that the cutter cannot come into contact with the ground or other objects Always place yourself behind the machine Allow all the wheels to r...

Page 16: ...aching an obstacle Pores in cloth grass catchers can become filled with dirt and dust with use and the catcher will collect less grass To prevent this regularly hose the grass catcher off with water and let dry before using Slope operation Mowing slopes can be dangerous Do not use the lawn mower on slopes steeper than 15 All slopes demand extra care If you feel unsure do not mow it Do Mow across t...

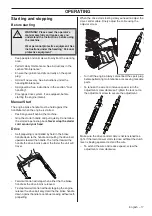
Page 17: ...the unit will travel Forward motion will stop when either the the brake handle or the drive bail is released To stop forward motion without stopping the engine release the drive bail only Hold the the brake handle down against handle to continue mowing without self propelling When the drive starts feeling slow you need to adjust the drive control cable Finely adjust the cable using the adjuster sc...

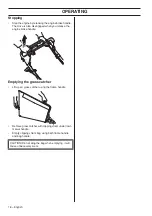
Page 18: ...en you release the engine brake handle Emptying the grass catcher Lift up on grass catcher using the frame handle Remove grass catcher with clippings from under lawn mower handle Empty clippings from bag using both frame handle and bag handle CAUTION Do not drag the bag when emptying it will cause unnecessary wear ...

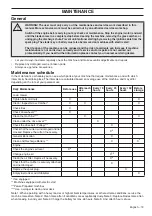
Page 19: ...ne before carrying out any checks or maintenance Stop the engine motor and wait until the blade comes to a complete stop before cleaning the machine removing the grass catcher or unclogging the discharge chute Prevent unintentional starting by removing the ignition cable from the spark plug The starter key or battery must also be removed on machines with electric start The life span of the machine...

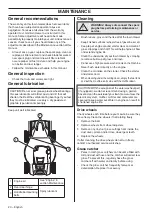
Page 20: ...rter cord When cleaning under the cutting cover empty the fuel tank and put the machine on its side with the muffler down Drive wheels Check wheels each time before you mow to be sure they move freely Clean the wheels if not rotating freely 1 Remove the bolt 2 Remove wheels from wheel adjusters 3 Remove any trash or grass cuttings from inside the dust cover pinion and or drive wheel gear teeth 4 R...

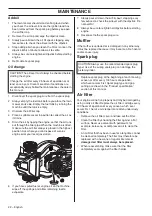
Page 21: ... at least once a year Check the engine oil level before starting the engine and after each 5 hours of continuous use Tighten oil plug securely each time you check the oil level Oil level Before starting for the first time Your lawnmower is shipped without oil in the engine You receive a container of oil with the unit Slowly pour the entire container down the oil fill spout into the engine Check th...

Page 22: ...ys be sure to retighten oil dipstick before starting engine 9 Reconnect to the spark plug wire Muffler If the muffler is corroded or is damaged in any other way it must be replaced because it may become a fire hazard and or cause injury Spark plug Replace spark plug at the beginning of each mowing season or after every 100 hours of operation whichever occurs first Spark plug type and gap setting a...

Page 23: ...e the air filter always is placed in the highest position 4 Use a wood block between blade and mower housing to prevent blade from turning when removing blade bolt 5 Remove the blade bolt by turning the bolt counter clockwise 6 Remove the old blade Make sure the blade adapter is free of damage Also check that the blade bolt is undamaged and that the engine shaft is not bent WARNING Always wear hea...

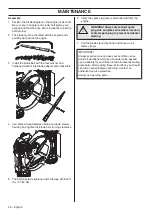
Page 24: ... bolt turning clockwise 5 The bolt should be tightened with a torque of 35 40 ft Ibs 47 54 Nm 6 Verify the spark plug wire is disconnected from the engine 7 Pull the blade around by hand and make sure it rotates freely WARNING Always disconnect spark plug wire and place wire where it cannot contact spark plug to prevent accidental starting IMPORTANT Always exercise care and use your common sense A...

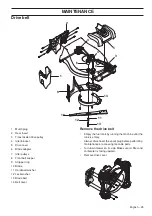
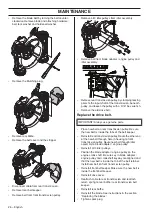
Page 25: ... 8 Front belt keeper 9 Stripper ring 10 Blade 11 Hardened washer 12 Lock washer 13 Blade bolt 14 Belt cover Remove the drive belt Empty the fuel tank by running the machine until the tank is empty Always disconnect the spark plug before performing maintenance or accessing mocable parts Turn lawn mower on its side Make sure air filter and carburetor is facing upward Remove drive cover ...

Page 26: ... pulley Be sure the new belt is inside the tabs of the belt keeper Reinstall rear transmission pulley Route the other end of the new belt through hole in housing to front transmission pulley Route new belt through idler assembly to blade adapter engine pulley Reinstall all 3 idler pulleys Position the blade adapter engine pulley on the engine crank shaft Be sure key in blade adapter engine pulley ...

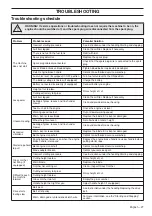
Page 27: ...oil in the engine Check the engine s oil level Walking speed too fast Cut at slower walking speed Uneven mowing Worn bent or loose blade Replace the blade if it is bent or damaged Wheel heights uneven Set all wheels at same height Buildup of grass leaves and trash under mower Clean underside of mower housing Excessive vibrations Worn bent or loose blade Replace the blade if it is bent or damaged B...

Page 28: ...1157788 27 z Yo 5 z Yo 5 2015 12 29 Original instructions ...

Reviews: