English-
11
SPECIAL TOOLS
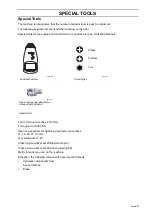
Laser tachometer
Safety
•
Laser product class 1.
•
Exercise care when the laser beam is on.
•
Do not look straight at the beam. Do not
aim the beam towards anyone else's
eyes, either people or animals.
•
Do not aim the laser beam towards pol-
ished surfaces where the beam can be
reflected into someone’s eyes.
•
Do not aim the laser beam towards explosive gases.
•
Remember when measuring
•
The reflective surface must be smaller than the non-reflective surface.
•
If the object to be measured is polished, cover the measurement surface with black tape or paint with
black paint prior to attaching the reflective tape.
•
Clean the surface before attaching the tape.
•
When measuring at low speed, more accurate measurement values can be obtained if you attach several pieces
of tape equally distributed around the measurement object. Now divide the read measurement value with the
number of pieces of tape to get the correct speed.
Measure speed
1.
Move the switch to the RPM position to measure the speed, or TOT to measure the number of revolutions.
2.
Attach a small piece of reflective tape (approximately 1 x 1 cm) on the rotating object to be measured.
3.
Press and hold down the measurement button on the side of the instrument. Aim the measurement laser beam at
the object and the reflective tape. The display will come on after 1-2 seconds.
4.
Hold the measurement button down during the entire measurement. The instrument switches off when the meas-
urement button is released.
Read the last, highest and lowest values
The instrument automatically saves the last, highest and lowest measurement values during a measurement (i.e. as
long as the measurement button is held down). Press and hold down the memory button (MEM) to read the saved val-
ues. Values are shown on the display after 1-2 seconds.
Measured value
Indicated by
Press once
Last
“LA”
Press twice
Highest
“UP”
Press three times
Lowest
“dn”
Replace the batteries
When the symbol for a weak battery is shown on the display, the batteries will soon be spent.
1.
Open the battery cover by loosening the crosshead screw that holds the cover in position.
2.
Remove the old batteries and insert new ones. Use four, 1.5 volt batteries of the type R6 (AA).
3.
Make sure the batteries are turned the right way, otherwise damage can be caused to the instrument.
4.
Close the battery cover and secure with the screw.
Maintenance
Clean the tachometer using a soft, damp cloth. Never use any form of solvent to clean it. Never dip it into water or
another fluid.
Do not subject the tachometer to direct sunlight, high temperatures, extreme dust or mechanical impact.
Remove the batteries if the instrument is not to be used for a long period of time.
The tachometer may only be opened by accredited technicians.
RPM
TOT
MEM
DIGITAL TACHOMETER
8009-853
Summary of Contents for PT 26D
Page 1: ...Workshop manual PT26D English ...
Page 13: ...English 12 SPECIAL TOOLS ...
Page 94: ...English 93 REPAIR INSTRUCTIONS 8043 197 Cutting unit Combi 155 ...
Page 107: ...English 106 REPAIR INSTRUCTIONS ...
Page 123: ...English 122 REPAIR INSTRUCTIONS ...
Page 145: ......
Page 146: ...English 145 APPENDIXES Circuit diagram Circuit diagram 1 ...
Page 147: ...English 146 APPENDIXES Circuit diagram 2 ...
Page 148: ...English 147 APPENDIXES Circuit diagram 3 ...
Page 149: ...English 148 APPENDIXES Circuit diagram 4 ...
Page 150: ...English 149 APPENDIXES Circuit diagram 5 ...
Page 151: ...English 150 APPENDIXES Circuit diagram 6 ...
Page 152: ...English 151 APPENDIXES Circuit diagram 7 ...
Page 153: ...English 152 APPENDIXES Circuit diagram 8 ...
Page 154: ...English 153 APPENDIXES Circuit diagram 9 ...
Page 155: ...English 154 APPENDIXES Circuit diagram 10 ...
Page 156: ...English 155 APPENDIXES Circuit diagram 11 ...
Page 157: ...English 156 APPENDIXES ...
Page 161: ...English 160 APPENDIXES 8043 160 Circuit board placement ...
Page 162: ...English 161 APPENDIXES Hydraulic diagram 8043 247 Hydraulic diagram ...
Page 163: ...English 162 APPENDIXES ...
Page 167: ...2009W18 115 08 30 26 ...


