English-
124
TROUBLE SHOOTING
Electrical System
For your assistance, there is “Fuses” on page 39, “Connectors on the circuit card” on page 158 and its
placement on page 157 and circuit diagrams 1 to 11 in chapter appendixes.
BITE
The machine also has integrated test equipment with LEDs on the circuit board and in the sensors. The
test function of the LEDsTable on page 128, and their placement on the circuit board is shown on
page 157.
With the help of the LEDs you should be able
to determine which circuit is malfunctioning
and whether there is a short circuit or open
circuit. Using the circuit diagram in the
manual you can trouble shoot the part of the
circuit that is outside of the circuit board.
The LEDs on the circuit card for each circuit
comes on when a function is activated. The
circuit card diodes can give the following
signals:
•
Green, circuit OK (circuit board supplies
voltage)
•
Red, circuit short circuited
•
Red and green, open circuit.
If the machine is equipped for a V blade, yet
the V blade is not mounted an open circuit
will be indicated as the solenoid valve is
mounted on the V blade.
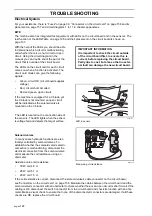
The LED is located on the connection side of
the sensors. The LED lights when the sensor
is voltage fed and detects the target surface.
Solenoid valves
In many cases hydraulic functions are elec-
trically controlled by solenoid valves. To
establish whether the solenoid valve's electri-
cal section is malfunctioning, disconnect the
electrical connection from the solenoid valve
and measure the coil resistance using an
ohmmeter.
Guideline value coil resistance:
•
30 W. coil 4.8
•
26 W. coil 5.7
•
20 W. coil 7.5
If the coil resistance is correct, disconnect the solenoid valve's cable connector on the circuit board,
see“Connectors on the circuit card” on page 158. Measure the cables between the circuit board and the
solenoid valve's connector with an ohmmeter to check whether there is an open circuit or short circuit. If the
cabling is OK, disconnect the switch connector from the circuit board and check its function with an ohm-
meter. Make a visual check to ensure that none of the disconnected connectors are damaged. If all these
checks are OK, replace the circuit board.
IMPORTANT INFORMATION
It is important to check the circuit outside
of the circuit board first, to ensure this is
correct, before replacing the circuit board.
Partly due to cost, but also so that no exter-
nal fault can damage the new circuit board.
8043-171
LED in sensor
8043-174
Measuring coil resistance
Summary of Contents for PT 26D
Page 1: ...Workshop manual PT26D English ...
Page 13: ...English 12 SPECIAL TOOLS ...
Page 94: ...English 93 REPAIR INSTRUCTIONS 8043 197 Cutting unit Combi 155 ...
Page 107: ...English 106 REPAIR INSTRUCTIONS ...
Page 123: ...English 122 REPAIR INSTRUCTIONS ...
Page 145: ......
Page 146: ...English 145 APPENDIXES Circuit diagram Circuit diagram 1 ...
Page 147: ...English 146 APPENDIXES Circuit diagram 2 ...
Page 148: ...English 147 APPENDIXES Circuit diagram 3 ...
Page 149: ...English 148 APPENDIXES Circuit diagram 4 ...
Page 150: ...English 149 APPENDIXES Circuit diagram 5 ...
Page 151: ...English 150 APPENDIXES Circuit diagram 6 ...
Page 152: ...English 151 APPENDIXES Circuit diagram 7 ...
Page 153: ...English 152 APPENDIXES Circuit diagram 8 ...
Page 154: ...English 153 APPENDIXES Circuit diagram 9 ...
Page 155: ...English 154 APPENDIXES Circuit diagram 10 ...
Page 156: ...English 155 APPENDIXES Circuit diagram 11 ...
Page 157: ...English 156 APPENDIXES ...
Page 161: ...English 160 APPENDIXES 8043 160 Circuit board placement ...
Page 162: ...English 161 APPENDIXES Hydraulic diagram 8043 247 Hydraulic diagram ...
Page 163: ...English 162 APPENDIXES ...
Page 167: ...2009W18 115 08 30 26 ...

