background image

User’s Guide

K E E P I N G T H E WO R L D S E W I N G ™

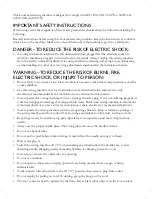
Summary of Contents for Viking Designer Sapphire 85

Page 1: ...User s Guide KEEPING THE WORLD SEWING ...

Page 2: ...ained in this manual Never operate this sewing machine if it has a damaged cord or plug if it is not working properly if it has been dropped or damaged or dropped into water Return the sewing machine to the nearest authorized dealer or service center for examination repair electrical or mechanical adjustment Never operate the sewing machine with any air openings blocked Keep ventilation openings o...

Page 3: ...ds involved Children shall not play with the appliance Cleaning and user maintenance shall not be made by children without supervision The noise level under normal operating conditions is less than 80dB A The machine must only be used with foot control of type FR5 manufactured by Shanghai Binao Precision Mould Co Ltd FOR NON CENELEC COUNTRIES This sewing machine is not intended for use by persons ...

Page 4: ... the FCC Rules These limits are designed to provide reasonable protection against harmful interference in a residential installation This equipment generates uses and can radiate radio frequency energy and if not installed and used in accordance with the instructions may cause harmful interference to radio communications However there is no guarantee that interference will not occur in a particula...

Page 5: ...elevant provisions of Directive 2014 53 EU To view a copy of the Declaration of Conformity please see RC 0234 To satisfy radio frequency exposure requirements a separation distance of 8 20 cm or more should be maintained between this device and persons during device operation To ensure compliance operations at closer than this distance is not recommended The built in antenna used for this transmit...

Page 6: ...ortant Needle Information 28 Changing the Needle 29 Threading the Upper Thread 29 Horizontal Spool Pin 29 Needle threader 30 Selecting Correct Thread Needle Combination 31 Threading for Twin Needle 32 Bobbin Winding 33 Bobbin Winding through the Needle 33 Winding Specialty Threads 33 Bobbin Winding while Embroidering or Sewing 34 Inserting the Bobbin 34 Changing the Presser Foot 34 Attaching the S...

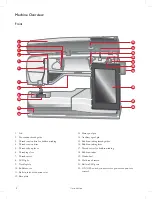
Page 7: ...1 1 Introduction ...

Page 8: ... pin 14 Auxiliary spool pin 15 Bobbin winding thread guides 16 Bobbin winding lever 17 Thread cutter for bobbin winding 18 Bobbin winder 19 Handwheel 20 Multi touch screen 21 Built in USB ports 22 ON OFF switch connectors for power cord and foot control 4 1 2 3 5 6 7 8 9 10 15 20 25 30 2 1 3 6 7 8 9 10 11 12 13 INCHES 4 0 8 12 16 20 24 28 32 36 40 44 48 CM 35 40 14 15 16 4 5 DESIGNED AND ENGINEERE...

Page 9: ...al compartments for presser feet and bobbins plus space for needles and other accessories Store the accessories in the tray so that they are easily accessible 1 Space for accessories 2 Spaces for presser feet 3 Removable bobbin holder 4 Holes for needles Embroidery Unit type BE 17 1 Embroidery unit release button underside 2 Embroidery arm 3 Embroidery hoop attachment 4 Level adjustment feet 5 Emb...

Page 10: ...Tapping the foot control does not change the set stop position Cut Function Touch the cut function button and your machine cuts the upper and bobbin threads raises the presser foot and needle and activates the FIX function for the next start To cut threads at the end of a stitch or stitch program touch the cut function button while sewing A scissor icon will flash on the screen alerting you that a...

Page 11: ...as been completed Touch STOP before starting to sew and your machine sews only one repetition of the stitch Only one stitch is displayed on the screen The indicator next to the STOP button is lit when the STOP function is active To cancel the function touch STOP again or select a new stitch The STOP function is cancelled when the stitch is completed The STOP function is also used to repeat a sewn ...

Page 12: ...p large 2 12 Felt pad 2 13 Straight Stitch Plate Included Accessories Not in Picture Complimentary software PC and MAC to download see Hard cover for machine Luggage style carrying bag with packing insert for embroidery unit Foot control Power cord Needles DESIGNER SAPPHIRE 85 Sampler book Scissors Pieces of fabric and stabilizer Microfiber cloth Included Hoops 1 DESIGNER Royal Hoop 360x200 2 DESI...

Page 13: ...ot guides the fabric The right toe of the foot is designed to ride along the hem edge Zipper Foot E This foot can be snapped on either to the right or to the left of the needle This makes it easy to sew both sides of the zipper Move needle position to right or left to sew closer to zipper teeth or for covering large cording Non Stick Glide Foot H This foot with a non stick coating underneath is us...

Page 14: ...aterial can stick to the foot and prevent the sewing machine from feeding properly When using any of the above materials sew on a piece of scrap fabric to make sure the machine feeds smoothly If not fasten the self adhesive glide plate to the underside of the presser foot Interchangeable Dual Feed The Interchangeable Dual Feed Foot with changeable presser feet is designed to feed layers of fabric ...

Page 15: ...on Triple and elastic for reinforced seams For top stitch increase the stitch length A12 A Reinforced straight stitch center needle position Triple and elastic for reinforced seams For top stitch increase the stitch length A13 A Reinforced straight stitch right needle position Triple and elastic for reinforced seams For top stitch increase the stitch length A14 A Reinforced zigzag stitch For joini...

Page 16: ...ight fabrics A30 A Two step zigzag For joining two pieces of lace and for elastic shirring A31 B Bartack Reinforce pockets shirt openings belt loops as well as at lower end of a zipper A32 B Bartack manual Reinforce pockets shirt openings belt loops as well as at lower end of a zipper A33 A Darning stitch forward and backward Darn and mend small holes in work clothes jeans tablecloths and linen to...

Page 17: ...le foot C Rounded bartack buttonhole For light weight fabrics A45 Sensor Buttonhole foot C Round end buttonhole For blouses and children s garments A46 Sensor Buttonhole foot C Keyhole buttonhole Square end for tailored jackets coats etc A47 Sensor Buttonhole foot C Tapered keyhole buttonhole Tapered end for tailored garments A48 Sensor Buttonhole foot C Decorative fashion buttonhole For most fabr...

Page 18: ...t stitch For leather and suede A56 A Bound buttonhole straight stitch With extra cutting space for bound buttonholes A57 Automatic button sewing For sewing on buttons A58 B Round eyelet For belts laces etc A59 B Teardrop eyelet For laces embellishments 18 1 Introduction ...

Page 19: ...titches Includes three types of stitches appliqué and pop up stitches combinations of these two types and sequin stitches M Theme Stitches Each stitch number on this menu contains a group of four stitches designed to be sewn out together in random combinations Change to the next stitch in the selected group by touching the reverse button N Embellished Stitches Decorative stitches that can be used ...

Page 20: ...ger to a different position on the screen Used e g for moving a design in the embroidery area 5 Swipe Touch move and release your finger in a swift gesture to swipe Left right right left swipe is used e g to scroll between stitch menus Top bottom bottom top swipe is used e g to scroll within a stitch menu Smart Toolbox Smart toolbox is available on a stitch or program in the sewing area or on a de...

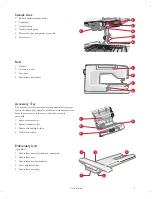
Page 21: ...2 2 Preparations ...

Page 22: ...ind the power cord and the foot control Note Before plugging in the foot control check to ensure that it is type FR5 see underside of foot control 1 Pull out the cord from the foot control Connect the foot control cord to the front socket on the bottom right side of the machine 2 Connect the power cord to the rear socket on the bottom right side of the machine Plug the cord into the wall socket 3 ...

Page 23: ...be stored in the back pocket of the hard cover USB Port Your machine has a USB port for connecting USB devices such as a memory stick USB plugs can only be inserted one way do not force them into the port To remove carefully pull the USB device straight out Note Make sure that the USB stick you use has the format FAT32 Using a USB device The external device button in file manager is only active wh...

Page 24: ...e information see LED Lights Your machine has LED lights which distribute the light evenly over the sewing area and eliminate shadows You can adjust the brightness of the light in the settings menu see Free Arm To use the free arm slide off the accessory tray When attached a hook keeps the accessory tray locked to the machine Remove the tray by sliding it to the left Manual Thread Cutter There are...

Page 25: ...pool pin Make sure that the thread reels off the spool counter clockwise and slide on a second spool cap Note Not all thread spools are manufactured in the same way If you experience problems with the thread turn it in the opposite way or use the vertical position Use a spool cap slightly larger than the thread spool For narrow thread spools use a smaller spool cap in front of the spool For large ...

Page 26: ...of thread or for a second spool when sewing with a twin needle Raise the auxiliary spool pin Slide on a large spool cap and place a felt pad under the thread spool Place thread spool on auxiliary spool pin Note When sewing with two needle threads deactivate deLuxe Stitch System 26 2 Preparations ...

Page 27: ...nd other decorative stitching Embroidery thread is not typically used in the bobbin unless both sides of the project will be seen A light weight embroidery bobbin thread is often used in the bobbin instead The lighter weight thread does not build up under the embroidery Note When using a metallic or a flat film thread for embroidery you may need to use a needle with a larger eye and lower the embr...

Page 28: ...uedes and leathers Embroidery Needle Embroidery needles have a special scarf a slightly rounded point and a slightly larger eye to avoid damage to thread and materials Use with metallic and other specialty threads for embroidery and decorative sewing Denim Needle Denim needles have a sharp point to penetrate tightly woven fabrics without deflecting the needle For canvas denim microfibers Wing Need...

Page 29: ... that the presser foot is raised and the needle is in the up position Horizontal Spool Pin 1 Hold the thread near the spool using your right hand 2 Use your left hand to bring the end of the thread over and behind the Pre Tension Thread guide A and under the thread guide B Bring the thread between the thread tension discs C 3 Continue threading in the direction indicated by the arrows Bring the th...

Page 30: ...ls the thread through the needle eye and forms a loop behind the needle Pull the thread loop out behind the needle Note The needle threader is designed to be used for size 70 120 needles You cannot use the needle threader for needles size 60 or smaller the wing needle twin needle triple needle or when the Sensor One Step buttonhole foot is attached There are also some optional accessories that req...

Page 31: ...ads fine cotton or polyester sewing thread rayon embroidery thread Stretch 130 705H S 75 11 Stretch medium Sweater knits double knit velour swimwear etc Medium weight threads normal cotton or polyester sewing thread rayon embroidery thread Stretch 130 705H S 90 14 Stretch heavy Sweater knits fleece etc Medium weight threads normal cotton or polyester sewing thread rayon embroidery thread Stretch 1...

Page 32: ...d between the thread tension discs C Make sure that one thread is on each side of the tension discs 3 Thread down through the right hand threading slot and then upwards through the left hand threading slot 4 Bring the threads from the right into the take up lever D and down in the left hand threading slot Make sure that one thread is inside the needle thread guide E and the other one outside Also ...

Page 33: ...o adjust winding speed drag the slider Stop and start the bobbin winding with the on screen buttons Hold the end of the thread firmly when starting to wind Once the bobbin begins to wind cut the excess thread Note It is important that you cut the thread end close to the bobbin When the bobbin is full the bobbin winder lever will move back and the winding will stop automatically The pop up message ...

Page 34: ... horizontal spool pin when winding the bobbin If it does place the cap and spool higher on the vertical spool pin Inserting the Bobbin Use only the bobbins designed for your DESIGNER SAPPHIRE 85 machine 1 Remove the bobbin cover by sliding it towards you 2 Place the bobbin in the bobbin case It drops in only one way with the logo facing up The thread unreels from the left of the bobbin The bobbin ...

Page 35: ...gned to feed layers of fabric and or batting evenly It is perfect for quilting sewing velvet stretch fabrics imitation leathers and fabrics that need precise pattern matching Snap on the Changeable Straight Stitch Foot when using the straight stitch in the center needle position with a stitch length up to 6mm Snap on the Changeable Zigzag Foot when selecting stitches up to 7mm wide and 6mm long 1 ...

Page 36: ...te The Straight Stitch Plate is recommended for embroidery It may also be used for certain techniques in sewing mode such as quilt piecing The smaller hole in the Straight Stitch Plate supports the fabric closer to the needle and helps prevent the fabric from being pulled down into the bobbin area especially at the beginning and or end of a seam 1 Remove the presser foot and slide off the bobbin c...

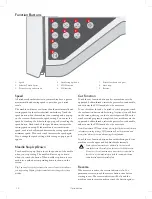
Page 37: ...3 3 Embroidery Preparations ...

Page 38: ... the underside of the embroidery unit Embroidery Hoop Overview 1 Embroidery hoop connector 2 Outer hoop 3 Inner hoop 4 Center marks 5 Quick release 6 Retaining screw 7 Ribs for fitting the clips Sensor Q Foot The Sensor Q foot is recommended for hoop embroidery See Attaching the Sensor Q Foot page 35 Straight Stitch Plate The Straight Stitch Plate is recommended for hoop embroidery See Changing to...

Page 39: ...nit are even If the machine is turned off turn it on 3 If you were already in embroidery mode or when you switch to embroidery mode a pop up message tells you to clear the embroidery arm and remove the hoop before calibration Touch OK The machine will calibrate and the embroidery arm will move to the ready position Note DO NOT calibrate the machine with the embroidery hoop attached as this can dam...

Page 40: ... can see the hoop size in the lower part of the inner hoop you have attached it correctly 3 Push the inner hoop firmly into the outer hoop 4 Close the quick release A Adjust the pressure of the outer hoop by turning the retaining screw B The fabric should be taut in the hoop for the best results Note When embroidering additional designs on the same fabric open the quick release move the hoop to th...

Page 41: ...4 4 Maintenance ...

Page 42: ...sewing several projects or any time you notice an accumulation of lint in the bobbin case area Remove the bobbin case holder A covering the front part of the bobbin case by lifting it up Remove the bobbin case B by lifting it up Clean with the brush Use caution when cleaning around the automatic thread cutter knife C Put the bobbin case and the bobbin case holder back in place Note Do not blow air...

Page 43: ... sewing and embroidery machine screen and or function buttons do not respond to touch The sockets and function buttons on the machine can be sensitive to static electricity If the screen does not respond to touch turn the machine OFF and then ON again If the problem persists contact your authorized HUSQVARNA VIKING retailer When sewing in heavy and or dense fabrics the machine emits a distinct sou...

Page 44: ... pin position used Try a different spool pin position vertical or horizontal Is the needle plate hole damaged Change the needle plate Is the thread tension too high for selected thread Lower the thread tension in small increments until problem is solved Bobbin Thread Breaks Is the correct bobbin used Use only the original bobbins approved for this model Did you insert the bobbin properly Check the...

Page 45: ...ght in settings menu in small increments until the problem is solved The Embroidery Design Is Distorted Is the fabric hooped properly The fabric must be tightly hooped For larger hoops use hoop clips Is the inner embroidery hoop properly inserted into the outer embroidery hoop Hoop the fabric in such a way that the inner hoop exactly matches the outer hoop Is the area around the embroidery arm and...

Page 46: ...ud Make sure that you have a working WiFi connection Make sure that you have signed in to your mySewnet account New mySewnet accounts are registered in the machine or at husqvarnaviking mysewnet com Make sure that there is available space on the mySewnet cloud If the mySewnet cloud is not accessible although you have checked the WiFi connection the server could temporarily be unavailable Please tr...

Page 47: ...imum Foot control model FR5 Safety class I WiFi module Frequency Transmitting power Receiver sensitivity 2 4GHz band 802 11 b g n 17 dBm 97 dBm Net weight kg machine only Net weight kg embroidery unit 10 3 7 Machine dimensions Length mm Width mm Height mm 485 240 300 The technical specifications and this owner s manual can be changed without prior notice 4 Maintenance 47 ...

Page 48: ......

Page 49: ...o change the machine equipment and the assortment of accessories without prior notice or make modifications to the performance or design Such modifications however will always be to the benefit of the user and the product Please note that on disposal this product must be safely recycled in accordance with relevant National legislation relating to electrical electronic products Do not dispose of el...

Page 50: ...4710713 26C 2020 KSIN Luxembourg II S a r l All rights reserved www husqvarnaviking com ...

Reviews: