1
2
3
1
2
12
UNPACKING
3ODFHWKHPDFKLQHRQDVWXUG\ÁDWVXUIDFHUHPRYHWKH
SDFNDJLQJDQGOLIWRII WKHFRYHU
5HPRYHWKHSDFNLQJPDWHULDODQGWKHIRRWFRQWURO
7KHPDFKLQHLVGHOLYHUHGZLWKDQDFFHVVRU\EDJDSRZHU
cord and a foot control cord.
4. Wipe the machine, particularly around the needle and
VWLWFKSODWHWRUHPRYHDQ\VRLOEHIRUHVHZLQJ
Note: Your HUSQVARNA VIKING
®
DESIGNER TOPAZ
™
25 sewing and embroidery machine is adjusted to provide the best stitch
result at normal room temperature. Extreme hot and cold temperatures
can affect the sewing result.
CONNECTING THE FOOT CONTROL CORD
$PRQJWKHDFFHVVRULHV\RXZLOOÀQGWKHIRRWFRQWUROFRUGDQG
the power cord. Connecting the foot control cord to the foot
FRQWUROLVRQO\QHFHVVDU\WKHYHU\ÀUVWWLPH\RXDUHJRLQJWR
use the machine.
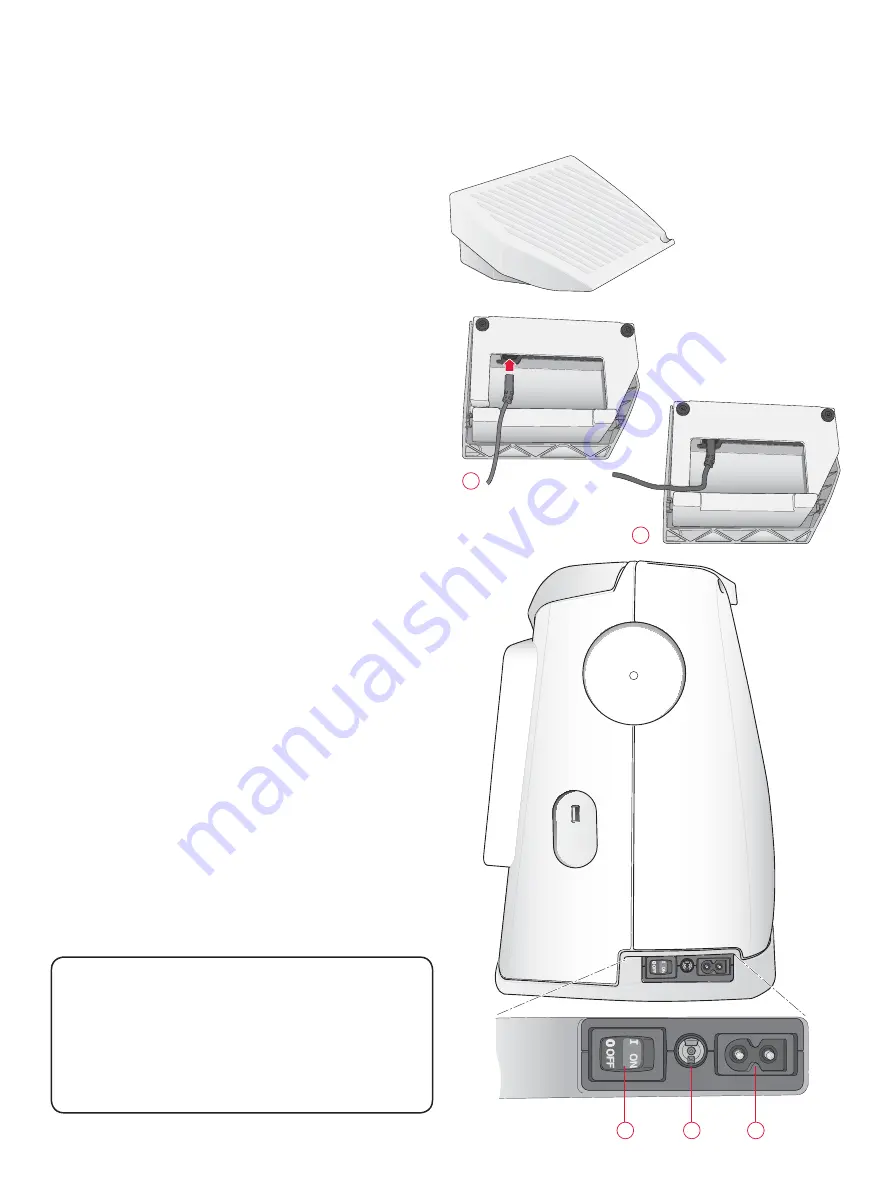
1. Take out the foot control cord. Turn the foot control
RYHU&RQQHFWWKHFRUGWRWKHVRFNHWLQVLGHWKHVSDFHRI
WKHIRRWFRQWURO3XVKÀUPO\WRPDNHVXUHLWLVSURSHUO\
connected.
2. Lay the cord in the slot on the underside of the foot
control.
CONNECT THE POWER CORD AND
FOOT CONTROL
2QWKHXQGHUVLGHRI WKHPDFKLQH\RXZLOOÀQGLQIRUPDWLRQ
DERXWWKHSRZHUVXSSO\YROWDJH9DQGWKHIU]
Note: Before plugging in the foot control, check to ensure that it is of type
“FR2” (see underside of foot control).
1. Connect the foot control cord to the front socket on the
ERWWRPULJKWVLGHRI WKHPDFKLQH
2. Connect the power cord to the rear socket on the bottom
ULJKWVLGHRI WKHPDFKLQH
3UHVVWKH212))VZLWFKWR´,µWRWXUQRQSRZHUDQG
OLJKW
For the USA and Canada
7KLVVHZLQJPDFKLQHKDVDSRODUL]HGSOXJRQHEODGHZLGHU
WKDQ WKH RWKHU 7R UHGXFH WKH ULVN RI HOHFWULF VKRFN WKLV
SOXJLVLQWHQGHGWRÀWLQDSRODUL]HGRXWOHWRQO\RQHZD\,I
WKHSOXJGRHVQRWÀWIXOO\LQWKHRXWOHWUHYHUVHWKHSOXJ,I
LW VWLOO GRHV QRW ÀW FRQWDFW D TXDOLÀHG HOHFWULFLDQ WR LQVWDOO
WKH SURSHU RXWOHW 'R QRW PRGLI\ WKH SOXJ LQ DQ\ ZD\


