background image

24

SERVICE AND ADJUSTMENTS

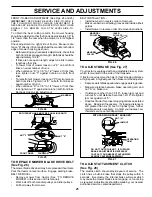
HOOD

HEADLIGHT
WIRE
CONNECTOR

TO REPLACE HEADLIGHT BULB

Raise hood.

Pull bulb holder out of the hole in the backside of the
grill.

Replace bulb in holder and push bulb holder securely
back into the hole in the backside of the grill.

Close hood.

INTERLOCKS AND RELAYS

Loose or damaged wiring may cause your tractor to run
poorly, stop running, or prevent it from starting.

Check wiring.  See electrical wiring diagram in the
Repair Parts.

TO REPLACE FUSE

Replace with 30 amp automotive-type plug-in fuse.  The
fuse holder is located behind the dash.

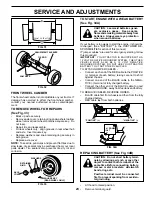
TO REMOVE HOOD AND GRILL ASSEMBLY
(See Fig. 35)

Raise hood.

Unsnap headlight wire connector.

Stand in front of tractor.  Grasp hood at sides, tilt toward
engine and lift off of tractor.

To replace, reverse above procedures.

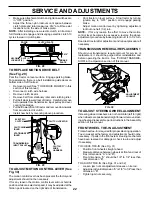
FIG. 34B

HEX BOLT

KEPS NUT

POSITIVE
(RED)
CABLE

NEGATIVE
(BLACK)
CABLE

TERMINAL
GUARD

TERMINAL
ACCESS
DOOR

ENGINE

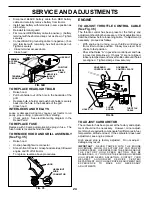
TO ADJUST THROTTLE CONTROL CABLE
(See Fig. 36)

The throttle control has been preset at the factory and
adjustment should not be necessary.  Check adjustment as
described below before loosening cable.  If adjustment is
necessary, proceed as follows:

With engine not running, move throttle control lever
from slow to choke position.  Slowly move lever from
choke to fast position.

Check that holes “A”  in governor control lever and hole
in governor plate line-up.  If holes “A” are not aligned,
loosen clamp screw and move throttle cable until  holes
are aligned.  Tighten clamp screw securely.

Disconnect BLACK battery cable then RED battery
cable and carefully remove battery from tractor.

Install new battery with terminals in same position as
old battery.

Reinstall terminal guard.

First connect RED battery cable to positive (+) battery
terminal with hex bolt and keps nut as shown. Tighten
securely.

Connect BLACK grounding cable to negative (-) bat-
tery terminal with remaining hex bolt and keps nut.
Tighten securely

 Close terminal access doors.

 Close hood.

GOVERNOR
CONTROL LEVER

GOVERNOR
CONTROL PLATE

THROTTLE
CABLE

HOLES “A”

FIG. 36

CLAMP
SCREW

TO ADJUST CARBURETOR

The carburetor has been preset at the factory and adjust-
ment should not be necessary.  However, minor adjust-
ment may be required to compensate for differences in fuel,
temperature, altitude or load.  If the carburetor does need
adjustment, see engine manual.

High speed stop is factory adjusted.  Do not adjust -
damage may result.

IMPORTANT:  NEVER TAMPER WITH THE ENGINE
GOVERNOR, WHICH IS FACTORY SET FOR PROPER
ENGINE SPEED.  OVERSPEEDING THE ENGINE ABOVE
T H E   F A C T O R Y   H I G H   S P E E D   S E T T I N G   C A N   B E
DANGEROUS.  IF YOU THINK THE ENGINE-GOVERNED
HIGH SPEED NEEDS ADJUSTING, CONTACT YOUR
N E A R E S T   A U T H O R I Z E D   S E R V I C E   C E N T E R /
DEPARTMENT, WHICH HAS PROPER EQUIPMENT AND
E X P E R I E N C E   T O   M A K E   A N Y   N E C E S S A R Y
ADJUSTMENTS.

FIG. 35

Summary of Contents for YTH145

Page 1: ...YTH145 Owner s Manual ...

Page 2: ...ments The mower could suddenly turn over if a wheel is over the edge of a cliff or ditch or if an edge caves in Do not mow on wet grass Reduced traction could cause sliding Do not try to stabilize the machine by putting your foot on the ground Do not use grass catcher on steep slopes III CHILDREN Tragic accidents can occur if the operator is not alert to the presence of children Children are often...

Page 3: ...f this owner s manual PRODUCT SPECIFICATIONS HORSEPOWER 14 5 GASOLINE CAPACITY 3 5 GALLONS AND TYPE UNLEADED REGULAR OIL TYPE API SF SG SH SAE 30 above 32 F SAE 5W 30 below 32 F OIL CAPACITY W FILTER 3 5 PINTS W O FILTER 3 0 PINTS SPARK PLUG CHAMPION RC12YC GAP 030 VALVE CLEARANCE INTAKE 003 005 EXHAUST 005 007 GROUND SPEED MPH FORWARD 0 5 5 REVERSE 0 2 4 TIRE PRESSURE FRONT 14 PSI REAR 10 PSI CHA...

Page 4: ...ETY RULES 2 PRODUCT SPECIFICATIONS 3 CUSTOMER RESPONSIBILITIES 3 16 19 ASSEMBLY 6 9 OPERATION 10 15 MAINTENANCE SCHEDULE 16 SERVICE AND ADJUSTMENTS 20 24 STORAGE 25 TROUBLESHOOTING 26 27 REPAIR PARTS TRACTOR 30 47 WARRANTY 51 ...

Page 5: ...Washer 1 Locknut 5 16 18 1 Hex Bolt 5 16 18 x 1 1 4 1 Hex Bolt 3 8 16 x 1 1 Lock Washer 3 8 Seat Manual Steering Wheel Parts Bag Nose Roller Mulcher Plate Front Bumper Steering Boot Nose Roller Brackets 2 Latch Hook Assemblies Steering Wheel Adapter 2 Keys Steering Wheel Insert 2 End Caps 2 Extention Brackets Steering Extension Shaft Slope Sheet 2 Weld Nuts 10 2 Lock Washers 10 2 Washers 3 16 x 3 ...

Page 6: ...freewheel control in freewheeling position to disengage transmission See TO TRANSPORT in the Operation section of this manual Roll tractor forward off skid Remove banding holding discharge guard up against tractor BEFOREROLLINGTRACTOROFFSKID ATTACH STEERING WHEEL See Fig 1 ASSEMBLE EXTENSION SHAFT AND BOOT Slide extension shaft onto lower steering shaft Align mounting holes in extension and lower ...

Page 7: ...ustment knob and flat washer loosely Do not tighten Lower seat into operating position and sit on seat Slide seat until a comfortable position is reached which allows you to press clutch brake pedal all the way down Get off seat without moving its adjusted position Raise seat and tighten adjustment knob securely LABEL TO ATTACH FRONT BUMPER See Fig 4 NOTE For ease of assembly you may wish to obtai...

Page 8: ...lcher plate and allow it to rest on plate while in operation FIG 6 TO CONVERT TO BAGGING OR DISCHARGING Simply remove mulcher plate and store in a safe place Your mower is now ready for discharging or installation of optional grass catcher accessory NOTE It is not necessary to change blades The mulcher blades are designed for discharging and bagging also ASSEMBLE GAUGE WHEELS TO MOWER DECK See Fig...

Page 9: ...ctions have been completed No remaining loose parts in carton Battery is properly prepared and charged Minimum 1 hour at 6 amps Seat is adjusted comfortably and tightened securely All tires are properly inflated For shipping purposes the tires were overinflated at the factory Be sure mower deck is properly leveled side to side front to rear for best cutting results Tires must be properly inflated ...

Page 10: ...W ENGINE ON ENGINE OFF OIL PRESSURE CLUTCH LIGHTS ON FUEL CHOKE MOWER HEIGHT DIFFERENTIAL LOCK PARKING BRAKE LOCKED UNLOCKED REVERSE NEUTRAL HIGH LOW ATTACHMENT CLUTCH ENGAGED MOWER LIFT DANGER KEEP HANDS AND FEET AWAY FREE WHEEL Automatic Models only OVER TEMP LIGHT PARKING BRAKE IGNITION ATTACHMENT CLUTCH DISENGAGED P KEEP AREA CLEAR SLOPE HAZARDS 15 15 15 SEE SAFETY RULES SECTION ...

Page 11: ...e engine off CLUTCH BRAKE PEDAL Used for declutching and braking the tractor and starting the engine HOURMETER Indicates hours of operation HEIGHTADJUSTMENTKNOB Usedtoadjustthemower cutting height AMMETER Indicates charging or discharging of battery PARKING BRAKE Locks clutch brake pedal into the brake position MOTION CONTROL LEVER Selects the speed and direction of tractor ATTACHMENT LIFT LEVER U...

Page 12: ...E DISCHARGED DEAD TO MOVE FORWARD AND BACKWARD See Fig 10 The direction and speed of movement is controlled by the motion control lever Start tractor with motion control lever in neutral N position Release parking brake and clutch brake pedal Slowly move motion control lever to desired position TO ADJUST MOWER CUTTING HEIGHT See Fig 10 The cutting height is controlled by turning the height adjust ...

Page 13: ...NSPORT See Figs 9 and 12 When pushing or towing your tractor be sure to disengage transmission by placing freewheel control in freewheeling position Free wheel control is located at the rear drawbar of tractor Raise attachment lift to highest position with attach ment lift control Pull freewheel control knob out and hold in position by inserting retainer spring into forward hole of control rod Do ...

Page 14: ...d gasoline with a minimum of 87 octane Use of leaded gasoline will increase carbon and lead oxide deposits and reduce valve life Do not mix oil with gasoline Purchase fuel in quantities that can be used within 30 days to assure fuel freshness IMPORTANT WHEN OPERATING IN TEMPERATURES BELOW 32 F 0 C USE FRESH CLEAN WINTER GRADE GASOLINE TO HELP INSURE GOOD COLD WEATHER STARTING WARNING Experience in...

Page 15: ... are discharged onto the area that has been cut Have the cut area to the right of the machine This will result in a more even distribution of clippings and more uniform cutting When mowing large areas start by turning to the right so that clippings will discharge away from shrubs fences driveways etc After one or two rounds mow in the opposite direction making left hand turns until finished See Fi...

Page 16: ...e more often when operating under a heavy load or in high ambient temperatures 2 Service more often when operating in dirty or dusty conditions 3 If equipped with oil filter change oil every 50 hours 4 Replace blades more often when mowing in sandy soil E N G I N E Replace Oil Filter If equipped Check Transaxle Cooling Adjust Blade Belt s Tension Replace Fuel Filter 1 4 2 2 2 2 5 If equipped with ...

Page 17: ...orking properly If your tractor does not function as described repair the problem immediately The engine should not start unless the clutch brake pedalisfullydepressedandattachementclutchcontrol is in the disengaged position When the engine is running any attempt by the opera tor to leave the seat without first setting the parking brake should shut off the engine When the engine is running and the...

Page 18: ... OIL See Fig 17 Determine temperature range expected before oil change All oil must meet API service classification SF SG or SH Be sure tractor is on level surface Oil will drain more freely when warm Catch oil in a suitable container Remove oil fill cap dipstick Be careful not to allow dirt to enter the engine when changing oil Remove drain plug After oil has drained completely replace oil drain ...

Page 19: ... Fig 19 Air screen must be kept free of dirt and chaff to prevent engine damage from overheating Clean with a wire brush or compressed air to remove dirt and stubborn dried gum fibers FOAM PRE CLEANER COVER KNOB COVER CARTRIDGE NUT FIG 18 PAPER CARTRIDGE BASE ENGINE COOLING FINS See Fig 19 Remove any dust dirt or oil from engine cooling fins to prevent engine damage from overheating Remove oil fil...

Page 20: ...Raise attachment lift lever to its highest position Slide mower under tractor with discharge guard to right side of tractor Lower lift lever to its lowest position Install mower in reverse order of removal instructions SUSPENSION ARMS RETAINER SPRINGS BOTH SIDES RETAINER SPRING ANTI SWAY BAR RETAINER SPRINGS BOTH SIDES ELECTRIC CLUTCH PULLEY FRONT LINK FIG 21 TO LEVEL MOWER HOUSING Adjust the mowe...

Page 21: ... brake BELT REMOVAL Remove mower from tractor See TO REMOVE MOWER in this section of this manual Work belt off both mandrel pulleys and idler pulleys Pull belt away from mower BELT INSTALLATION Install new belt in reverse order of removal Make sure belt is in all pulley grooves and inside all belt guides Install mower in reverse order of removal instructions MANDREL PULLEY IDLER PULLEYS MANDREL PU...

Page 22: ...ed at the friction pack located on the right side of transmission FIG 30 ADJUSTMENT LOCKNUT TO ADJUST STEERING WHEEL ALIGNMENT If steering wheel crossbars are not horizontal left to right whenwheelsarepositionedstraightforward removesteer ing wheel and reassemble per instructions in the Assembly section of this manual FRONT WHEEL TOE IN ADJUSTMENT Front wheel toe in is required for proper steering...

Page 23: ...around batteries If your battery is too weak to start the engine it should be recharged See BATTERY in the CUSTOMER RE SPONSIBILITIES section of this manual If jumper cables are used for emergency starting follow this procedure IMPORTANT YOUR TRACTOR IS EQUIPPED WITH A 12 VOLT NEGATIVE GROUNDED SYSTEM THE OTHER VEHICLE MUST ALSO BE A 12 VOLT NEGATIVE GROUNDED SYSTEM DO NOT USE YOUR TRACTOR BATTERY...

Page 24: ...n Check that holes A in governor control lever and hole in governor plate line up If holes A are not aligned loosen clamp screw and move throttle cable until holes are aligned Tighten clamp screw securely Disconnect BLACK battery cable then RED battery cable and carefully remove battery from tractor Install new battery with terminals in same position as old battery Reinstall terminal guard First c...

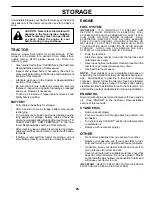
Page 25: ...OM FORMING IN ESSENTIAL FUEL SYSTEM PARTS SUCH AS CARBURETOR FUEL FILTER FUEL HOSE OR TANK DURING STORAGE ALSO EXPERIENCE INDICATES THAT ALCOHOL BLENDED FUELS CALLED GASOHOL OR USING ETHANOL OR METHANOL CAN ATTRACT MOISTURE WHICH LEADS TO SEPARATION AND FORMATION OF ACIDS DURING STORAGE ACIDIC GAS CAN DAMAGE THE FUEL SYSTEM OF AN ENGINE WHILE IN STORAGE Drain the fuel tank Start the engine and let...

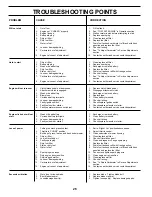
Page 26: ...lty ignition switch 7 Check replace ignition switch 8 Faulty solenoid or starter 8 Check replace solenoid or starter 9 Faulty operator presence switch es 9 Contact an authorized service center department Engine clicks but will not 1 Weak or dead battery 1 Recharge or replace battery start 2 Corroded battery terminals 2 Clean battery terminals 3 Loose or damaged wiring 3 Check all wiring 4 Faulty s...

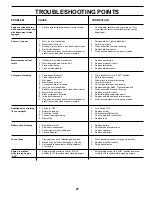
Page 27: ...lace sharpen blade Tighten blade bolt 7 Buildup of grass leaves and trash under mower 7 Clean underside of mower housing 8 Mower drive belt worn 8 Replace mower drive belt 9 Blades improperly installed 9 Reinstall blades sharp edge down 10 Improper blades used 10 Replace with blades listed in this manual 11 Clogged mower deck vent holes from buildup of 11 Clean around mandrels to open vent holes g...

Page 28: ...28 SERVICE NOTES ...

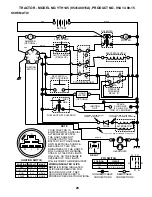
Page 29: ...TS WILL CHANGE WITH ENGINE SPEED AT IDLE THE LIGHTS WILL DIM AS THE ENGINE IS SPEEDED UP THE LIGHTS WILL BECOME THEIR BRIGHTEST WIRING INSULATED CLIPS NOTE IF WIRING INSULATED CLIPS WERE REMOVED FOR SERVICING OF UNIT THEY SHOULD BE REPLACED TO PROPERLY SECURE YOUR WIRING A AMMETER RED IGNITION SWITCH CIRCUIT POSITION OFF B L RUN LIGHT B L S START G M L S B G M L B L RUN MAKE A Y NONE NONE NONE Y A...

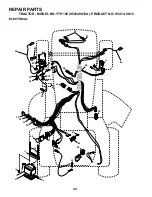
Page 30: ...R PARTS TRACTOR MODEL NO YTH145 954140015A PRODUCT NO 954 14 00 15 ELECTRICAL 30 28 29 26 24 42 43 44 44 25 41 19 20 19 20 40 33 32 31 30 50 22 21 70 12 12 11 10 8 2 1 27 46 47 16 D C AMPE RES 45 55 80 51 81 ...

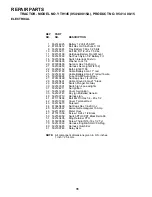
Page 31: ...6 532108824 Fuse 30 AMP Auto Green 27 873510400 Nut Keps Hex 1 4 20 Unc 28 532145491 Cable Ground 6 Ga 21 black 29 532160784 Switch Plunger Nc Gray 30 532140301 Switch Ign 4 pos w lights 31 532124211 Nut Ignition 32 532141226 Cover Sw Ignition 33 532122147 Key Ign Modelled Generic 40 532160719 Harness Ign 41 871110408 Bolt Blk Fin Hex 1 4 20 x 1 2 42 532131563 Cover Terminal Red 43 532145673 Solen...

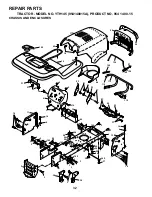
Page 32: ...4 14 00 15 CHASSIS AND ENCLOSURES 17 29 28 58 37 20 37 23 51 57 53 52 53 64 14 3 74 3 38 39 14 4 14 13 14 14 4 11 1 3 2 140 9 14 14 5 5 37 3 3 144 25 26 26 10 26 144 25 26 3 3 3 3 3 142 3 3 3 3 142 143 60 109 110 115 113 145 129 57 68 134 18 37 37 30 159 3 31 60 60 ...

Page 33: ...0508 Screw Thdrol 6 16 18 x 1 2 TYT 38 532139886 Bracket Asm Pivot L H Mower Rear 39 532139887 Bracket Asm Pivot R H Mower Rear 51 873800400 Nut Lock Hex W Ins 1 4 20 52 819091416 Washer 9 32 x 7 8 x 16 Ga 53 532150067 Bracket Pnt Pick off LT PL Husqvarna 57 874780412 Bolt Hex 1 4 20 x 3 4 58 532150127 Air Duct Engine P L 60 872140606 Bolt Rdhd Sqnk 3 8 16unc x 3 4 64 532154798 Dash Lower STLT 68 ...

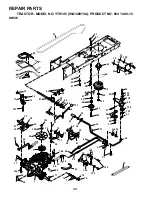
Page 34: ...102 94 3 19 16 146 98 53 35 55 36 62 35 36 22 34 16 1 77 96 147 71 18 77 100 104 84 16 105 106 144 30 52 57 93 96 26 25 19 24 2 26 95 76 78 75 74 27 26 59 42 61 38 41 42 40 42 39 56 9 63 65 20 66 145 19 18 89 90 21 81 83 82 10 8 42 51 51 23 33 33 16 100 100 16 27 51 148 149 150 48 150 151 50 49 26 47 50 51 87 87 86 88 88 ...

Page 35: ...h 55 532105709 Spring Return Clutch 56 874760620 Bolt Fin Hex 3 8 16 UNC x 1 1 4 57 532140294 V Belt Ground Drive 59 532140312 Keeper Center Span 61 817490612 Screw Thdrol 3 8 16 x 3 4 Ty TT 62 532123533 Cover Pedal Premium 63 532145868 Pulley Engine 65 810040700 Washer Lock Hvy HLCL Spr 7 16 66 532154778 Keeper Belt Engine 71 532140158 Strap Torque Lh Hydro 18 20 T 73 532156347 Strap Torque Rh Hy...

Page 36: ...4140015A PRODUCT NO 954 14 00 15 STEERING ASSEMBLY 5 5 7 7 4 3 43 6 43 8 18 19 22 20 27 62 23 11 40 66 29 25 5 8 10 40 40 68 68 11 11 15 8 6 46 46 8 6 2 47 67 13 65 47 1 41 17 42 37 36 37 38 63 11 39 44 51 54 29 29 29 29 40 11 76 74 75 78 77 32 ...

Page 37: ... 532136874 Gear Sector 22 Teeth 29 817490612 Screw Thdrol 3 8 16x3 4 Ty tt 32 532137347 Rod Tie 36 532155099 Bushing Strg 37 532152927 Screw TT 32 5 x 5 x 3 8 Flange 38 532124416 Cap Wheel Steer 39 819133808 Washer 13 32 x 2 3 8 x 8 Ga 40 532124701 Nut Lock Center 3 8 24 Unf 41 532100711 Adaptor Wheel Strg 42 532155092 Boot Dash Steering 43 532121749 Washer 25 32 X 1 1 4 X 16 Ga 44 532153720 Exten...

Page 38: ...13 32 X 1 X 14 Ga 10 532155925 Pan Seat 11 532120068 Knob Seat 1 3 13 UNC Blk 12 532121246 Bracket Mounting Switch 13 532121248 Bushing Snap Blk Nyl 50 Id 14 872050412 Bolt Rdhd Sqnk 1 4 20x1 1 2 15 532134300 Spacer Split 28x 96 Yel Zinc 16 532121250 Spring Cprsn 1 27 Blk Pnt 17 532123976 Nut Lock 1 4 Lge Flg Gr 5 Zinc 18 532124238 Cap Spring Seat 21 532153236 Bolt Shoulder 5 16 18 Unc 22 87380050...

Page 39: ... Cap Axle Blk 1 50 X 1 00 532144334 Sealant Tire 10 oz Tube 2 8 14 5 1 532157032 Decal Oper Step Thru E F 2 532145005 Decal Battery 3 532166339 Decal Hood RH 4 532166340 Decal Hood LH 5 532166101 Decal HP Engine 8 532137259 Decal Warning Multi Languages 9 532150617 Decal Fender Husq 10 532157140 Decal Fender Danger E F KEY PART NO NO DESCRIPTION 1 6 2 1 5 8 4 10 3 9 11 7 WHEELS TIRES 12 532157007 ...

Page 40: ...REPAIR PARTS TRACTOR MODEL NO YTH145 954140015A PRODUCT NO 954 14 00 15 ENGINE 40 62 13 4 72 2 1 OPTIONAL EQUIPMENT Spark Arrester 29 78 81 3 14 38 15 16 78 32 31 34 33 37 33 39 35 23 ...

Page 41: ...59880 Shield BRN DBR Guard 29 532137180 Kit Spark Arrestor Flat Scrn 31 532157103 Tank Fuel 3 5 STLT W O Sensor 32 532140527 Cap Asm Fuel W sym Vented 33 532123487 Clamp Hose Black 34 532106082 Pad Spacer 35 817490512 Screw 37 532124923 Line Fuel 7 5 38 Plug Oil Drain Order From Engine Manufacturer 39 532109227 Pad Idler 1 75 x 75 x 06 62 810040500 Washer Lock Hvy Hlcl Spr 5 16 72 871070512 Screw ...

Page 42: ... 32 33 54 133 55 56 17 21 5 134 135 136 116 117 119 118 137 140 138 1 46 44 21 22 24 25 26 27 2 28 29 23 36 37 37 38 61 59 2 132 84 36 37 40 132 85 83 40 21 21 21 18 18 20 35 118 136 21 139 137 119 117 116 5 21 134 137 19 4 3 129 92 131 130 92 5 6 21 125 102 102 104 103 105 106 104 105 106 103 101 90 90 91 92 93 94 93 92 95 ...

Page 43: ... 1 532162809 Housing Asm Mower 42 2 872140506 Bolt Rdhd Sqnk 5 16 18unc X3 4 3 532138017 Bracket Asm Fr Sway Bar 38 42 4 532138440 Bracket Asm Deck 42 sway Bar 5 532124670 Retainer Spring 6 532130832 Arm Suspension Rear 8 532850857 Bolt 3 8 24x1 25 Gr8 Patched 9 810030600 Washer Lock Hvy 3 8 Unplated 10 532140296 Washer Hard Blade Mower Vented 11 532134149 Blade Mower Mulching 42 12 532129895 Bear...

Page 44: ...AIR PARTS TRACTOR MODEL NO YTH145 954140015A PRODUCT NO 954 14 00 15 MOWER LIFT 15 20 16 1718 20 20 15 20 4 5 6 2 3 1 6 5 4 7 8 23 24 25 27 28 29 30 50 26 37 41 36 40 38 12 11 31 32 31 32 19 19 13 13 13 13 49 ...

Page 45: ...wnlock 1 2 13unc 19 532139868 Arm Suspension Rear 20 532163552 Retainer Spring 23 532110807 Nut Special 24 819131016 Washer 13 32 X 5 8 X 16 Ga 25 532124874 Spring 2 1 8 26 876020308 Pin Cotter 3 32 X 1 2 27 532126971 Rod Adj Lift Zinc 7 49 Wrk Lg 28 873350600 Nut Hex Jam 3 8 16 Unc 29 532138057 Knob Inf 3 8 16 Unc Blk W sym 30 532150233 Trunnion Infin Height 31 532140302 Bearing Pvt Lift Spherica...

Page 46: ...46 REPAIR PARTS TRACTOR MODEL NO YTH145 954140015A PRODUCT NO 954 14 00 15 HYDRO GEAR TRANSAXLE MODEL NUMBER 319 0650 ...

Page 47: ...2142952 Arm Bypass 36 532142953 Ring Retaining 37 532142954 Arm Actuating 38 532142955 Pin Actuating 39 532150777 Bolt 5 16 24 x 1 3 4 40 532150778 Locknut Hex 5 16 24 UNJC 41 532142958 Brake Rotor Stator Kit KEY PART NO NO DESCRIPTION 43 532142884 Washer 7 16 x 7 8 x 060 44 532150829 Differential Assembly 52 532142991 Washer 3 4 x 1 5 x 13 53 532142961 Seal 75 x 1 25 x 250 56 532142963 Shaft Inpu...

Page 48: ...48 SERVICE NOTES ...

Page 49: ...49 SERVICE NOTES ...

Page 50: ...SIGHTING GUIDE ONLY RIDE UP AND DOWN HILL NOT ACROSS HILL SUGGESTED GUIDE FOR SIGHTING SLOPES FOR SAFE OPERATION Operate your Tractor up and down the face of slopes not greater than 15 never across the face Make turns gradu ally to prevent tipping or loss of control Exercise extreme caution when changing direction on slopes ...

Page 51: ... adverse reaction due to incorrect storage or use habits 2 Failure to operate or maintain the unit in accordance with the Owner s Operator s manual or instruction sheet furnished by Husqvarna 3 Alterations or modifications that change the intended use of the product or affects the product s performance operation safety or durability or causes the product to fail to comply with any applicable laws ...

Page 52: ...532166364 REV 1 10 05 98 SV Printed in U S A ...

Reviews: