IGFL-CRFD/CRFD 1/2-0508
4
Location
The refrigerated merchandisers have been designed for
use only in air conditioned stores where temperature and
humidity are maintained at or below 75°F and 55% relative
humidity. DO NOT allow air conditioning, electric fans,
ovens, open doors or windows (etc.) to create air currents
around the merchandiser, as this will impair its correct
operation.
Product temperature should always be maintained at a
constant and proper temperature. This means that from the
time the product is received, through storage, preparation
and display, the temperature of the product must be
controlled to maximize life of the product.
Uncrating the stand
Place the fixture as close to its permanent position as
possible. Remove the top of the crate. Detach the walls from
each other and remove from the skid. Unbolt the case from
the skid. The fixture can now be lifted off the crate skid.
Lift
only at base of stand!
exterior Loading
These models have
not
been structurally designed to
support excessive external loading.
Do not walk on their
tops;
This could cause serious personal injury and damage
to the fixture.
Leveling
IMpORTAnT! IT Is IMpeRATIve THAT CAses Be
LeveLeD FROM FROnT TO BACK AnD sIDe TO
sIDe. A LeveL CAse Is neCessARY TO InsURe
pROpeR OpeRATIOn, AnD WATeR DRAInAGe.
It is the contractor’s responsibility to install
case(s) according to local construction and
health codes
DO NOT SEAL JOINT TRIM TO FLOOR!
Installation
Refrigeration
Refrigerant Type
The standard refrigerant will be R-22 unless otherwise
specified on the customer order. Check the serial plate on
the case for information.
Refrigeration Lines
Liquid
Suction
3/8” O.D.
5/8” O.D.
Control settings
See CRFD technical data sheet for the appropriate settings
for your merchandiser. Maintain these parameters to
achieve near constant product temperatures. Product
temperature should be measured first thing in the morning,
after having been refrigerated overnight. Defrost times
should be as directed in the CRFD technical data sheet.
The number of defrosts per day should never change.
The duration of the defrost cycle may be adjusted to meet
conditions present at your location.
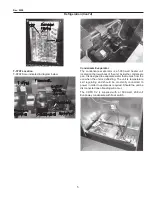
Access to TX valves and Drain Lines
Mechanical -
Remove product from end of case. Remove
refrigeration and drain access panels (labeled), TX
valve.
electronic expansion valve (Optional)
A wide variety of electronic expansion valves and case
controllers can be utilized. Please refer to EEV and
controller manufacturers information sheet. Sensors for
electronic expansion valves will be installed on the coil inlet,
coil outlet, and in the discharge air. (Some supermarkets
require a 4th sensor in the return air). Case controllers will
be located in the electrical raceway or under the case.
Thermostatic expansion valve Location
This device is located on the same side as the refrigeration
stub. A Sporlan balanced port expansion valve model
is furnished as standard equipment, unless otherwise
specified by customer.
expansion valve Adjustment
Expansion valves must be adjusted to fully feed the
evaporator. Before attempting any adjustments, make
sure the evaporator is either clear or very lightly covered
with frost, and that the fixture is within 10°F of its expected
operating temperature.
Measuring the Operating superheat
1. Determine the suction pressure with an accurate
pressure gauge at the evaporator outlet.
2. From a refrigerant pressure temperature chart,
determine the saturation temperature at the
observed suction pressure.
3. Measure the temperature of the suction gas at the
thermostatic remote bulb location.
4. Subtract the saturation temperature obtained in step
No. 2 from the temperature measured in step No. 3.
5. The difference is superheat.
6. Set the superheat for 5°F - 7°F.


