Medium Temperature
HUSSMANN CORPORATION • BRIDGETON, MO 63044-2483 (Printed in U.S.A.)
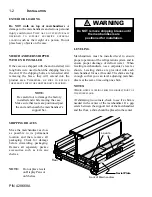
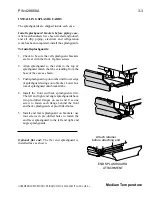
Optional flat end: The flat end splashguard retain-
er is installed last, as shown.
OFFSETTING BUMPERS AND TOP RAIL
Offsetting the bumpers and top rails helps to
disguise the joint locations, giving the lineup a
smoother look.
1. Do not remove factory-installed faceted
bumpers or top rails on the CW2 family. Do
not expose bumpers or top rails to excessive
heat or direct sun as this may cause distortion
of the material.
2. Remove full-length factory-installed top rails
and bumpers from cases as follows:
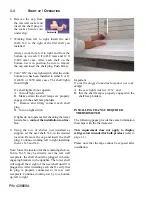
a. To remove top rails, push rail toward the
back of the case with one hand while lift-
ing the top edge with the other hand. A flat
screwdriver may be used carefully as a pry.
(Refer to preceding drawing.)
b. Starting at one end, carefully peel bottom
of top rail free of the retainer and set the
rail inside the case.
c. Remove bumpers by pulling bumper away
from bumper retainers.
There are no starter bumpers in the CW2 family.
Full-length bumpers and top rails are installed
without internal trim or fasteners.
3. Starting at the left end of the line up, install the
first full-length bumper by pushing it into
place, touching the faceted bumper. Make sure
that no gaps exist between sections. Continue
installing the bumpers the length of the line up.
Do NOT install the last upper bumper section
at this time. This section will be installed in the
last step.
4. Return to the left end of the line up and posi-
tion the top rail as shown on next page.
5. Push the bottom portion of the top rail section
into the retainer. Use one hand to push the top
rail toward the rear of the case while using the
other hand to “snap” the top section down over
the edge as shown.
Optional Flat End
Splash-guard Attachment
Attach retainer
before attaching end


