background image

5-6


S

ervice

P/N 3003960_A 

U.S. & Canada 1-800-922-1919 • Mexico 1 800-890-2900 • www.hussmann.com

ADJUSTING SELF-CLOSING DOORS

Door may be adjusted if it is found that when 
the door self-closes, doors do not have enough 
tension.

1. Using a 5/16” wrench, turn and hold the top 
hinge pin one full arc toward the handle of the 
door as shown below.

2. While holding the 5/16” wrench and hinge 
pin in place, tighten the jam nut with a 11/16” 
wrench as shown below.

3. For more tension – a faster, harder door 
close - hold the hinge pin with the 5/16” 
wrench in a starting position to sustain tension 
while loosening the jam nut with the 11/16” 
wrench.

4. Repeat Step 1 and 2 as needed for each 
door.

NOTE:  The typical tension needed for 
self-closing of the door when the door is 
released from a point approximately 6” to 7” 
open.

NOTE:  Do not completely remove both the 
hinge pin and the slide pin at the same time.

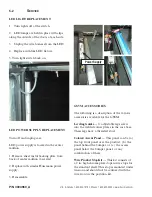
ADJUSTING SAWTOOTH

To fix the alignment of the doors: This adjust-
ment is needed only when the non-hinge side 
top corner is lower than the hinge side top 
corner, therefore causing the doors to appear 
unleveled.

1. Door alignment can be completed by loos-
ening the bottom hinge pin and sliding the 
pin with the 3/4” wrench supplied and sliding 
the bottom of the door left or right as shown 
below.

2. Retighten the hinge pin and slide pin as 
shown below.

NOTE:  Preventive maintenance program 
should include checking and tightening - if 
necessary - of the hinge and slide pins.

Risk of injury. Pinching hazard due to potential 

pre-loaded pressure.

Summary of Contents for GSVM4060F

Page 1: ...Temperature Self Contained Vertical Merchandiser with Doors P N 3003960_A April 2016 Installation Operation Manual IMPORTANT Keep in store for future reference MANUAL IO SC GSVM 4060F Spanish 3003961...

Page 2: ......

Page 3: ...483 U S Canada 1 800 922 1919 Mexico 1 800 890 2900 www hussmann com 2016 Hussmann Corporation Merchandiser must operate for 24 hours before loading product Regularly check merchandiser temperatures D...

Page 4: ......

Page 5: ...erature Adjustment 2 7 Typical Sensor to Control Config 2 8 START UP OPERATION Start Up 3 1 Controls and Adjustments 3 1 Load Limits 3 1 Stocking 3 1 Shelf Weight Limits 3 2 MAINTENANCE Care and Clean...

Page 6: ...t has been carefully inspected at our factory Any claim for loss or damage must be made to the carrier The carrier will provide any necessary inspection reports and or claim forms Apparent Loss or Dam...

Page 7: ...operating the merchandiser UNLOADING Unloading from Trailer Lever Bar also known as a Mule Johnson Bar J bar Lever Dolly or Pry Lever Move the merchandiser as close as possible to its permanent locat...

Page 8: ...of the floor MERCHANDISER LEVELING Be sure to position merchandisers proper ly Level the merchandiser by all four corners Merchandiser s must be installed level to ensure proper operation of the refr...

Page 9: ...the other Sealing of the lower front and rear panels on self contained mod els may hamper their removal for servicing or maintenance of the condensing unit NOTE Do not allow trim to cover any intake...

Page 10: ...extension cord 6 Ensure that the proper electrical requirements for the equipment are supplied 7 Verify field electrical connections are tight 8 Verify all electrical wiring is secured and clear of an...

Page 11: ...1 6 Installation P N 3003960_A U S Canada 1 800 922 1919 Mexico 1 800 890 2900 www hussmann com NOTES...

Page 12: ...s a hazardous situation which if not avoided could result in death or serious injury CAUTION Indicate s a hazardous situation which if not avoided could result in minor or moderate injury NOTICE Not...

Page 13: ...dicated for the merchandiser Failure to do so voids the warranty Do not use an extension cord Never plug in more than one merchandiser per electrical circuit Always use a dedicated circuit with the am...

Page 14: ...tory with all service valves open GSVM models have a refrigeration system that uses a hermetic compressor For self contained models like GSVM 4060F this water seal drains into a electric condensate pa...

Page 15: ...compressor Your controller has been custom configured to pro vide the best temperature and defrost control for your chilled or frozen food The front of the controller has an adjustment knob and status...

Page 16: ...t program has been loaded into the controller When the Controller is first powered up or is turned off and then back on a 2 digit Parameter Code Number will display for 3 seconds Then the Self Check w...

Page 17: ...d during defrost and until it times out even though the refrigeration mode has been initiated The green LED will be lit 2 The compressor will start after a 30 second delay once power is applied 3 The...

Page 18: ...itch to a duty cycle operation During duty cycle operation the refrigeration system will cycle on and off until the sensor is serviced The graph below shows an example of duty cyle operation during a...

Page 19: ...the temperature the display shows the setpoint cut out value A few seconds after the temperature is set the controller reverts to the sensed temperature in the merchandiser 3 To verify merchandiser s...

Page 20: ...A B B SECTION B B YELL P N 0 LOCATION OF BULB TXV TXV BULB 14T31 30163 FAN DELAY TSTAT3 8 P N E201818 A A B B YE P N LOCATION OF BULB TXV 14T31 30163 FAN DELAY TSTAT3 8 P N E201818 Case Sensor Locatio...

Page 21: ...ol panel Adjust this control knob to maintain the discharge air temperature shown Measure discharge air temperatures at the center of the discharge honeycomb Defrosts are temperature controlled for se...

Page 22: ...n and into the return air grille SHELF MAXIMUM WEIGHT LIMITS Hussmann merchandiser shelves are designed to support the maximum weight load limits as indicated in the table below Exceeding these maximu...

Page 23: ...onia based cleaners on acrylic parts Solvent oil or acidic based cleaners on any interior surfaces Do not use high pressure water hoses Do Disconnect electrical power before cleaning Remove the produc...

Page 24: ...Use warm water or add a mild detergent to the water and apply with a cloth Always wipe rails dry after wetting Use alkaline chlorinated or non chlorine containing cleaners such as window cleaners and...

Page 25: ...e conden sate evaporation pan or on the heater coil will reduce the pan s evaporation capacity and cause premature heater failure The evaporation pan waste water will overflow and spill onto the floor...

Page 26: ...low blockage increases energy consump tion and reduces the merchandiser s ability to maintain operating temperature To clean the coils use a vacuum cleaner with a wand attachment and a soft non metall...

Page 27: ...it Heat and air registers fans and doors etc x Check for water leaks x Clean evaporator coil s and fan blade s Do not use an acid base cleaner Rinse off any cleaner residue x Clean discharge air honey...

Page 28: ...4 6 Maintenance P N 3003960_A U S Canada 1 800 922 1919 Mexico 1 800 890 2900 www hussmann com NOTES...

Page 29: ...Reinstall display pans Bring merchandiser to operating temperature before restocking CLEANING COILS NEVER USE SHARP OBJECTS AROUND COILS Use a soft brush or vacuum brush to clean debris from coils Do...

Page 30: ...ion 6 screws 2 Replace with similar Hussmann power supply 3 Reassemble GSVM ACCESSORIES The following is a description of the various accessories available for the GSVM Leveling Guides 6 adjustable le...

Page 31: ...arm 4 Refrigerant over charge 5 Low voltage compressor cycling on overload 1 Short of refrigerant 2 Inefficient compressor 3 Coil iced up 1 Defective control 2 Control sensing element not in positive...

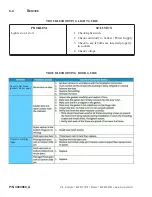
Page 32: ...TROUBLESHOOTING LIGHT GUIDE PROBLEM Lights won t start SOLUTION 1 Check light switch 2 Check continuity to ballast Power Supply 3 Check to see if bulbs are inserted properly in sockets 4 Check voltag...

Page 33: ...SSMANN CORPORATION BRIDGETON MO 63044 2483 U S A GSVM 4060F Merchandisers TROUBLESHOOTING DOOR GUIDE CONTINUED Condensation Between Panes of Glass Condensation on Unheated Doors Condensation on High H...

Page 34: ...for each door NOTE The typical tension needed for self closing of the door when the door is released from a point approximately 6 to 7 open NOTE Do not completely remove both the hinge pin and the sli...

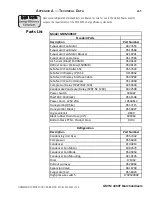
Page 35: ...5C 0557343 Safe Net III Display F 65C H159052 Safe Net III Display Interface Cable 0509783 Safe Net III Control Harness 0513058 Compressor Relay T92P7A22 120 0459304 Condensate Pan Heater Relay SPDT N...

Page 36: ...waste outlet Condensate Pan Description Part Number Electric Condensate Pan Assy 350W 0528492 Condensate Pan Only 0528496 Condensate Heater 350W 19S678 Float 1804342 Sheet Metal Replacement Parts Pai...

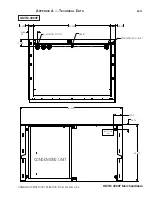
Page 37: ...MO 63044 2483 U S A GSVM 4060F Merchandisers Appendix A Technical Data A 3 GSVM 4060F DRAIN ELECTRICAL OUTLET REFRIGERATION OUTLET SECTION B B 2 000 37 000 2 000 4 186 2X 3 507 22 910 41 308 CONDENSIN...

Page 38: ...378 41 308 45 386 DIMENSION WITH OPEN DOOR 30 330 25 6 16 500 166 27 821 OPENING 15 346 OPENING 15 346 OPENING 30 378 41 308 16 500 60 166 27 821 OPENING 15 346 OPENING 15 346 OPENING 45 386 DIMENSION...

Page 39: ...sed on store temperature and humidity that does not exceed 80 F and 55 R H unless otherwise stated Schedule defrost at night while lights are off HUSSMANN_GDF_2 1 SHEET SIZE D GSVM4060F A GSVM4060F AI...

Page 40: ...ber of Fans 4W open shell 2 Amperes Watts Evaporator Fans 115V 60Hz 0 12 4 Condensate Pan Heaters 115V 3 350 GSVM 4060F Defrost Heaters 2 2 6 300 Door Heater 1 51 174 LED Fixture 0 13 15 Condensing Un...

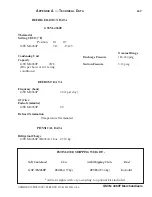
Page 41: ...ed REFRIGERATION DATA GSVM 4060F Thermostat Setting CI CO F Position 1 7 GSVM 4060F 5 5 15 25 Condensing Unit Capacity GSVM 4060F 2678 Btu per hour at std rating conditions DEFROST DATA Frequency hour...

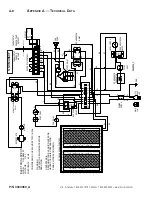
Page 42: ...TORS BK T STAT LIMIT W BK CONDENSATE PAN RELAY W LEVEL SWITCH NEMA 5 20P BK W LINE 1 LINE 2 COMP NA PHASE FAN PHASE THERMOSTAT SENSOR AIR TEMP THERMOSTAT SENSOR TEMP DEFROST HEATER SAFENET III CONTROL...

Page 43: ...information or other support contact your Hussmann representative Please include the model and serial number of the product Hussmann Corporation Corporate Headquarters Bridgeton Missouri U S A 63044 2...

Page 44: ...Hussmann Corporation 12999 St Charles Rock Road Bridgeton MO 63044 2483 www hussmann com...

Reviews: