6
4. Installation
Store Conditions
• Case is designed to operate at temperatures at or
below 80°F at 55% relative humidity. Case must be
kept in that environment to ensure case performance
and product safety.
• Do not position the case near an HVAC vent. A
minimum of 15’ clearance is required.
• Do not position the case near an entrance door.
Outside ambient conditions may have an adverse
affect on the refrigeration performance
• Do not position the case tight against
a ceiling or soffi t.
A minimum clearance 8” above the unit is required for
proper compressor discharge air fl ow.
• Do not block case front panel vent (supplies critical
intake air fl ow to the compressor)
5. Start Up
1. Apply power to the merchandiser.
2. Wait for the self check to complete.
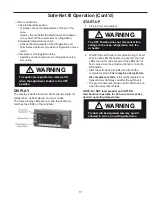
• During self check each LED fl ashes for one second,
then all LEDs turn on for two seconds.
• If the LEDs do not fl ash, make sure the adjustment
knob is not in the “OFF” position.
3. The compressor will start 30 seconds after the self
check is complete.
• The merchandiser temperature displays at startup.
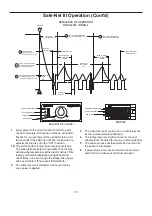
• An initial defrost occurs two hours after startup.
• The compressor runs until it reaches its setpoint
temperature or until defrost.
4. Refrigeration: The compressor will continue to cycle
on-and-off normally until scheduled- or demand-
defrost occurs.
5. Defrost. Defrost is scheduled to occur every 8
hours, or earlier if triggered by a demand defrost (for
models equipped with demand defrost)
• Defrost duration continues for a preset time period,
or until defrost termination temperature is reached,
whichever occurs fi rst.
• During defrost the display shows the initial defrost
temperature (temperature at the start of defrost).
• This initial defrost temperature is displayed for the
full preset time period (even if refrigeration mode
resumes before the end of this period).
6. The refrigeration/defrost cycle repeats (steps 4, 5)
until the power is interrupted.
7. If power is interrupted, the process will start over at
step 1
• The time to subsequent scheduled defrost will reset.
8.
NOTE: Do NOT load product until AFTER
merchandiser reaches desired operating
temperature (approximately 4 hours).
OPERATION-
Check shelf loading. Overstocking case
will affect its proper operation. Do not block discharge
and return air.
1. Do not display packages over the air inlet located at
the front of the lowest deck - this restricts the airfl ow
and results in warmer temperatures in the case.
2. Product must be at temperature when loading case.
Case is not designed to cool food.
3. Do not display more than 150 pounds of product per
shelf. Additional weight will cause defl ection in the
display shelves.
Temperature Adjustment
1. Rotate the (SafeNet 3) controller adjustment dial
clockwise for a colder setpoint, or counter-clockwise
for a warmer setpoint.
• For most food products the optimal dial setting is 5
(the factory setting).
• For packaged meats and/or fi sh, change the
controller dial setting to 7.
• To save energy (for beverages and other non-critical
food products) the controller dial may be set to 1.
• Check internal product temperatures (IPTs)
periodically with a pocket thermometer when
adjusting case temperatures.
2. While adjusting the temperature, the display shows
the setpoint. A few seconds after the temperature is
set, the controller reverts to the sensed temperature
in the merchandiser.
Alarms And Codes
fl ashing temperature or (Beep)
audible sensor alarm LED, E1 or E2]
1) If the Temperature or Sensor Alarm LED (red) on
the controller and display is fl ashing, a temperature
sensor has failed. The display shows E1 if the
Discharge Air sensor has failed or E2 if the
evaporator sensor has failed.
2) If the Discharge Air sensor fails, refrigeration will
run continuously. Refrigeration will default to a Safe
Mode Duty cycle 6 minutes ON 2 minutes OFF
including normal defrost cycle.
3) If alarm continues to sound for 1 hour, Unload
food product turn off, full counter clock wise turn or
unplug case and contact Hussmann Service


