©2009 HUSSMANN CORPORATION • BRIDGETON, MO 63044-2483 U.S.A.
U.S. & CANADA 1-800-922-1919 • MEXICO 1-800-522-1900 • WWW.HUSSMANN.COM
Whenever possible, use all product before per-
forming maintenance. Product allowed to warm
above the operating temperature (26°F) may
freeze when restocked.
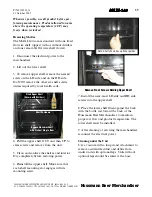
Removing Shelves
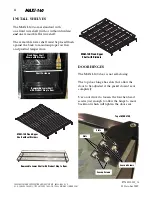
The MAXI-140 comes standard with one fixed
flat wire shelf (upper) with or without dividers,
and one removable flat wire shelf (lower).
1. Disconnect the electrical power to the
merchandiser.
2. Lift out the lower shelf.
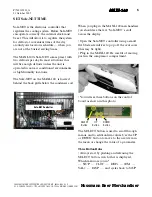
3. To remove upper shelf, remove the nearest
screw on the LH side and on the RH side.
Do NOT remove the other six shelf screws
unless required by local health code.
4. Pull the upper shelf OUT and then UP to
clear screws and remove from the unit.
5. Clean and sanitize the shelves and interior.
Dry completely before restoring power.
6. Reinstall the upper shelf. Make sure that
each shelf mounting slot engages with its
mounting screw.
7. Install the near-most LH side and RH side
screws into the upper shelf.
8. Place the lower shelf flush against the back
with the bottle rail toward the back of the
Hussmann Beer Merchandiser to maintain
proper air flow and product temperature. The
lower shelf must be installed .
9. After cleaning or servicing the merchandiser,
reconnect the electrical power.
Cleaning under the Unit
Use a vacuum with a long wand attachment to
remove accumulated dust and debris from
under units with optional legs. Units without
optional legs should be sealed at the base.
11
P/N 0512888_A
01 October 2009
MAXI-140
Hussmann Beer Merchandiser
MAXI-140
MAXI-140
MAXI-140
MAXI-140
MAXI-140
MAXI-140
Shelf Fasteners
Removable Lower Shelf
with Product Stop to Rear
Fixed Upper Shelf
(Shown with Dividers)
Remove Front Screws Holding Upper Shelf
Note: Shelf shown has optional guides.
Summary of Contents for MAXI-
Page 20: ......

