1
The inspection must be performed by a qualified professional.
Use only original spare parts.
Cleaning
Before chimney sweeping can be performed, the adjustment bar must be set all the way to the left to
prevent soot and ash from entering the automatic control.
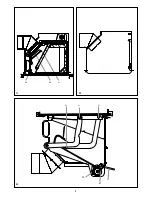
Drawing C
Remove the smoke shelf
(1)
. Push the plate forward and lift it up a bit to the side. Tilt one side downward.
The plate is now free and can be removed from the combustion chamber. Lift the steel smoke deflector
plate
(2)
off of the hooks so that it can be removed.
Insulation
The efficient, but porous insulation of the combustion chamber may, in time, be worn and damaged. Cracks
in the insulation are irrelevant to the efficiency of the insert. However, it should be replaced when, due
to wear and tear, it has been reduced to less than half its original thickness.
HWAM automatic
TM
On a cold stove, the starting point of the feeler is controlled. The starting point on a cold stove is about
0° above horizontal. It should feel easy going and bouncy when you push it, no matter if the stove is
cold or hot. By rising or falling temperatures it must not move at a bound. The damper plates must be
dry and clean and slide together unhindered. Control bars and slide gates may have to be smeared with
WD0 (never oil).
Door lift (Drawing B)
The door lift mechanism consists of a chain pull placed on either side of the stove and a spring. If the
door opens with difficulty, you may correct this by greasing the chain wheel boxes and door hinges (1)
with copper grease (we recommend a grease that can withstand temperatures of up to 1,100º C). You
should do this once every year. If the door still opens and closes too stiffly, the spring on the door lift
mechanism can be loosened slightly. If the door slides too easily, the spring has loosened. The spring can
be loosened or tightened as follows:
Remove the liner from the building-in cassette. Make sure the door of the combustion chamber ()
is closed. Attach the tightening tool () supplied with the stove to the toothed wheel (5). To tighten
the spring so that the door closes more slowly (or can remain fully open), turn the toothed wheel (5)
clockwise slightly. This can be done by turning the tightening tool () counter-clockwise. To loosen the
spring so that the door closes faster (or can no longer remain fully open), lift the locking pawl (6) and
turn the toothed wheel (5) counter-clockwise slightly. This can be done by turning the tightening tool
() clockwise.
IMPORTANT! Keep a firm grip on the handle of the tightening tool () when lifting the
locking pawl as considerable weight and force are transferred when it is lifted.
After each adjustment, check to see whether the desired effect has been achieved. If not, repeat the
process. If you have loosened the spring, we recommend holding the door handle when checking the
effect for the first time to ensure that the spring has not become so loose that the door closes too fast
with the risk of damaging the glass.
Please Note: You should always have a professional adjust, grease and repair these parts.
Summary of Contents for 55s
Page 2: ......
Page 4: ...1 1 1 A1 A2 A3 7 8 5 6 5 4 3 2 a 39 1 cm b 40 4 cm 1 2...
Page 5: ...D C 3 2 1 B 1 1 1 6 5 4...
Page 6: ...E F G 1 1 1 2 2 H...
Page 57: ...57...
Page 58: ...58...
Page 59: ......
Page 60: ...hwam hwam com www hwam com...


