9
Now push the three batts up around the fire tube and press them up into the chimney thereby achieving
a compact and tight-fitting seal.
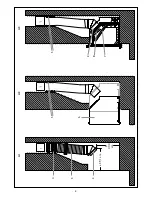
Installing the outer casing (Drawing A2)
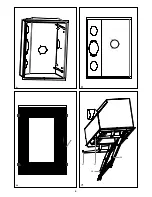
If you would like to mount hoses in order to distribute a portion of the convection heat to other rooms,
push the two plates on each side of the smoke outlet hole on the casing outwards
(see drawing H)
.
Push the outer casing
(6)
into place at the bottom of the fireplace. Carefully ensure that the outer casing
is level and that its front edge is flush with the brickwork. The three adjustment screws in the bottom of
the casing can be used for fine adjustment so that the casing is completely level
(drawing F). Screw the
connector to the building-in cassette with the help of the self-tapping screws supplied.
If the gap between the fireplace aperture and the outer casing is to be closed with brickwork, there must
be a minimum distance of 5 mm around the outer casing The brickwork above the outer casing must
therefore be self-supporting. Attach the casing to the masonry with 1- screws in the base.
Mounting the insert (Drawing A3)
Remove the smoke shelf
(7)
from the insert. Remove the smoke deflector plate
(8)
from the insert.
Attach an Ø6 mm seal to the bottom the smoke outlet bushing. Then push the insert into place in the
brickwork casing. Push the inner pipe all the way into the liner’s smoke outlet connector. Afterwards,
remount the smoke deflector plate
(8)
and smoke shelf
(7)
.
Seal between fire tube and chimney on top of the batts using heatproof mortar
(5)
. This can be done
through the soot door
(1)
of the chimney, and should only be done when the insert is assembled.
Connecting external supply of fresh air
The HWAM I 0/55 can be connected to fresh air systems. The fresh air system can be purchased
separately.
2. Restructuring of brickwork around insert
During the reconstruction, the outer casing should be carefully levelled off at a suitable height. As the
reconstruction progresses, there should be a gap of min. 5 mm between the brickwork and the outer
casing. The frame of the outer casing has a width of 25 mm, though only 20 mm at the top. Any brick-
work stretching across the outer casing must be self-supporting. Remember the screws between the
outer casing and the wall.
Fire tubes and any convection ducts to other rooms should be fitted to the outer casing during the
reconstruction.
The outer casing is not load-bearing. Therefore, fire tubes exceeding 2 m in length and, possibly, the
chimney, must be secured (using hangers) thus avoiding putting any load on the outer casing.
When the reconstruction has been completed, mount the insert as described in point 1.
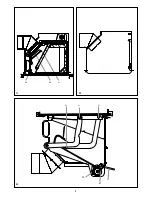
Fitting the loose parts (Drawing C)
Before you start using the insert, you must ensure that all loose parts are fitted correctly.
a. Smoke plate
(1)
. Must lie on the rear plate and on the slanting side plates. It must fall into position in
the track on the rear plate.
Summary of Contents for 55s
Page 2: ......
Page 4: ...1 1 1 A1 A2 A3 7 8 5 6 5 4 3 2 a 39 1 cm b 40 4 cm 1 2...
Page 5: ...D C 3 2 1 B 1 1 1 6 5 4...
Page 6: ...E F G 1 1 1 2 2 H...
Page 57: ...57...
Page 58: ...58...
Page 59: ......
Page 60: ...hwam hwam com www hwam com...


