background image

MAINTENANCE

In general, to insure the smooth operation of the leveling 
system, it is a good idea to occasionally check the individual 
leveling units to prevent problems.  This is especially true 
under the unusual conditions stated in the following:                                        

If driving conditions are unusually muddy, the units may
become caked or clogged with mud.  This condition may 
hamper the proper operation of the leveling system.  This 
problem may be prevented or remedied by cleaning off each 
leveling unit if they become excessively muddy.                                                   

In wet or icy weather leveling units may become encrusted 
with ice.  This may cause the leveling system to function 
improperly.  To eliminate this problem, periodically check the 
leveling units and break loose any ice which may be causing 

Do not move the trailer while the leveling units are still in

All major components of the system can be replaced

with rebuilt units or can be sent to HWH CORPORATION to
be rebuilt, when the system is out of warranty.                     

contact with the ground.  Visually check to see if the leveling
units have returned to the STORE/TRAVEL position before
moving the trailer.                                                                 

MP44.0017

13NOV17

UNUSUAL CONDITIONS

NOTE:

OIL LEVEL

improper operation.

NOT IN PARK/BRAKE CHECK

should now function.

button and set the park brake.  The leveling system

LEVEL" button is pushed.  Release the "AUTO LEVEL"

BRAKE" indicator light should come on while the "AUTO

Push the "AUTO LEVEL" button.  The "NOT IN PARK/

WARNING:

CANNOT ROLL FORWARD OR BACKWARD.

THE COACH WHEELS SECURELY SO THE COACH 

to the "ACC" or "ON" position.  Release the parking brake.  

Apply the brake so the coach cannot roll.  Turn the ignition

WHEN MAKING THIS CHECK, BLOCK 

qualified RV repair center, your vehicle or coach 

or if there are other problems or questions, consult a 

If any of the above checks or inspections reveal a problem 

manufacturer, or HWH CORPORATION
for service or repair.

WINTER WEATHER DRIVING

components, such as HWH jacks.

have dried.  This can facilitate corrosion of metallic

Anti-icing / deicing agents when splashed on your vehicle,
continue to absorb moisture from the air even after they

icing / deicing agents, thoroughly wash jacks with warm

To help reduce the corrosion of jacks after exposure to anti-

soapy water.

cap before removing.

and steps should be fully retracted before checking fluid

breather cap.  Clear any dirt away from the breather / filler

assembly.  The oil level is checked and filled through the

level.  The oil reservoir is part of the pump / manifold

Any HWH hydraulic equipment, including jacks, slide-outs

servicing of the coach.

All maintenance should be done as part of the normal 

there is an oil leak in the system.

purchased and then once every two years.  More often if 

The oil level should be checked when the vehicle is first 

should be between the bottom of the dipstick and the

reservoir. Most breather caps have a dipstick.  Fluid level

The oil  level should be within one inch of the top of the

emergency Dexron automatic transmission fluid can be used.

Dexron automatic transmission fluid contains red dye

and can cause staining should a leak occur.  DO NOT USE
brake fluid or hydraulic jack fluid.  Use of these can damage 

HWH Specialty Hydraulic Oil is recommended.  In an

NOTE: Overfilling the tank can cause leakage of oil 
through the breather cap.

center mark.

FLUID:

NOTE:

seals.

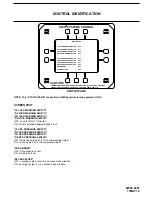
Summary of Contents for SYSTEM CONTROL

Page 1: ...OPERATOR S MANUAL BEFORE USING BLOCK FRAME AND TIRES CAUTION LIGHT STATUS AUTO STORE HYD LEVEL MANUAL HOME R RESET STOP www hwh com Ph 800 321 3494 or 563 724 3396 Fax 563 724 3408 2096 Moscow Road Moscow Iowa 52760 On I 80 Exit 267 South HWH CORPORATION CONTRAST CORPORATION W H H R ROOM HYD LEVEL AUTOMATIC STEP STP COVER R Hydraulic Step and Step Cover Dual Direction Hydraulic Storage Slide Out A...

Page 2: ...ify the dealership where you purchased the vehicle or had the leveling system installed Dealership management people are in the best position to resolve the problem quickly If the dealer has difficulty solving the problem he should immediately contact the Customer Service Department at HWH CORPORATION If your dealer cannot or will not solve the problem notify the Customer Service Department HWH CO...

Page 3: ...etract sequence for the jacks when manual or NOTE See individual function pages in the OPERATING PROCEDURES section of this manual for detailed information about specific screen buttons PANEL BUTTONS SCREEN BUTTONS AND LIGHTS time The ignition key must be on for the RESET button to work UNDERSTAND OPERATOR S MANUAL BEFORE USING BLOCK FRAME AND TIRES SECURELY BEFORE REMOVING TIRES OR CRAWLING UNDER...

Page 4: ...FF OFF OFF OFF ON Jack has load on it it is supporting weight OFF Jack has no load on it It is not supporting weight NOTE This STATUS PAGE is specific to HWH hydraulic leveling systems ONLY LR HYD PRESSURE SWITCH RF HYD PRESSURE SWITCH LF HYD PRESSURE SWITCH RR JACK WARNING SWITCH LR JACK WARNING SWITCH RF JACK WARNING SWITCH LF JACK WARNING SWITCH RR HYD PRESSURE SWITCH ON Jack is extended approx...

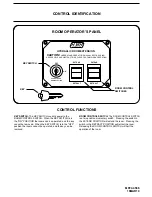
Page 5: ...ed and the key can be The ROOM CONTROL SWITCH is a two position momentary switch Pressing the switch in the EXTEND POSITION will extend the room Pressing the switch in the RETRACT POSITION will retract the room Releasing the ROOM CONTROL SWITCH will halt the operation of the room ROOM OPERATOR S PANEL KEY KEY SWITCH ROOM CONTROL SWITCH OPERATE ONE ROOM AT A TIME CORPORATION W KEEP PEOPLE AND OBSTR...

Page 6: ...em has been used push the AUTO STORE button to retract the jacks and or return the system to the traveling mode It is a good idea to always push the AUTO STORE button after starting the engine This will ensure thermal expansion of the fluid in the hydraulic leveling system will not cause a jack down indicator to come on while traveling 2 Check that all four leveling jacks are fully retracted to th...

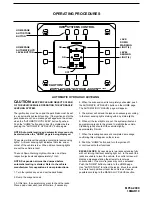
Page 7: ...s approximately 1 inch NOTE Suspension air must be dumped before automatic leveling is started Refer to the vehicle manufacturer for suspension air dump instructions 2 Dump the suspension air 3 At this time the operator may want to check the jacks Place a pad under each jack at this time if necessary 4 When the suspension air is completely exhausted push the AUTOMATIC HYD LEVEL button on the HOME ...

Page 8: ...s Each set of buttons operate a pair of jacks front rear left or right side The RAISE and LOWER buttons are momentary buttons The jacks will extend or retract while the buttons are being pushed The Jack Down Warning Lights will come on as there respective jack extends approximately 1 inch 1 Turn the ignition key on and set the park brake 2 Push the MANUAL HYD LEVEL button on the HOME page and plac...

Page 9: ...h the AUTO STORE button The AUTO STORE light will flash as STORING 3 As each jack retracts fully it s jack down indicator will go out The panel does not show this One minute after all the jacks are fully retracted the STORING light will stop flashing and revert to a solid AUTO STORE light THE STORE TRAVEL POSITION AND THE VEHICLE IS AT STORE TRAVEL POSITION CHECK THAT ALL JACKS ARE FULLY RETRACTED...

Page 10: ...e problem If the If an attempt to level the vehicle in an automatic leveling mode fails putting the system in an EXCESS SLOPE situation rooms cannot be extended Individual ROOM OPERATION pages can be accessed from the ROOM SELECTION page but when the EXTEND button is pushed a message will appear directing the operator to push the HOME button and resolve the EXCESS SLOPE situation Rooms can be retr...

Page 11: ...een fully extended after the room is fully retracted This assures proper Hold the switch to RETRACT three or four seconds of the room do not reverse direction of the room until the room is fully retracted If necessary the direction of the room may be reversed but watch for binding of the room If the direction of the room has been reversed DO NOT retract the room until the room CLEAR OF ROOM WHEN O...

Page 12: ...o EXTEND three or four seconds pressurization of the cylinders Do not hold the ROOM CONTROL SWITCH IMPORTANT NOTE During normal operation the room is fully extended If necessary the direction of the room may be reversed but watch for binding of the room If the direction of the room has been reversed DO NOT re extend the room until the room has been fully retracted If either side of the room stops ...

Page 13: ...moving release the after the room is fully retracted or stops moving in the RETRACT position for more than ten seconds Do not hold the ROOM CONTROL SWITCH reversed DO NOT retract the room until the room the room If the direction of the room has been of the room may be reversed but watch for binding of the room is fully retracted If necessary the direction of the room do not reverse direction of th...

Page 14: ...osition for more than ten seconds after the STEP or STEP COVER is fully extended or stops moving DO NOT FORCE THE STEP or STEP COVER NOTE Releasing the control switch will halt the operation of the STEP or STEP COVER operation of the STEP or STEP COVER NOTE Releasing the control switch will halt the retracted or stops moving DO NOT FORCE THE STEP ten seconds after the STEP or STEP COVER is fully c...

Page 15: ...rol toggle switch must be used to extend the storage slide out the driver s side If the storage slide is extended either side either control switch can be used to retract the storage slide EXAMPLE 1 The storage slide is extended out the passenger side of the vehicle Push and hold the driver s side control switch to RETRACT The storage slide will move to the retracted position and stop EXAMPLE 2 Th...

Page 16: ... only one solenoid valve is open It is recommended to operate the auxiliary hand pump occasionally to check it s operation FRONT VIEW END VIEW CLOSE OPEN OPERATING MOTION will not function RELEASE CAM IMPORTANT ONLY MOVE THE RELEASE CAM IN THE DIRECTION SHOWN MOVING THE CAM IN THE OPPOSITE DIRECTION CAN DAMAGE THE VALVES RET JACK EXT P42088 LEFT RET P42089 RIGHT EXT JACK EXT B STYLE RET P42091 ROO...

Page 17: ...RE ROD END CAP END ADDING FLUID If the system has only Single Acting jacks with return springs remove the easiest hose to access and place the end in a bucket Using the release cam manually open the EXTEND solenoid valve for that jack if equipped with solenoid valves or move the jack control hydraulic switch to EXTEND for that jack Make sure the tank is at least half full Pump the hand pump until ...

Page 18: ...ing brake Apply the brake so the coach cannot roll Turn the ignition WHEN MAKING THIS CHECK BLOCK qualified RV repair center your vehicle or coach or if there are other problems or questions consult a If any of the above checks or inspections reveal a problem manufacturer or HWH CORPORATION for service or repair WINTER WEATHER DRIVING components such as HWH jacks have dried This can facilitate cor...

Page 19: ...he Leveling System and the bubble the freezer floor or upon whichever surface within the vehicle Level the vehicle by placing a bubble level in the center of lights are on Level the vehicle according to the yellow tweaking process until the system levels the vehicle touch panel Recheck with a level Repeat the relevel the vehicle using the yellow level lights on the the front up more Again unlevel ...

Reviews: