background image

- 68 -

No.

Name

No.

Name

No.

Name

No.

Name

801

THH10

831

Tom-HiMid3

861

Voice11

891

Voice41

802

THH11

832

Tom-HiMid4

862

Voice12

892

Voice42

803

THH12

833

Tom-Lo1

863

Voice13

893

W-Block01

804

THH13

834

Tom-Lo2

864

Voice14

894

W-Block02

805

Tima1

835

Tom-Lo3

865

Voice15

895

W-Block03

806

Tima2

836

Tom-Lo4

866

Voice16

896

W-Block04

807

Timpani01

837

Tom-Lo5

867

Voice17

897

W-Block05

808

Timpani02

838

Tom-Lo6

868

Voice18

898

W-Block06

809

Timpani03

839

Tom-Lo6

869

Voice19

899

W-Block07

810

Timpani04

840

Tom-Lo7

870

Voice20

900

W-Block08

811

Timpani05

841

Tom-Lo8

871

Voice21

901

W-Block09

812

Timpani06

842

Tom-Lo9

872

Voice22

902

W-Block10

813

Timpani07

843

Tom-LoMid1

873

Voice23

903

W-Block11

814

Timpani08

844

Tom-LoMid2

874

Voice24

904

W-Block12

815

Timpani09

845

Tom-LoMid3

875

Voice25

905

W-Block13

816

Timpani10

846

Tom-LoMid4

876

Voice26

906

W-Block14

817

Timpani11

847

Tom-LoMid4

877

Voice27

907

W-Block15

818

Timpani12

848

Triangle1

878

Voice28

908

W-Block16

819

Timpani13

849

Triangle2

879

Voice29

909

W-Block17

820

Timpani14

850

Triangle3

880

Voice30

910

W-Block18

821

Timpani15

851

Voice01

881

Voice31

911

W-Block19

822

Timpani16

852

Voice02

882

Voice32

912

W-Block20

823

Timpani17

853

Voice03

883

Voice33

913

W-Block21

824

Timpani18

854

Voice04

884

Voice34

914

W-Block22

825

Timpani19

855

Voice05

885

Voice35

826

Tom-Hi1

856

Voice06

886

Voice36

827

Tom-Hi2

857

Voice07

887

Voice37

828

Tom-Hi3

858

Voice08

888

Voice38

829

Tom-HiMid1

859

Voice09

889

Voice39

830

Tom-HiMid2

860

Voice10

890

Voice40

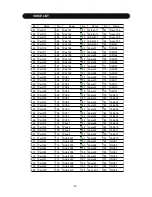
VOICE LIST

Summary of Contents for HDP-1

Page 1: ... 1 HDP 1 DIGITAL DRUM USER S MANUAL KIT ENTER SETUP EXIT G BOX CLICK PHRASE PHONE VO L MASTER VO L ...

Page 2: ...signed to provide reasonable protection against harmful interference in a residential installation This equipment generates uses and can radiate radio frequency energy and if not installed and used in accordance with the instructions may cause harmful interference to radio communications However there is no guarantee that interference will not occur in a particular installation If this equipment d...

Page 3: ... AC adaptor into the same AC outlet as appliances with high power consumption such as electric heaters or ovens SERVICE AND MODIFICATION This product should be serviced by qualified service personnel when w the power supply cord or the plug of the adaptor has been damaged w liquid has been spattered into the unit or it has been exposed to rain w the instrument does not appear to operate nor mally ...

Page 4: ... Loop Parts 17 3 Play the Sequential Note 18 4 Play the Effect Sound 19 5 Play Complete Music 19 6 Change the G BOX Number During the Playing 19 7 Synchronized Start 19 9 Adjust the Tempo 19 METRONOME 20 SOUND EFFECTS 21 PHRASE 22 ENTER THE RECORD MODE 22 RECORDER SETUP 23 1 Clear the Phrase 23 2 Record Mode 23 3 Select a Kit for Recording 24 4 Select Accompaniment 24 5 Measure Setting 25 6 Beat S...

Page 5: ... 3 Edit Layer B 36 4 Complete the Pad Kit Editing 36 EXTERNAL KIT EDIT 37 1 External Edit Preparing 37 2 Edit Parameters 38 3 Complete the External Kit Editing 38 GLOBAL EDIT 39 1 Enter the Global Edit 39 2 Select Parameters 40 3 Edit Parameters 40 1 Reverb Effect Edit 40 2 Chorus Effect Edit 40 3 Delay Effect Edit 41 4 Complete the Global Editing 41 KIT RESET 42 1 Enter the Kit reset 42 2 Reset t...

Page 6: ...STEM SETUP 49 GENERAL SETUP PROCEDURE 50 CHAIN 51 OVERALL SETTINGS 51 1 Equalizer 51 2 Master Volume 51 3 Master Tune 52 4 Pedal Switch Function 52 5 Pedal Effective Action 52 6 Local 52 7 Phrase Playing Mode 52 USER REVERB EFFECT 53 USER CHORUS EFFECT 54 USER DELAY EFFECT 54 USER EQUALIZER 55 RESET 56 MIDI USB 57 KIT LIST 58 GROOVEBOX ACCOMPANIMENT LIST 60 SOUND EFFECTS LIST 61 VOICE LIST 62 SPEC...

Page 7: ...rding modes provide easy way to edit the recording in real time Also orchestration accompani ments can be merged into the phrase METRONOME Built in editable metronome is one of the useful utilities ADVANCED FUNCTION SOUND EFFECTS The drum is equipped with DSP device that generates sound effects applying to the original sound to improve sound quality or change characteristic of the sound DRUM KIT E...

Page 8: ...pport board and bottom of the unit then insert four M6X12 screws and fasten it Stick Storage There are attached stick storage in the right side on the unit Insert stick into the hole of the storage and push it until the stick hooks in and hear click sound Push it again the stick will pop out Note Please use attached stick Other sticks might have loose or stuck problem Sticks ...

Page 9: ...button 6 Buttons Press the button to record phrase 7 G BOX Button With the GrooveBox feature the pad triggers musical elements including rhythm chord effect sound and sequencer notes Press the button to enter the GrooveBox mode 8 CLICK Button Metronome On Off switch Press and hold down this button for 2 seconds to engage metronome setup mode When the metronome is engaged indicator of the button wi...

Page 10: ...lence without disturbing others in the room by plugging a set of headphones into the sockets 6 Expand Trigger Jacks Connect external Ride cymbal Hi Hat cymbal Snare Kick drum and Hi Hat control pedal through these jacks 7 Foot SW Jack Plug in a foot switch pedal The pedal can be assigned to data plus minus Start Stop feature for easy operation by the pedal The default setting is data plus minus Pl...

Page 11: ...w the volume and it ll blink Press the ENTER button to confirm your setting or after about 2 seconds without any operation it will return to the previous window automatically Rotate the PHONE VOL knob to control the head phone volume only PLAYING PAD MASTER VOL PHONE VOL PLAYING PADS All pads have striking strength sensitivity feature Strike the pad harder to make higher volume and strike the pad ...

Page 12: ...tral position bow of the cymbal to make cymbal sound strike the edge of the cymbal to make edge shot sound Bow Edge Playing Snare Drum Strike the central position head of the pad to make head sound strike the rim of the pad to make rim sound There are two rim portions with different rim sound Also there is a mark on the pad to indicate the portion Playing Hi Hat 1 Strike the Hi Hat pad without pre...

Page 13: ...also appears in the right side of the display Rotate the Data knob to select a pad kit Rotate the knob clockwise to increase the kit number and anticlockwise to decrease the kit number All pad kits listed in the Ap pendix KIT LIST in the back of the manual 2 CHAIN It is often to change the pad kit during the performance The Chain feature provides easy and fast way to change the kit You can organiz...

Page 14: ...umber will be shown in the KIT area in the right side of the display Rotate the DATA knob to select Chain number Press the KIT button again to exit the Chain mode and convert to normal Kit Selection window Tip You can assign your favorate kits to chain Please refer to the SYSTEN SETUP Chapter for details 3 USE PEDAL TO SELECT You could also use foot switch pedal to select kit or Chain number if th...

Page 15: ...kit number and blink A represents no layering but voice A only b represents no layering but voice B only and L represents Layer mode is engaged Rotate the Data knob to change the mode Press the ENTER button again to confirmand back to normal kit number display Standard Layering Mode mark SETUP ENTER EXIT 2 Not all kits preset layering feature Please refer to KIT LIST in the back of the manual If t...

Page 16: ...veBox provides an interesting and unique feature for your performance and entertainment When you play pad it triggers GrooveBox music but not simply pad kit sound The GrooveBox music composed of loop playing parts including drum beat and three obbligatos and single voice parts including effect sound and sequential notes Each loop part and sequences has 4 variations A to D Combining with these pres...

Page 17: ...The name of GrooveBox music and its index number with prefix b will be shown The tempo and beat of it will appear on the right side of the screen When the music number is blinking rotate the Data knob to select GrooveBox music Pressing the EXIT or KIT button to exit the GrooveBox and turn to Kit window PERFORMANCE 1 PLAY THE LOOP PARTS Start playing loop parts by strike the Pad 1 to play beat stri...

Page 18: ... which was effective before the stop 2 PLAY THE SEQUENTIAL NOTE Each G Box music has sequence part You can control when its notes sound When you strike pad 5 or 6 notes will be triggered sequentially The variation code of the pad 5 is the same as pad 1 and the variation code of the pad 6 is the same as pad 2 The sequence is synchronized with beat and or obbligato in measure Only notes in the same ...

Page 19: ... Tip In the initializing window you can enter the synchronized start directly by pressing the but ton Change variations together AAAA 4 3 Adjust tempo KIT 5 CHANGE THE G BOX NUMBER DURING THE PLAYING you can change the GrooveBox by rotating the Data knob when all pads stopped by the button 4 PLAY COMPLETE MUSIC You can compose your music by arranging parts per your taste in the way described above...

Page 20: ...g and turn to the next parameter setting Press the KIT button to exit the setting and back to the Kit Selection window Following parameters can be changed MetroTempo MetroVol 3 Volume The current metronome volume will blink Rotate the DATA knob to change it ranged 0 127 2 Beat the current beat will blink Rotate the DATA knob to change the beat ranged 2 12 The beat will also be shown in the right s...

Page 21: ...addition there are several other reverb effects such as Gated Reverb and plate Gated Reverb add ambience only while the original signal is still sounding As soon as the signal falls below a threshold the reverb is automatically cut off Plate simulate plate type reverb with their tight dense early reflections and sharp reverb buildup Echo It is a reflection of sound arriving at the listener some ti...

Page 22: ...them must fit you desire 1 Easy Record In this way you don t need to setup anything All of your current settings will be applied for the recording includ ing kit selection effects setting metronome setting etc You can record 16 measure phrase in Overdub mode without accompaniment In the Kit select window press the button to enter the record entry window The indicator flashes and the PHRASE indicat...

Page 23: ...ndow The indicator flashes and the PHRASE indicator light up Then press the SETUP but ton to start record setup Note The phase number in the right side of the screen will be 3 Recording Based on a Phrase If you already have phrase recorded you could edit it or use its frame for new recording In the kit selection window press the PHRASE button to enter the phrase select window Use the Data knob to ...

Page 24: ...set are as follows 2 RECORD MODE There are two record mode Over Dub and Over Write After finish recording for all measures it ll restart from the first measure for further recording with contents recorded The Over Dub mode provides possibility to add more notes and sound tracks to the previous recording The Over Write mode provides the possibility to replace contents in certain measure with newly ...

Page 25: ...many beats per measure If the metronome is engaged it ll sound per this setting The current beat appears and blinks Rotate the Data knob to select beat per measure you desire The avail able beat is 2 12 Press the ENTER button to confirm and turn to the next item Note If the accompaniment is selected or you enter the setup window from the phrase select play window this item will skip automatically ...

Page 26: ...hoice The current type code will blink Rotate the Data knob to select If the reverb was set to oFF in previ ous step this item will be skipped automatically 9 REVERB EFFECT 9 1 Reverb Effect Switch Switch reverb effect On or Off by rotating the Data knob If it is set to On after press the ENTER button it ll turn to following steps to select reverb type and set its level If you choose Off it ll jum...

Page 27: ...hen record will start instantly no matter you start play pad or not The record indicator will stop flash and stays lighting while the CLICK indica tor flashes with current beat and tempo accordingly The Ready Measure count Measure number preset 11 2 Select Delay Type There are 5 delay types for your choice The current type code will blink Rotate the Data knob to select If the delay was set to oFF ...

Page 28: ...t measure will be replaced with your newly performance in this measure It provides a way to edit your recording in measure base The mode mark appears in the most right of the first row D represents as Over Dub and W represents as Over Write You can change the record mode by rotate the Data knob while the mode mark is blinking Press the button or the button to stop recording instantly the measure c...

Page 29: ...drum is to save up to 30 phrases When recording or playing back stops you can enter the save window by pressing the EXIT button The first avail able phrase number will appear and blink Press the EN TER button to save it and turn to the phrase select window Or you could change the phrase number to save using the Data knob If this number is used for previous recording the display will warn you Save ...

Page 30: ...top blink Duringthe recording youcanchangethetempobypressing and hold the CLICK button for 2 seconds The current tempo in the right column of the display will blink Use the Data knob to change it then press the ENTER button to confirm your setting and exit the setting or it ll exit auto matically after 3 seconds The tempo will stop blink During the record you can turn the metronome sound On Off by...

Page 31: ...is unrecoverable Erase ERASE PHRASE PHRASE In the phrase playing stage you can enter the record op eration directly Press the button to enter the record entry window with the contents and frame of current selected phrase for your edit Press the SETUP button to enter the record setup win dow with the contents and frame of current selected phrase to change record setting then edit your phrase or mak...

Page 32: ... kits and 5 external instrument kits can be edited You can assign voice to each pad set its volume and pan etc Some parameters are for entire kit but not for individual pad such as sound effects type etc they are also editable The diagram below presents major modules and brief control flow of the Drum kit edit function Following pages will give you detailed description DRUM KIT EDIT Kit Edit 1 2 3...

Page 33: ...ecting a pad then change the parameter or you can edit a parameter for multiple pads by selecting a parameter then change the pad 2 EDIT PARAMETERS After select parameter press the ENTER button to confirm Current parameter data will blink Use the Data knob to change data then press the ENTER button to confirm your setting and turn to the next parameter Tip If you don t want to change the current s...

Page 34: ...meter name is LayerPoint This edit item is available when the layer mode selected is not Off otherwise it ll be skipped The range of the point is 0 127 Rotate the Data knob to set the layer Point then press the ENTER button to confirm Please refer to the LAYER section of the DRUM KIT chapter in this manual for details LayerPoint SETUP ENTER EXIT SETUP ENTER EXIT SETUP ENTER EXIT Volume A 1 LAYER 1...

Page 35: ...will not be effective DRUM KIT EDIT 2 4 ADJUST PITCH The parameter name is Pitch A This parameter affects the pitch of the voice The range of the pitch is 10 10 0 represents original pitch 10 is the lowest and 10 is the highest pitch Rotate the Data knob to adjust the pitch then press the ENTER button to confirm 2 5 SET REVERB LEVEL FOR PAD The parameter name is Reverb A This parameter deter mines...

Page 36: ...7 Chr Dely B Level of the Chorus and Delay effects for the voice B 0 to 127 Delay B Level of the Delay effect for the voice B 0 to 127 DRUM KIT EDIT Save 4 COMPLETE THE PAD KIT EDITING Press the EXIT button anytime during the editing to terminate If you do not make any change it ll exit the edit and back to Kit Edit item select window If you made change during the edit you can save edit results Ki...

Page 37: ...ent parameter data will be shown for your reference Rotate the Data knob to select parameter you want to edit 3 Select an Instrument Part to Edit Select an instrument by striking it Please note that some instruments have two or more parts for example the snare have head rim1 and rim2 parts ride cymbal has head and edge parts etc Select a part to be edited by striking relevant part the icon of this...

Page 38: ...ereo pan space 64 to 63 Pitch E Pitch of the voice E 10 to 10 Reverb E Level of the reverb effect for the voice E 0 to 127 Chr Dely E Level of the Chorus and Delay effects for the voice E 0 to 127 3 COMPLETE THE EXTERNAL KIT EDITING Press the EXIT button anytime during the editing to terminate If you do not make any change it ll exit the edit and back to Kit Edit item select window If you made cha...

Page 39: ...ll be shown for your reference Rotate the Data knob to select parameter you want to edit 3 EDIT PARAMETERS When the parameter is selected and its name blinks press the ENTER button to confirm and its current data will blink Use the Data knob to change parameter data then press the ENTER button to confirm your setting and turn to the next parameter Tip If you don t want to change the current settin...

Page 40: ...revious step this item will be skipped automatically Note The level is for the selected reverb type You can adjust reverb voice level for individual pads with the Pad Edit or External Kit Edit functions based on this level 2 CHORUS EFFECT EDIT There are 23 selectable chorus effect types Please refer to the SOUND EFFECTS Chapter and SOUND EFFECTS LIST in the back of the Manual for details DRUM KIT ...

Page 41: ...he power turns off You could recover the default setting with Kit Reset function Please refer to the Kit Reset section of this chapter for more information 3 DELAY EFFECT EDIT There are 5 selectable delay effect types Please refer to the SOUND EFFECTS Chapter and SOUND EFFECTS LIST in the back of the Manual for details Parameters of chorus effect edit are Delay SW Switch chorus effect On or Off De...

Page 42: ...ed it ll turn to the Kit window Or press the EXIT button to cancel and it ll back to the Reset item select window Sure 2 Reset the External Kit Rotate the Data knob when Reset Ext is blinking with the external kit number in front press the ENTER button The display will show Sure Press the ENTER button to confirm and its set ting recovers to its default setting The reset processing needs couple of ...

Page 43: ...Note The advanced edit does not link with any specific Pad Kit and External Kit This is global setting The diagram below presents major modules and brief control flow of the Advanced edit function Following pages will give you detailed description In the Kit select window press the SETUP button There are 4 modes can be selected Rotate the Data knob until Advanced appear then press the ENTER button...

Page 44: ...nob press the EN TER button to confirm Its current parameter data will blink Use the Data knob to change the data of the parameter then press the ENTER button to confirm your setting and turn to the next parameter Tip If you don t want to change the current setting of an item press the ENTER button to skip it and turn to the next item PAD ADVANCED EDIT There are two modes of the advanced edit for ...

Page 45: ...nds instead of one The Mask Time setting helps to prevent such problems Once a pad has been hit any additional trigger signals occurring within the specified Mask Time will be ignored The higher the value the easier for sounds to be omitted when strikes the pad fast and repeatedly The range of the mask time is 0 127 msec ADVANCED EDIT Sensi SETUP ENTER EXIT SETUP ENTER EXIT Headroom Mask Time SETU...

Page 46: ...ce it carefully ADVANCED EDIT SETUP ENTER EXIT Cross Talk 4 COMPLETE THE PAD ADVANCED EDIT Press the EXIT button anytime during the Pad Advanced Edit to exit If you do not make any change it ll exit and back to the Pad External select window If you made change during the Pad Advanced Edit you can save editing results The display will show Save Press the ENTER button and the current settings will b...

Page 47: ...entering the External edit window the default instru ment to edit is Snare You can select another one by striking it no matter what part you hit Its icon on the display will blink Note Press the Hi Hat control pedal to the bottom to select it Its edit procedure is different Please refer to HI HAT CONTROL PEDAL section in the next page for details Tip You can edit multiple parameters for a instru m...

Page 48: ...it is 0 127 Rotate the Data Knob to set the value or press the pedal with your desired strength then press the ENTER button to confirm Pedal Threshold The parameter name is Pedal THR It determines the position of the Pedal Threshold point The scale of Hi Hat pedal movement is 0 127 The top position of the pedal is defines as 127 and bottom is 0 Rotate the Data Knob to set the value or press the pe...

Page 49: ...ignment Pedal setting Mas ter tune etc This function also provides user effects feature that allows you to creat your own effects All of these settings are applied to entire unit instead of particular drum kit and pad instrumet The diagram below presents major modules and brief control flow of the Drum kit edit function Following pages will give you detailed description SETUP OPTION SAVE KIT SELEC...

Page 50: ...press the ENTER button to confirm your setting and turn to the next parameter Tip If you don t want to change the current setting of an item press the ENTER button to skip it and turn to the next item Note The diagram in the right shows an example of the Chain setup procedure Chain 01 Chain 01 Parameter name Current parameter data Chain 01 Change parameter data SETUP ENTER EXIT SETUP ENTER EXIT Ch...

Page 51: ... turn to the next chain number Press the EXIT button to exit No EQUALIZER TYPE 01 Normal 1 02 Normal 2 03 Bass Boost 04 Bass Mid 05 Moderate 06 Bright Mid 07 Bright 08 Bright High 09 User EQ 2 MASTER VOLUME The parameter name is Master Vol This parameter determines the master volume The mas ter volume range is 0 to 127 Note The MASTER VOLUME knob can adjust the master volume as well But that adjus...

Page 52: ...ER EXIT Master Tune SETUP ENTER EXIT Release 7 PHRASE PLAYING MODE The parameter name is PhrasePlay You have 4 options which determines phrase play mode 1 SingleOnce Play single phrase once It ll stop after finish the playing 2 SingleRept Play single phrase repeatedly until press the button to stop 3 All Once Play all phrases once It ll stop after finish all phrases playing 4 All Repeat Play all p...

Page 53: ...ines the time it takes for the reflected sound from the room to decay or die away Rotate the Data Knob to change the value The range is 0 127 127 represents 250ms 3 PRE HI PASS FILTER The parameter name is Pre HP It filters out low frequency Rotate the Data Knob to change the value The range is 0 127 SYSTEM SETUP SETUP ENTER EXIT SETUP ENTER EXIT ReverbTime Pre Delay SETUP ENTER EXIT SETUP ENTER E...

Page 54: ...ulation rate Higher is the rate more intensive will be the effect 0 127 Depth Depth is the maximum amount of modulation applied to the delay 0 127 SYSTEM SETUP UserChorus SETUP ENTER EXIT Parameter Description Data Mode Define the delay Mode 1 Mono delay 2 Stereo delay Delay Time It determines the delay time 0 represents 0 ms 127 represents 1 3 seconds 0 127 Feedback Feeding back a small amount of...

Page 55: ...GainTreble Gain of the Treble band 0 127 USER EQUALIZER This function makes it possible to create your own 4 Band Parametric Equalizer It ll be included in the Sound Effects List named User EQ for your choice There are 4 parameters for User Equalizer setup listed below The way of the setup is the same as User Reverb setup SYSTEM SETUP User EQ SETUP ENTER EXIT ...

Page 56: ...eset processing needs couple of seconds while the display shows Reset After reset finished it ll turn to the Kit window Or press the EXIT button to cancel and it ll return to the Setup window Note Don not strike any pad and external instru ment after press the ENTER button until it turns to the Kit window During the reset processing any button is disabled After system setup advanced edit kit edit ...

Page 57: ...a Windos 7 MAC OSx environment The drum will be recognized as USB Audio device to receive and transmit the same MIDI messages described above MIDI USB Function Transmitted Recognized Remarks Basic Channel 10 1 16 Note Number 0 127 0 127 Velocity Note ON Note OFF 1 127 64 0 127 0 127 Major Controls B9h 04h xxh Bxh 79h 00h Bxh 7Bh 00h Yes Yes Yes X Yes Yes Hi Hat pedal control Reset All Controller A...

Page 58: ... Perc Off Off Off Off Off Off Off Off 19 Strings Mix Mix Mix Mix Mix Mix Mix Mix 20 CowBell Off Off Off Off Off Off Off Off 21 Bell Drum Off Off Off Off Off Off Off Off 22 Robot FX Off Off Off Off Off Off Off Off 23 War Crysis Off Off Off Off Off Off Off Off 24 SwingSwing Off Off Off Off Off Off Off Off 25 Pots Switch Switch Switch Switch Off Switch Switch Switch 26 Hits Off Off Off Off Off Off Of...

Page 59: ...unny Off Off Off Off Off Off Off Off 60 Kraski Off Off Off Off Off Switch Switch Off 61 Ceremony Off Off Off Off Off Off Off Off 62 Heavy Beat Off Off Off Off Off Off Off Off 63 Hi Fi Off Off Off Off Off Off Off Off 64 Music Box Off Off Off Off Off Off Off Off 65 CH Opera1 Off Off Off Off Off Off Off Off 66 CH Opera2 Off Off Off Off Off Off Off Off 67 CH Opera3 Off Off Off Off Off Off Off Off 68 C...

Page 60: ... Stay 06 Carbon 16 The way 07 California 17 That s it 08 Let s rock 18 Games 09 Pop ballad 19 Step 10 Slapin 20 Mixer Accompaniment List No Accompaniment No Accompaniment 01 Bottle 11 Month 02 Bowdown 12 Sunshine 03 Freemind 13 Vida 04 Remcele 14 Mayday 05 Smile 15 Being 06 Soft 16 Case 07 Wish 17 Marie 08 Binary 18 Myeyes 09 Carryout 19 Sea 10 Challenge 20 Spud ...

Page 61: ...cription Display No Description Display 01 Chorus Li ght 1 Lt Chorus1 13 Flange Slow Deep Slw Flange 02 Chorus Light 2 Lt Chorus2 14 Flange Deep Dp Flange 03 Chorus Medium 1 Md Chorus1 15 Phaser Light Lt Phaser 04 Chorus Medium 2 Md Chorus2 16 Phaser Medium Md Phaser 05 Chorus Deep 1 Dp Chorus1 17 Phaser Slow Deep Slw Phaser 06 Chorus Deep 2 Dp Chorus2 18 Phaser Fast Fst Phaser 07 Chorus Fast 1 Fs...

Page 62: ...07 710 Hand Drum 66 79 324 328 393 396 Banya 61 63 Tabla 779 791 Timpani 792 825 Voice 232 239 851 892 Animal Sound 62 65 Bell 108 116 123 134 208 219 329 345 765 778 Marimba 447 484 Brass 135 146 Bowl 120 122 Pot 694 706 Wood Block 893 914 Triangle 848 850 Cowbell 193 207 Craski 220 224 Balalaika 80 104 Guitar 310 323 Lute 424 446 Chinese Instrument 147 186 Hits 368 379 Special FX 759 764 Scratch...

Page 63: ...aik19 138 Brass04 019 LowTom 059 Castanets 099 Balalaik20 139 Brass05 020 OpenHi hat 060 MuteSurdo 100 Balalaik21 140 Brass06 021 Low midTom 061 OpenSurdo 101 Balalaik22 141 Brass07 022 Hi midTom 062 Animal1 102 Balalaik23 142 Brass08 023 CrashCymb1 063 Animal2 103 Balalaik24 143 Brass09 024 RHighTom 064 Animal3 104 Balalaik25 144 Brass10 025 RideCymb1 065 Animal4 105 Banya1 145 Brass11 026 ChCymb...

Page 64: ...ts58 Chinese32 218 CR11 258 Effects19 298 Effects59 Chinese33 219 CR12 259 Effects20 299 Effects60 Chinese34 220 Craski1 260 Effects21 300 Effects61 Chinese35 221 Craski2 261 Effects22 301 Effects62 Chinese36 222 Craski3 262 Effects23 302 Effects63 Chinese37 223 Craski4 263 Effects24 303 Effects64 Chinese38 224 Craski5 264 Effects25 304 Effects65 Chinese39 225 Cymbal01 265 Effects26 305 Effects66 ...

Page 65: ...a12 339 HEA11 379 Hit12 419 Kick23 459 Marimba13 340 HEA12 380 HMN01 420 Kick24 460 Marimba14 341 HEA13 381 HMN02 421 Kick25 461 Marimba15 342 HEA14 382 HMN03 422 Kick26 462 Marimba16 343 HEA15 383 HMN04 423 Kick27 463 Marimba17 344 HEA16 384 HMN05 424 Lute01 464 Marimba18 345 HEA17 385 HMN06 425 Lute02 465 Marimba19 346 Hi hat01 386 HMN07 426 Lute03 466 Marimba20 347 Hi hat02 387 HMN08 427 Lute04...

Page 66: ...rc088 499 Perc Fx08 539 Perc009 579 Perc049 619 Perc089 500 Perc Fx09 540 Perc010 580 Perc050 620 Perc090 501 Perc Fx10 541 Perc011 581 Perc051 621 Perc091 502 Perc Fx11 542 Perc012 582 Perc052 622 Perc092 503 Perc Fx12 543 Perc013 583 Perc053 623 Perc093 504 Perc Fx13 544 Perc014 584 Perc054 624 Perc094 505 Perc Fx14 545 Perc015 585 Perc055 625 Perc095 506 Perc Fx15 546 Perc016 586 Perc056 626 Pe...

Page 67: ...ot05 738 Snare13 778 SPH14 659 Perc129 699 Pot06 739 Snare14 779 Tabla01 660 Perc130 700 Pot07 740 Snare15 780 Tabla02 661 Perc131 701 Pot08 741 Snare16 781 Tabla03 662 Perc132 702 Pot09 742 Snare17 782 Tabla04 663 Perc133 703 Pot10 743 Snare18 783 Tabla05 664 Perc134 704 Pot11 744 Snare19 784 Tabla06 665 Perc135 705 Pot12 745 Snare20 785 Tabla07 666 Perc136 706 Pot13 746 Snare21 786 Tabla08 667 P...

Page 68: ...m LoMid1 873 Voice23 903 W Block11 814 Timpani08 844 Tom LoMid2 874 Voice24 904 W Block12 815 Timpani09 845 Tom LoMid3 875 Voice25 905 W Block13 816 Timpani10 846 Tom LoMid4 876 Voice26 906 W Block14 817 Timpani11 847 Tom LoMid4 877 Voice27 907 W Block15 818 Timpani12 848 Triangle1 878 Voice28 908 W Block16 819 Timpani13 849 Triangle2 879 Voice29 909 W Block17 820 Timpani14 850 Triangle3 880 Voice...

Page 69: ... Record G Box Click Phrase Setup Enter and Exit buttons Data Knob Kit Edit Voice Volume Pan Pitch Effect Layer Reset External triggering Advanced Edit Sensitivity Headroom Crosstalk Mask Time Triggering curve System Setup Chain assignment Master Volume Master tune Equalizer Foot switch pedal Local Phrase play mode User effects and Equalizer Reset Reset Kits Advanced edit Phrases and Reset all Phra...

Page 70: ...ghai Huaxin Musical Instrument Co Ltd 35 Lao Shan Yi Cun Shanghai 200120 China Tel 86 21 58820000 Fax 86 21 58783113 Email huaxin huaxin music com www huaxin music com Rev 1 02 HDP 1 DIGITAL DRUM USER S MANUAL ...

Reviews: