background image

SUPO 647

REV D

Operation & Safety Manual
HB-P4.5 / HB-P5.O

15

Item #

Part #

Decal Meaning or Designation

QTY.

1

144-21-007-
51

Decals, HB-P4.5

1

1.1

DE600E-10

DECAL, MANUAL BOX

1

1.2

DE600E-14

DECAL, ML

1

1.3

DE751

DECAL,E-DOWN

1

1.4 

DE601

DECAL,LOGO

1

1.5

DE603-7
OR
DE603-8

DECAL, MODEL #HB-P4.5
OR
DECAL, MODEL #HB-P5.0

2

1.6

DE746

DECAL,LANYARD ATTACHMENT

1

1.7

DE652

DECAL,WEBSITE

2

1.8

DE679

DECAL,HYDR FLUID

1

1.9

DE706

DECAL,UPR

1

1.10

DE718

DECAL,CE MARK

1

1.11

DE723
OR 
DE729

DECAL,WHEEL LOAD HB-P4.5 
OR
DECAL,WHEEL LOAD HB-P5.0

4

1.12

DE727 

DECAL, KEEP

2

1.13

DE728 

DECAL,CLEAR

2

1.14

DE730

DECAL,OL ALARM 

1

1.15

DE739

DECAL,LWR 

1

1.16

DE740

DECAL,LWR PWR

1.17

DE742

DECAL,CAPACITY,550#,1P,I,WO/SO

2

2

DE738

DECAL,CTL UPR

1

3

NA

SERIAL NUMBER PLATE

1

4

NA

SERIAL NUMBER REFERENCE

1

SECTION 3 | DECALS

Summary of Contents for 1 Seris

Page 1: ...OPERATION SAFETY MANUAL PUSH AROUND AERIAL WORK PLATFORM SUPO 647 REV D HB P4 5 HB P5 0 SERIES 1 ...

Page 2: ...l HB P4 5 HB P5 0 SUPO 647 REV D 2 NOTES If there is a question about application and or operation contact Custom Equipment Inc 2647 Hwy 175 Richfield WI 53076 U S A Tel 1 262 644 1300 Fax 1 262 644 1320 www hybridlifts com ...

Page 3: ...HIS MACHINE WITHOUT THE EXPRESS WRITTEN CONSENT OF THE MANUFACTURER IS PROHIBITED Fall protection notice The guardrail system around the perimeter of the platform is the fall protec tion system for push around elevating work platforms per the EN 280 2001 Standard It is prohib ited to use an Aerial Work Platform manufactured by Custom Equipment Inc With any portion or all of the guardrails removed ...

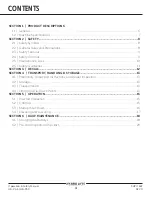
Page 4: ... 5 Maintenance Lock 10 2 6 Safety Guidelines 11 SECTION 3 DECALS 12 SECTION 4 TRANSPORT HANDLING STORAGE 13 4 1 Preliminary Unpacking Instructions and Dealer Inspection 13 4 2 Storage 13 4 3 Transportation 13 4 4 Lifting and Tie Down Points 13 SECTION 5 OPERATION 15 5 1 Pre start Inspection 15 5 2 Controls 15 5 3 Startup Shut Down 16 5 4 Elevating and Lowering 17 SECTION 6 DAILY MAINTENANCE 18 6 1...

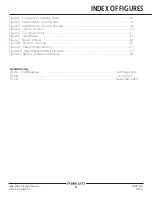
Page 5: ...gure 1 Emergency Lowering Valve 10 Figure 2 Maintenance Lock Pin Use 11 Figure 3 Maintenance Lock Pin Storage 11 Figure 4 Decal Locations 13 Figure 5 Tie Down Points 15 Figure 6 Rear Brakes 15 Figure 7 Base Controls 16 Figure 8 Platform Controls 16 Figure 9 Master Power Switch 17 Figure 10 Rear Brakes And Bubble Level 17 Figure 11 Battery Charger Led Display 20 ...

Page 6: ... and approved in accordance with the requirements of the Machinery Directive 2006 42 EEC using the document EC Community Legislation on Machinery and taking guidance from EN280 2001 A2 2009 An EC type examination was tested internally by the manufacturer in accordance with EN280 2001 A2 2009 and 2006 42 EEC Annex VIII as listed in Article 12 and Annex IV item 17 of directive 2006 42 EEC which excl...

Page 7: ...son Horizontal Manual Force 45 lb 200 N Floor Loading Machine Weight Unloaded Approx 773 lb 351 kg Minimum Wheel Load Contact Pressure 205 3 psi 1415 kPa Maximum Wheel Load Contact Pressure 351 4 psi 2422 kPa Minimum Machine Loading Floor Pressure 115 1 psf 5 51 kPa Maximum Machine Loading Floor Pressure 197 0 psf 9 43 kPa Environmental limitations Wind No windy conditions Indoor use only Rated Sl...

Page 8: ...istributed 550 lb 1 Person 249 5 kg 1 Person Horizontal Manual Force 45 lb 200 N Floor Loading Machine Weight Unloaded Approx 870 5 lb 395 kg Minimum Wheel Load Contact Pressure 250 3 psi 1726 kPa Maximum Wheel Load Contact Pressure 408 5 psi 2816 kPa Minimum Machine Loading Floor Pressure 129 6 psf 6 21 kPa Maximum Machine Loading Floor Pressure 211 5 psf 10 13 kPa Environmental limitations Wind ...

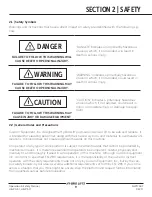
Page 9: ...Equipment Inc designed the Hy Brid Lift push around scissor lift to be safe and reliable It is intended for elevating personnel along with their necessary tools and materials to overhead work locations Vibration does not create significant hazards on this machine An operator of any type of work platform is subject to certain hazards that cannot be protected by mechanical means It is therefore esse...

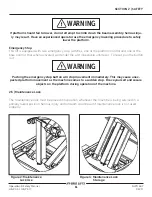
Page 10: ... hydrau lically locked with a check valve and has controlled descent when valve activates Decals Danger Caution and Warning decals are displayed at various locations on this unit Key Switch Security A key switch is required to prevent unauthorized use 2 4 Safety Controls Descent Manual Override For manually lowering the scissors a manual valve is provided To lower the scissors pull the cable locat...

Page 11: ... will render the unit inoperable until reset To reset pull the button out WARNING Pushing the emergency stop button will stop movement immediately This may cause unex pected platform movement as the machine comes to a sudden stop Brace yourself and secure objects on the platform during operation of the machine 2 5 Maintenance Lock The maintenance lock must be placed into position whenever the mach...

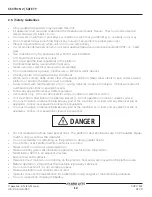
Page 12: ...verhead obstructions or possible hazards Follow any applicable national traffic regulations Use indoors only Lift is not designed for windy conditions or electrical storms Unit must be on hard level surface before elevating Do not operate on incline or uneven surface You must maintain a clearance between any part of the machine or its load and any electrical line or apparatus Follow local power li...

Page 13: ...SUPO 647 REV D Operation Safety Manual HB P4 5 HB P5 O 13 ...

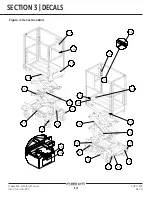
Page 14: ...ion Safety Manual HB P4 5 HB P5 0 SUPO 647 REV D 14 SECTION 3 DECALS 4 1 1 1 4 1 5 1 12 1 13 1 2 1 7 1 11 1 11 2 3 1 16 1 11 1 3 1 10 1 11 1 7 1 12 1 13 1 17 1 5 1 9 1 14 1 8 1 15 1 6 Figure 4 Decal Locations ...

Page 15: ...DEL HB P5 0 2 1 6 DE746 DECAL LANYARD ATTACHMENT 1 1 7 DE652 DECAL WEBSITE 2 1 8 DE679 DECAL HYDR FLUID 1 1 9 DE706 DECAL UPR 1 1 10 DE718 DECAL CE MARK 1 1 11 DE723 OR DE729 DECAL WHEEL LOAD HB P4 5 OR DECAL WHEEL LOAD HB P5 0 4 1 12 DE727 DECAL KEEP 2 1 13 DE728 DECAL CLEAR 2 1 14 DE730 DECAL OL ALARM 1 1 15 DE739 DECAL LWR 1 1 16 DE740 DECAL LWR PWR 1 17 DE742 DECAL CAPACITY 550 1P I WO SO 2 2 ...

Page 16: ...tion Turn key switch to off position For safety and controlled handling it is not recommended to move the unit on a slope greater than 5 Check entire machine for loose or unsecured items Remove any loose items from machine Apply manual brake lock on rear wheels 4 4 Lifting and Tie Down Points Lower the work platform to the down position Turn key switch to off position For safety and controlled han...

Page 17: ...ne A checklist for pre start inspection can be found in the back of this manual 5 2 Controls Figure 7 Base Controls Item Control Indicator 1 Master Power Switch Operation described as follows 2 Battery Charger Indicator Lights Item Control Indicator 1 Up Down Rotary Switch Operation described as follows 2 Emergency Stop Operation described in Section 2 4 3 Overload Indicator Light 4 Battery Voltag...

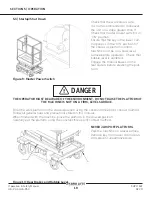
Page 18: ...rs before elevating the plat form DANGER THE OPERATOR MUST BE AWARE OF THE ENVIRONMENT DO NOT RAISE THE PLATFORM IF THE MACHINE IS NOT ON A FIRM LEVEL SURFACE Enter the work platform in the stowed position using the constant three point contact method Follow all general rules and precautions stated in this manual When finished with the machine place the platform in the stowed position Carefully ex...

Page 19: ...s the Elevate Lower Enable Button While holding down the Enable But ton rotate and hold the Elevate Lower switch until the platform is in the desired position Using Lower Base Controls Make sure the base controls are selected with the selector switch at the base controls Press the Enable Button at the same time as the Elevate Lower Switch to raise or lower the platform Press ing the top of the swi...

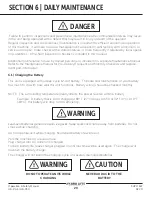
Page 20: ...ts and replace ment part information 6 1 Charging the Battery This unit is equipped with a deep cycle 12 volt battery The care and maintenance of your battery has much to do with how well this unit functions Battery wiring should be checked monthly NOTE The surrounding temperature greatly affects the power reserve within a battery Example A battery that is 100 charged at 80 F 27 C drops to 65 at 3...

Page 21: ...GING READY BATTERY 1 STATUS CHARGING READY Green LED ON Red LED OFF Green LED ON Green LED ON Red LED ON Green LED OFF Green LED ON Red LED OFF Green LED ON Reading the Battery Displays This display indicates that the power is on but there is no con nection to a battery The charger must see approximately five 5 volts on a battery to deliver D C current This display indicates that power is on and t...

Page 22: ...trols are not missing damaged or disconnected Electrical cables and wires are not torn frayed or disconnected Hydraulic hoses are not torn or loose and there are no leaks Check that hoses and cables have no worn areas or chafing Check the tires for damage Check that all snap rings are secure in grooves on pivot pins Functional Tests Gate closes automatically and latches alignment can be adjusted w...

Page 23: ...on Safety Manual HB P4 5 HB P5 O 23 If there is a question about application and or operation contact Custom Equipment Inc 2647 Hwy 175 Richfield WI 53076 U S A Tel 1 262 644 1300 Fax 1 262 644 1320 www hybridlifts com NOTES ...

Page 24: ... Inc 2647 Highway 175 Richfield WI 53076 U S A Tel 1 262 644 1300 Fax 1 262 644 1320 www hybridlifts com service customequipmentlifts com Hy Brid Lifts is a trademark of Custom Equipment Inc These machines comply with specified EN 280 requirements Revision Date December 2015 Printed in the U S A ...

Reviews: