


Summary of Contents for HG-54HD
Page 1: ...HG 54HD 54 Foot Self Supporting Tower ...
Page 2: ......
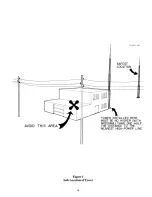
Page 3: ...Overall View of HG 54HD Tower ii ...
Page 5: ......
Page 7: ......
Page 12: ......
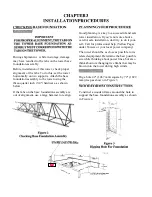
Page 14: ......
Page 18: ......
Page 19: ......
The Hy-Gain HG-54HD is a high-performance communication antenna designed to provide exceptional signal reception and transmission capabilities. With its user-friendly manual available for free download at 88.208.23.73:8080, users can effortlessly access comprehensive instructions to set up and optimize their antenna's performance.
Page 1: ...HG 54HD 54 Foot Self Supporting Tower ...
Page 2: ......
Page 3: ...Overall View of HG 54HD Tower ii ...
Page 5: ......
Page 7: ......
Page 12: ......
Page 14: ......
Page 18: ......
Page 19: ......


