Gas Log or
Fireplace Insert
Hood
12” Minimum
Heat Resistant
Material
2” Mantel
4” Mantel
6” Mantel
8” Mantel
15”
16”
13.5”
14.25”
2-3/4”
Adjustable Fireplace Hood (FAH-BLK)
Instruction Sheet
2
| S
tep
4 |
Masonry Installations:
[See STEP 3 for Non-Masonry Applications]
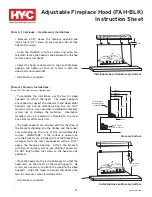
• To complete this installation, use the two (2) Hood
Supports to attach the hood. The Hood Supports
are aligned to support the Hood-Left and Hood-Right
Sections and will be attached using two (2) 1-1/4”
masonry screws. Use care when installing the masonry
screws not to damage the materials. Alternative
fasteners may be required if attaching to the steel
brick lintel or other materials.
• The Hood Supports are installed with the short leg of
the bracket extending into the firebox and the longer
arm extending up the face of the non-combustible
surface. IMPORTANT: If the surface is uneven, be
sure the brackets are installed so that the bracket has
clearance from the most pronounced surface, 3-1/2”
above the fireplace opening. Attach the brackets
with two (2) masonry screws, pre-drilling if necessary.
DO NOT fully tighten the screws so the hood may be
adjusted.
• Place the hood onto the installed brackets so that the
hood rests on the offsets of the Hood Supports. No
screws are necessary to attach the Hood to the Hood
Supports. Align the Hood as desired and tighten the
four (4) masonry screws installed earlier.
• Installation is complete.
| S
tep
3 |
Continued ... Non-Masonry Installations:
• Measure 2-3/4” above the fireplace opening and
install two (2) 1/2” screws for each section. Do not fully
tighten the screws.
• Align the FAH-BLK with the screws and allow the
selected slots on the hood to slide between the finished
surface and screw heads.
• Adjust the hood as necessary to align with fireplace
opening and tighten all four (4) screws in both the
Hood-Left and Hood-Right.
• Installation is complete.
Installing Hood on Non-Masonry Surface
Masonry Surface
Installing Hood on Masonry Surface
Attach Hood
Supports
FAH-BLKI 9/2018


