background image

Handling 


  HMG 4000 

Edition 2016-03-08 - V01 R04 

[17] 

Part No.: 669950


4.3 Navigating in the menu/command bar (toolbar) 


All settings and input options in the different applications and function menus of 
the HMG 4000 are largely self-explanatory and can be used intuitively. 


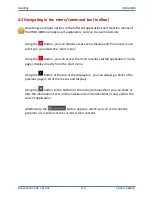
Using the 

 button, you can directly access every display and from every menu 

point you can access the "

Start menu

". 


Using the 

 button, you can access the most recently started application / menu 

page / display directly from the start menu. 


Using the 

 button at the top of the display bar, you can always go back to the 

previous page in all of the menus and displays.  


Using the 

 button to the bottom of the menu/command bar you can show or 

hide the information texts on the individual command buttons (icons) and/or the 
current application. 


Additionally, the 

 button appears, which you can use to directly 

generate a screenshot of the current screen content. 


Summary of Contents for HMG 4000

Page 1: ...PortableDataRecorder HMG 4000 Operating Manual Translation of original instructions ...

Page 2: ...Content HMG 4000 Edition 2016 03 08 V01 R04 2 Part No 669950 ...

Page 3: ...keys 12 2 2 Connection jacks 13 3 first steps with the HMG 4000 14 3 1 Unpacking 14 3 2 Charging battery 14 3 3 Switching device on and off 15 3 4 Updating firmware 15 4 Managing the HMG 4000 16 4 1 Touchscreen operation 16 4 2 Display graphics setup 16 4 3 Navigating in the menu command bar toolbar 17 5 Quickstart 18 5 1 Basic settings 18 5 2 Measured values 20 5 3 Starting simple recording 21 6 ...

Page 4: ... settings 76 9 2 Date and time settings 76 9 3 Display settings 77 9 4 Graphic settings 77 9 5 Device information 78 9 6 Manage settings 78 10 Stopwatch application 81 11 Programmable switches application 82 11 1 Article Serial number 83 11 2 Measured values 83 11 3 Switch point settings 83 11 4 Advanced settings 84 11 5 Managing settings 85 12 SMART sensor application 87 12 1 Connecting SMART sen...

Page 5: ... 106 16 3 Repair 106 16 4 Software update 107 16 5 Changing battery 109 16 6 DC DC ground bond 110 17 Accessories 111 17 1 Sensors 111 17 2 Sensor cables 112 17 3 Other accessories 112 17 4 Spare parts 112 18 Technical data 113 18 1 Input channels 113 18 2 Programming interface 114 18 3 Supply voltage 114 18 4 Display 114 18 5 Interfaces 115 18 6 Memory 115 18 7 Technical standards 115 18 8 Ambien...

Page 6: ...erence Please note the specifications given in this documentation regarding the instrument technology were correct at the time of publishing Modifications to technical specifications illustrations and dimensions are therefore possible If you discover errors while reading the documentation or have additional suggestions or tips please contact us at HYDAC ELECTRONIC GMBH Technical Documentation Haup...

Page 7: ...r special sensors which are automatically detected by the HMG 4000 and whose parameters such as measurement values measuring ranges and measuring units can be set On the one hand there are the HYDAC HSI Sensors HYDAC Sensor Interface for the measurement of pressure temperature and flow rate for the connection of which there are 8 analogue input channels Furthermore there is the option of connectin...

Page 8: ...phone or tablet computer for the purpose of entering number values and text When taking measurements of rapid dynamic machine processes all 8 analogue input signals can be recorded simultaneously at a rate of 0 1 ms This function of course requires suitable fast sensors to be used The most impressing feature of the HMG 4000 is its ability to record the dynamic processes of a machine in the form of...

Page 9: ...able Graphics Scaling Tracker Zoom The HMG 4000 communicates with a PC via the integrated USB device interface For the subsequent easy editing display and evaluation of the measurements on a PC you can use the HMG 4000 s HMGWIN software which is included in the scope of delivery This also permits the remote control of the HMG 4000 directly from the computer The HYDAC software CMWIN is also supplie...

Page 10: ...cations The series HMG 4000 portable data recorders are maintenance free and work perfectly when used under the conditions specified If however you do encounter problems please contact your HYDAC representative Any tampering with the switch will cause all warranty claims to become null and void Compliance with European Standards The HMG 4000 series portable data recorders have the CE mark and thus...

Page 11: ...multaneously online measurement please ensure equipotential The information on the name plate must be noted Troubleshooting and repair work may only be carried out at the HYDAC Service Department All relevant and generally recognised safety requirements must be adhered to 1 7 Copyright protection The dissemination and or reproduction of this document as well as the exploitation and communication o...

Page 12: ...vent damage to the touchscreen do not use sharp or pointy objects on it and do not apply heavy pressure A few simple gestures tap stroke and drag movements as well as expanding and shrinking are all you need to operate the touchscreen Notes can be found in Chapter 4 1 Touchscreen operation ESC key To cancel an entry or go Back step by step On off button Brightness setting Touchscreen Quick press S...

Page 13: ...ature flow rate or oil condition Digital inputs blue 1 input jack for 2 digital signals Channel I J e g for frequency or speed measurements CAN bus HCSI red 1 connection jack for CAN bus and HYDAC HCSI sensors channel K Programming connection yellow 1 connection jack for programmable electronic HYDAC pressure temperature and level switches USB host for connecting slaves e g USB memory stick USB De...

Page 14: ...ead to overheating or explosion of the battery or to damage to the HMG 4000 If the battery charge is low a corresponding warning message appears on the display If the battery is completely empty the HMG 4000 cannot be switched on directly after connecting the power adapter Charge the empty battery for a few minutes first before switching the HMG on again Incorrectly connecting the power adapter ca...

Page 15: ...evice needs to be updated provided an update file is available Under certain circumstances the settings saved in the HMG 4000 may no longer be legible after installing an update Corresponding notices appear on the display before the update is executed If necessary back up this data on a PC before starting the update Connect the power adapter to the HMG 4000 in order to guarantee a safe and interru...

Page 16: ...on of the touchscreen is done with a few simple gestures tap swipe and drag movements as well as expanding and shrinking Tap Drag Expand Shrink 4 2 Display graphics setup Start button start menu Back button Display bar Battery charge status Info and help Show texts Generate screenshot Menu Command bar toolbar Display Selection field ...

Page 17: ...can access the Start menu Using the button you can access the most recently started application menu page display directly from the start menu Using the button at the top of the display bar you can always go back to the previous page in all of the menus and displays Using the button to the bottom of the menu command bar you can show or hide the information texts on the individual command buttons i...

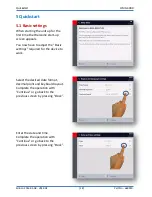
Page 18: ...rt up screen appears You now have to adjust the Basic settings required for the device to work Select the desired date format decimal point and keyboard layout Complete the operation with Continue or go back to the previous screen by pressing Back Enter the date and time Complete the operation with Continue or go back to the previous screen by pressing Back ...

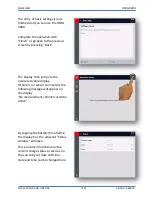
Page 19: ...pressing Back The display then jumps to the measured value display If there is no sensor connected the following message will appear on the display No measurement channel currently active By tapping the battery time field in the display bar the adjacent Status window will open This provides information on the current charge status as well as on the currently set date and time Date and time can be ...

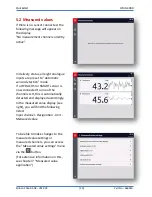
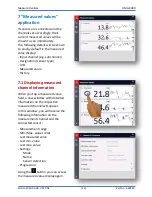
Page 20: ...detection mode If a HYDAC HSI or SMART sensor is now connected to one of the channels A H this is automatically detected and displayed accordingly In the measured value display see right you will find the following listed Input channel Designation Unit Measured value To be able to make changes to the measured value settings or measured channels you can access the Measured value settings menu via t...

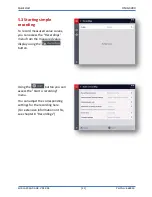
Page 21: ...o record measured value curves you can access the Recordings menu from the measured value display using the button Using the button you can access the Start a recording menu You can adjust the corresponding settings for the recording here For extensive information on this see chapter 8 Recordings ...

Page 22: ...alues Device settings Using the button you can access the most recently started application Using the button in the Further applications field additional functions or applications of the device will be shown for selection Stopwatch SMART sensors Programmable switches File manager Screenshots CAN tools If Further applications is selected this setting will remain This means that when you open the st...

Page 23: ...el Designation sensor type Unit Measured value History 7 1 Displaying measured channel information When you tap a measured value field a new window with detailled information on the respective measured channel will appear In this window you will receive the following information on the measurement channel and the connected sensor Measurement range Min Max values reset Last measured value Last min ...

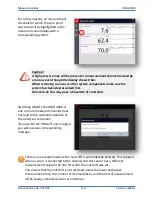
Page 24: ...value zero point You can re specify the zero point via the button This function can be used for example in order to hide any pressure heads in a system In case a pressure transducer still has for example 3 bar of pressure even when the system is switched off this value can be used as the new zero point for the display Using the button you can delete the zero shift Re zeroing can be done at any poi...

Page 25: ...do this may pose a hazard to life and limb Switching ON OFF the HMG 4000 or one or more measured channels does not lead to the automatic deletion of the newly set zero point If you switch the HMG off and on again you will receive a corresponding message There is one exception where the null shift is automatically deleted This happens when a sensor is connected to the channel and this sensor has a ...

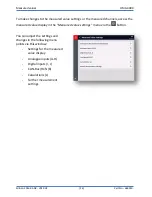
Page 26: ...measured channels access the measured value display in the Measured value settings menu via the button You can adjust the settings and changes in the following menu points via this window Settings for the measured value display Analogue inputs A H Digital inputs I J CAN Bus HCSI K Calculations L Further measurement settings ...

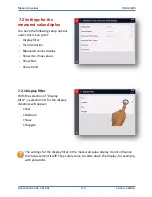
Page 27: ...nd duration Measured values display Show min max values Show bars Show trend 7 2 1 Display filter With the selection of Display filter a selection list for the display dynamics will appear Fast Medium Slow Sluggish The settings for the display filter in the measured value display do not influence the measurement itself They solely serve to settle down the display for example with pulsations ...

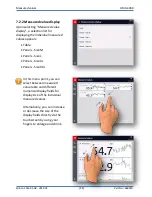
Page 28: ...easured values appears Table Panels Size M Panels Size L Panels Size XL Panels Size XXL In this menu point you can select between measured value table and different numerical display fields for display size of the individual measured values Alternatively you can increase or decrease the size of the display fields directly via the touchscreen by using your fingers to enlarge and shrink ...

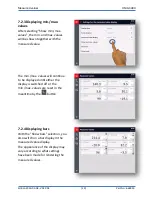
Page 29: ...measured value The min max values will continue to be displayed until either the display is switched off or the min max values are reset in the meantime by the button 7 2 4 Displaying bars With the Show bars selection you also switch on a bar display in the measured value display The appearance of the display may vary according to what settings have been made for rendering the measured values ...

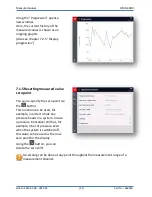
Page 30: ...ction you can also switch the trend display on and off in the measured value display You can select for which period the history should be shown You can choose from different time periods from 10 seconds to 60 minutes Different display images appear in the measured value display depending on the trend display settings ...

Page 31: ...he right beside the box you will find the sensor type e g HDA 4000 the sensor type e g analogue sensor and possibly a designation e g system pressure 7 3 1 Mode In field Mode you can set whether a HYDAC HSI or SMART sensor with automatic sensor detection or a standard analogue sensor is connected With automatic sensor detection the HMG 4000 applies all of the information and values directly from t...

Page 32: ...ch measurement channel in the Name field In this regard a new window with a keyboard layout opens Enter the desired name and save the input with Apply German umlauts will show if you press and hold the corresponding letter The designation entered is now shown in the Name field and correspondingly in the measured value display ...

Page 33: ...ind HSI 0 to 10 V and 4 to 20 mA as well as PT 100 and PT 1000 at channel H in the list You can add an additional analogue signal via the button With the button you can delete an analogue signal from the list 7 3 4 Measurement range To define the measurement range enter the corresponding values for Decimal format Lower Upper measurement area and Unit In the Unit field you can add an additional uni...

Page 34: ...s are marked with a tick Depending on the settings to the right beside the box you will find the mode and possibly a designation e g speed 7 4 1 Mode Here you can specify separately for each input in which form the digital input signal should be processed The following modes are available Digital status Frequency speed flow rate Pulse count Intervals PWM duty cycle Extended measurement Depending o...

Page 35: ...ow rate The frequency is measured in Hz and depending on the setting can be converted to speed or flow rate 1 Hz to 30 kHz With l min and USG min the K Factor must also be entered This indicates the connection between pulses and volume Pulse l or Pulse USG Frequencies under 1 Hz can be measured with Advanced measurement 7 4 4 Pulse count The pulses are counted here The measured value corresponds t...

Page 36: ...es for units The times are measured with a resolution of 1 ms Times up to 500 hours can be totalled up The total can be reset at all times 7 4 6 PWM pulse duty factor Here the ratio between the switch on and switch off times is measured The HMG records the pulse duty factor for frequences of 1 Hz to 1 kHz The value is updated with the current periodic time The pulse duty factor with frequencies un...

Page 37: ...ered with up to 9 positions in front of and 6 positions after the decimal point The update rate measurement ranges and accuracies are dependent on the basic measured procedures used One particularity is with the measurement procedure Measure frequency or Measure PWN pulse duty factor Here you can set a timeout value While the measured value jumps to 0 when measuring the simple frequency the speed ...

Page 38: ...one CAN bus system according to the selected mode The connection K CAN bus HCSI at the HMG 4000 can be operated in two different modes HCSI sensors In this mode up to 28 HCSI sensors with a total of up to 28 measurement channels can be connected to the device in order to establish an internal CAN bus system Evaluating messages This mode describes connecting up an existing CAN bus system e g in agr...

Page 39: ...nels etc This means that when setting up the bus connection one or more channel numbers must be set for each sensor in order to establish a direct reference between the physical sensor and the corresponding display in the HMG The allocated channel number remains saved permanently in the sensor The individual sensors are connected via a 5 pin M12x1 connection cable ZBE 30 and HCSI Y splitter Like w...

Page 40: ... directions is not permitted HCSI sensors Under this menu point you have a list of all of the HCSI measurement channels which are active in the HMG that is a list with all connected HCSI sensors To the left beside the corresponding channel you will find a box which you can use to switch the input on and off Active channels are marked with a tick To change the settings of the corresponding channel ...

Page 41: ... first sensor is activated and a corresponding message appears You must trigger the conflict by changing and reallocating duplicate channel numbers Handling measured values The HMG 4000 sends a measured value query via the bus After this all connected HCSI sensors send their measured value Once the HMG has received all measured values it will send the next query The refresh time of the measured va...

Page 42: ...e and model of the CAN bus system and the way it is connected If the HMG 4000 is connected to a running CAN bus system with incorrect presets this can lead to bus malfunctions bus crashes and error functions and as a result can also lead to damage to the machine to the system and to individuals In Evaluating messages mode you can access the main menu of this CAN functionality where you have the op...

Page 43: ...r may not be connected Do not switch on Switch on Message acknowledgement Message acknowledgement needs to be switched off or on depending on the application Passive monitoring do not acknowledge This setting must always be selected when the HMG 4000 is connected up to a CAN bus system so as to evaluate pre defined messages passively Active monitoring acknowledging messages To test or to commissio...

Page 44: ...ured values If you selected and activated a CAN bus channel Kn the adjacent configuration window will open Adjust all of the necessary settings one after the other according to the bus messages which need to be evaluated and displayed as a measured value Message type The HMG 4000 can evaluate the following message types General J1939 Message CANopen PDO CANopen SDO Depending on the selected messag...

Page 45: ...d decimal format Resolution Enter the value for the unit bit Offset Enter any offset there may be Frame type Select the used frame type standard extended Message ID Enter the message ID hex 0 1FFFFFFF Message format Select the used message format normal multiplex With Multiplex enter the bit position and bit length of the selector as well as the value of the selector Number display Select the used...

Page 46: ... unit and decimal format Resolution Enter the value for the unit bit Offset Enter any offset there may be Priority Enter the priority of the message 0 7 Datapage Enter the values for EDP and DP of the PGN EDP 0 DP 0 EDP 1 DP 1 PDU format Enter the value for the PDU format 0 255 PDU specific Enter the value for PDU Specific 0 255 Source address Enter the value for the source address 0 255 Bit posit...

Page 47: ...channel If no name is entered here CAN channel x will be shown as the channel name Measurement range Enter the lower and upper measurement range limit unit and decimal format Resolution Enter the value for the unit bit Offset Enter any offset there may be COB ID Enter the COB ID hex 0 3FFFFFFF Number display Select the used number representation whole number floating point number Bit position Ente...

Page 48: ...ed here CAN channel x will be shown as the channel name Measurement range Enter the lower and upper measurement range limit unit and decimal format Resolution Enter the value for the unit bit Offset Enter any offset there may be COB ID Enter the COB ID hex 0 3FFFFFFF Index Enter the index hex 0 FFFF Subindex Enter the subindex hex 0 FF Transfer direction Select the transfer direction download uplo...

Page 49: ...tual measurement channels The virtual measurement channels are always updated at 1 ms The following settings are required for calculated channels Name Formula Measurement range Name The entered name is used as the name of the measurement channel If no name is entered Formula channel X is used as the channel name with X standing for a number between 1 and 4 ...

Page 50: ...n the calculation or if one of the outlet channels has left the measurement range the measured value will be identified as invalid Unlike the mathematical rules the root of a negative number does not result in an error Instead the result corresponds to the negated root from the sum of the radians As such the result of sqrt 4 is 2 The same applies for the logarithm log ln This usually corresponds t...

Page 51: ...st In the Analogue signal list you can currently see the input signals stored in the HMG 4000 and at which input channels these are used You can add an additional analogue signal via the button With the button you can delete an analogue signal from the list 7 7 2 Unit list In the Unit list you can see the physical units currently stored in the HMG 4000 and at which input channels these are used Wi...

Page 52: ...surement unit for pressure Apply from sensor bar psi MPa If Apply from sensor is selected the corresponding unit of the sensor will be displayed If bar psi or MPa is active the measured value will be converted to the corresponding unit 7 7 5 Measurement unit for temperature Apply from sensor C F Kelvin If Apply from sensor is selected the corresponding unit of the sensor will be displayed If C F o...

Page 53: ...converted into the corresponding unit The settings in this menu always apply to all analogue measurement channels and all connected HSI sensors with automatic sensor detection This means for example that when psi is selected as the unit for the pressure sensors the measured values of all of the HSI pressure sensors connected to the HMG will be shown in psi The HSI temperature and flow rate sensors...

Page 54: ...w via the Recording menu In the measured value view tap the button in the menu command bar toolbar If there are no recordings saved in the HMG 4000 yet the adjacent screen will open If there are recordings in the HMG 4000 already these will be shown in the display correspondingly Using the button you can delete the individual saved recordings You can access the Folder settings window using the but...

Page 55: ...t in relation to the settings for the measurement rate With all recording procedures the smallest possible measurement rate which can be set depends among other things on the number of active measurement channels and is scaled as follows up to 10 active channels 100 μs 11 to 20 active channels 200 μs 21 to 50 active measurement channels 500 μs 51 to 100 active measurement channels 1 ms with calcul...

Page 56: ... will be asked whether you want to discard or save the stopped recording If you touch the button during an ongoing recording or if you press the Esc key your measurement will still continue In this event you will first be asked whether you intend to discard or save the recording after having finished your recording All recording settings including graphic settings are noted in the HMG 4000 This me...

Page 57: ...if one or more of the predefined events occur Theses are for example exceeding or not reaching a set limit value or exiting a measurement window external digital signals etc Event log The event log provides the opportunity to save measured values in the form of a table A measurement line in the table includes a timestamp and the current measured value Optionally it also contains the min and max va...

Page 58: ...ed for each connected measurement channel The measured values according to the set measurement rate are saved independent from the signal update time of the connected sensors This means that for example with a preset measurement rate of 1 ms and a signal update time of 10 ms the measured value will be saved 10 times before the signal at the input changes Maximum recording duration Under this menu ...

Page 59: ...d for each connected measurement channel The measured values according to the set measurement rate are saved independent from the signal update time of the connected sensors This means that for example with a preset measurement rate of 1 ms and a signal update time of 10 ms the measured value will be saved 10 times before the signal at the input changes Maximum recording duration Under this menu p...

Page 60: ...s that for example with a preset measurement rate of 1 ms and a signal update time of 10 ms the measured value will be saved 10 times before the signal at the input changes Maximum recording duration Under this menu point you can select a recording length of 10 seconds staggered for up to 28 days Zoom area With the zoomed area an additional display area can be created during the recording in the g...

Page 61: ... and upper measured value limit Time Enter the desired date and time The starting condition must be fulfilled in order for the recording to start End condition If there is an End condition for the measurement you can activate it by tapping on the corresponding check box The following conditions are available for this Digital input Select the corresponding digital input and enter the required switc...

Page 62: ...e limit value Measured value window Select the corresponding measurement channel and enter the history of the measured value as well as the lower and upper measured value limit Event connection You also have the option of linking events Without linking each of the four events acts alone and independently as a trigger for a measurement recording It should be borne in mind that events are always lis...

Page 63: ...ld the 15 seconds after it The 10 90 setting for example means that with a recording length of 30 seconds the 3 seconds before the event happens should be recorded as should the 27 seconds after it After the end of a recording Under this menu point you can set how you wish to proceed after the automatic ending of the recording Here you have the following options at your disposal Stop recording The...

Page 64: ...ggered for up to 28 days Additional entries Under this menu point you can set if additional time controlled entries staggered from 1 second to 24 hours should be saved in the table alongside the triggered entries Values to be recorded Under this menu point you can set if the current min and max values should be saved in the table in addition to the current measured values As soon as a new measured...

Page 65: ... and upper measured value limit Time Enter the desired date and time The starting condition must be fulfilled in order for the recording to start End condition If there is an End condition for the measurement you can activate it by tapping on the corresponding check box The following conditions are available for this Digital input Select the corresponding digital input and enter the required switc...

Page 66: ...limit value Measured value window Select the corresponding measurement channel and enter the history of the measured value as well as the lower and upper measured value limit Event connection You also have the option of linking events Without linking each of the four events acts alone and independently as a trigger for a measurement recording It should be borne in mind that events are always liste...

Page 67: ...cording starts automatically Save and repeat without limit The recording is stopped and saved while at the same time another recording with the same settings starts and is saved with a serial number This operation repeats until the recording is stopped manually Save and repeat with limit The recording is stopped and saved while at the same time another recording with the same settings starts and i...

Page 68: ...Y axis If multiple channels are being recorded simultaneously you can choose the channel or the sensor which should be displayed on the Y axis To do so click on the corresponding measurement channel over the graphic The axis is now displayed in the same colour as its measured values curve see below By ticking the corresponding selection box you can show or hide each measurement channel separately ...

Page 69: ...04 69 Part No 669950 In the menu command list toolbar you have the following options for the graphical display of the recording while it is running 8 3 1 Status You can view the current information on the running recording by pressing the button ...

Page 70: ... using the button Here you can adjust the detail settings for the graphical display Press the button to go from the graphical display back to the overall view that is in the overall time range X axis and measurement range Y axis 8 3 4 Settings You can access the View settings submenu using the button Here you can adjust the detail settings for the graphical display of the individual measurement ch...

Page 71: ...ime period X axis and measurement range Y axis in scale To the left of the Y axis you can see which measurement channel is currently scaled to the Y axis If you have recorded the measurement using more than one channel you can select the channel or sensor to be rendered in the y axis To do so click on the corresponding measurement channel over the graphic The axis is now displayed in the same colo...

Page 72: ...ollowing options for displaying and processing the recording 8 4 1 Previous Next view You can switch back and forth between the different edited views step by step using the and buttons 8 4 2 Scale You can access the Scale submenu using the button Here you can adjust the detail settings for the graphical display ...

Page 73: ... the following settings X axis Scaling over time scaling across recorded measurement channels Y axis Setting the measurement channel for scaling the Y axis Time Settings Time display Time format Lower recording limit Upper recording limit Lower display limit Upper display limit Measurement channel settings Colour in the display Current upper display limit Current lower display limit 8 4 5 Tracker ...

Page 74: ...xis you can zoom into the measurement curve in the background and move it 8 4 6 Stored views With the function you can save individually generated graphic views and open them whenever you want With the button you can add a view Using the button you can delete the individual saved views 8 4 7 Comments With the function you can enter a comment text for recording e g a description of the operating st...

Page 75: ...useful for displaying individual measured values For a simple measurement curve recording you are shown a measured values table listing the measured values of the active channels in columns and the associated recording time in rows Depending on the display settings like in the graphical display either the timestamp or the date and time will be shown for each entry In the Recording menu you can swi...

Page 76: ... 9 1 Region and language settings Under this menu point you can adjust the following settings for the display and input of texts figures and values Language Date format Decimal separators Keyboard layout 9 2 Date and time settings Under this menu point you can enter the current values for the date and time In the Motion correction field you can correct any inaccuracies in the HMG s time measuremen...

Page 77: ...ies Brightness 10 100 Automatic switch off switch off time up to 8 hours Colour scheme bright dark 9 4 Graphic settings Under this menu point you can adjust the following settings for the graphical display of recordings Background like set colour scheme always bright always dark Line strength thin thick Colour list for the display of the individual measurement channels ...

Page 78: ...iles possibly on the internal data carrier see Chapter 16 4 Software update Battery charge status Memory allocation 9 6 Manage settings All measurement channels and device settings you adjusted in the HMG 4000 for the last measurement can be saved and the reloaded at a later time for example when the same measurement needs to be repeated multiple times Furthermore you can delete specific settings ...

Page 79: ...saved settings is the General folder However you can add as many folders as you like to this folder like a reference to halls or machines for example To load saved device settings select the desired file and finish the operation with Apply 9 6 2 Delete Using the button you can delete the individual saved settings Select the settings you wish to delete a corresponding check mark will appear to the ...

Page 80: ...tact Restore delivery status All saved files settings and recordings will be deleted Select the desired function and then finish the operation with Reset or discard the operation with Cancel After resetting a corresponding message will appear for a short time or the welcome screen if you are in delivery status 9 6 4 Settings You can access the Folder settings window using the button Here you can c...

Page 81: ...watch permits the measuring of the elapsed time interim times and the times between two or more events The following functions are integrated into the menu command bar toolbar Start Starts measuring Stop Ends measuring Reset Zero points of the display Lap time Recording of interim times addition stop ...

Page 82: ...n the HMG 4000 using an M12x1 connection cable type ZBE 40 or ZBE 30 and select Establish connection from the display After establishing the connection successfully the following menu will open The content of this menu can vary depending on the device connected The following displays and functions are available in the window which opens Part serial number Measured values Switch point settings Adva...

Page 83: ...the display 11 2 Measured values In the menu point the current measured value and the switch status of the switch outputs for the connected devices will be shown 11 3 Switch point settings Under this menu point you can enter and change the values for the switch and switch back points of the available switch outputs The content of this menu can vary depending on the device connected ...

Page 84: ... sec for temperature and level Outlet 1 2 4 depending on the number of switch outlets Select the switch function for the respective switch output hysteresis function closer opener window function closer opener Unit pressure temperature level Select the unit in which the measured value of the connected sensor should be output and shown Pressure bar psi MPa Temperature C F Level cm inch Maximum valu...

Page 85: ...s the Folder settings window using the button Here you can change the defaults for sorting the files 11 5 1 Save You can save the current settings with the button Here select or create the desired target folder and enter a file name Then complete the operation with Save or discard your input with Cancel The preset standard folder for saved settings is the General folder However you can add as many...

Page 86: ...on with Apply or discard the operation with Cancel After applying the settings a corresponding message appears 11 5 3 Delete Using the button you can delete the individual saved settings Select the settings you wish to delete a corresponding check mark will appear to the edge on the right of the screen Then complete the operation with Delete or discard the process with Cancel ...

Page 87: ...ctive SMART sensor s operating instructions The following details refer to the SMART sensor HYDACLab HLB 1400 however they can apply equally to other sensors The measured value display of SMART sensors is shown in the screenshot on the right example HLB 1400 The number and content of the outlet signals and thus of the showed measured values can vary depending on the connected SMART sensor The disp...

Page 88: ...ART sensor is connected A H Address Optionally you can specify a sensor bus address a z The default setting is No address Bus addresses must be assigned when the SMART sensor is operated in a bus system This function is not described further here Establishing connection Use this button to connect the HMG 4000 with the connected SMART sensor Working offline Use this button to manage the recordings ...

Page 89: ...es the following information about the connected SMART sensor Designation of the unit Part serial number Status Information about the various measurement channels with regard to their type and measurement range 12 2 2 Measured values The actual measured values along with the associated units of measurement of the connected SMART sensor are shown here Using the button you can access the Measured va...

Page 90: ...aults for the importing of recordings 12 2 4 Settings This menu varies depending on the connected SMART sensor The possible settings presets etc can be found in the respective instruction manual of the SMART sensor being used 12 2 5 Managing settings All device settings can be saved and loaded again at a later time You can save the current settings with the button You can delete the individual sav...

Page 91: ...ngs This menu enables you to assign a bus address to a sensor Here select a value from the list Complete the operation with Apply or discard the process with Cancel Bus addresses must be assigned when the SMART sensor is operated in a bus system This function is not described further here ...

Page 92: ...r specifications need to be adjusted for the HMG 4000 according to the type and model of the CAN bus system and the way it is connected If the HMG 4000 is connected to a running CAN bus system with incorrect presets this can lead to bus malfunctions bus crashes and error functions and as a result can also lead to damage to the machine to the system and to individuals The CAN tools application is m...

Page 93: ...CAN bus system at the end of the bus line as the last participant rather than using a branch line If the HMG 4000 is connected using a branch line the internal load resistor may not be connected Do not connect Connect Message acknowledgement Message acknowledgement needs to be switched off or on depending on the application Passive monitoring do not acknowledge This setting should always be select...

Page 94: ...o date with current message traffic According to the presets you can view all or just individual messages T Sent messages R Received messages S Status values Warning CAN messages Bus errors Passive Status messages Use the button to reset the messages list Using the button you can delete the settings for displaying mode or sorting order Use the button to store the current messages list as a file Af...

Page 95: ...the setting Cyclical Transmission is not selected you can send the message manually by tapping on the corresponding message line Using the button you can display a summary of the current messages list information 13 2 2 Stored messages In this menu point you can manage the messages lists stored in the HMG 4000 Using the button you can mark and delete the saved lists You can access the Folder setti...

Page 96: ...hapter 15 File Manager First select the corresponding communication log and enter the node ID of the participant Open Using this function you can specifically select the EDS file of the participant Tap to open the corresponding field It may be the case under certain circumstances that individual EDS files from different manufacturers cannot be processed Search This function is only available to HY...

Page 97: ... entered manually and correspond to the data from parameter 1018 13 2 5 Network Management With the Network Management NMT function you can specify the global services of the network management Included in this is the starting and stopping of individual participants during operation and the management of emergency situations You can assign the following statuses to one of the participants or all o...

Page 98: ... CANopen or J1939 devices of the HYDAC ELECTRONIC GMBH In this respect only one device without an active load resistor may be connected to the HMG 4000 The values currently set in the device for node ID and baud rate as well as the device status and configuration do not have to be known for the search to function All information is read out using the search function of the HMG 4000 After tapping C...

Page 99: ... device is found detected you can change the node ID and baud rate according to the requirements After tapping Continue the connected device is configured with the changed settings Then finish the operation with Finish or tap on Back to make further changes to the connected device ...

Page 100: ...a screenshot on the display quickly tap the corresponding file In display mode you can use the and buttons to swipe back and forth between saved screenshots You can select and delete saved screenshots using the button You can access the Settings window using the button Here you can change the defaults for sorting the files as well as the storage location and file names ...

Page 101: ...ttings parameter sets etc 15 1 Working with the file manager The device has an internal data carrier and a USB host interface for an external data carrier USB memory stick After starting the file manager the selection of internal memory HMG or of external memory USB will appear provided an external device was detected If there is no USB memory stick inserted the HMG folder will show up straight aw...

Page 102: ...like in Explorer In this regard you can avail of the following tools from the menu command list Select all Remove all selections Delete Copy Move Rename New folder To open a folder tap on the corresponding field To edit a folder or file select the corresponding line by tapping the box to the right a tick will appear To remove the selection tap on the box again the tick disappears ...

Page 103: ...folders Exception Updates Here the files are saved directly to the folder CanTools folder EDS General subfolder 1 Subfolder 2 Subfolder n Traces General subfolder 1 Subfolder 2 Subfolder n Recordings folder General subfolder 1 Subfolder 2 Subfolder n Updates folder Update file 1 Update file n In each folder you can create up to 1000 subfolders each with up to 10000 files in order to for example cr...

Page 104: ...manager evaluates just the first 55 characters of folder and file names Longer names will be shortened Files which are larger than 2 GB will also not be shown In normal applications just 31 characters are allowed for folder and file names Here a timestamp or serial number is attached as a postfix to the entered name ...

Page 105: ... copy insert rename and delete files among other things During an active connection to the PC the HMG 4000 will switch to PC mode In this mode only the current measured values and depending on the setting the history and min max values will be displayed consecutively It is not possible to operate the HMG 4000 in PC mode In this status the touchscreen and operating keys are non functioning If the H...

Page 106: ...bborn contamination you can also use a mild household cleaner Make sure no dampness gets into the device 16 2 Maintenance Calibration The series HMG 4000 portable data recorders are maintenance free and work perfectly when used under the conditions specified see technical data However we recommend having the device calibrated at regular intervals Depending on usage and area of operation cyclical c...

Page 107: ... Updates Multiple update files can be saved to the device at the same time If one or more update files are saved to the HMG 4000 the adjacent window will open Select the desired update file It is possible to save multiple update files and thus different software versions to the HMG 4000 Under certain circumstances it may be necessary to install an older version than the currently installed softwar...

Page 108: ...4000 is not connected to the power and the battery charge is too low the adjacent message will appear In this case the software update may only be started if the HMG 4000 is connected to the power After confirmation with Continue the software update will begin Here the adjacent message will first appear Then complete the operation with Start or discard the process with Cancel The HMG 4000 will res...

Page 109: ...Move the battery compartment cover downward over and past the block Loosen the connection plug of the battery pack Connect up the new battery pack slide the battery compartment cover into the guide until it snaps into place and reattach the cover with the fixing screw The battery cannot be disposed of in the residual waste Send the battery pack for recycling of old batteries ...

Page 110: ... measuring with connected power supply units In this case you have the opportunity to bridge the galvanic separation by inserting a speedy 100 mA micro fuse included in the scope of delivery into the intended holder in the battery compartment of the HMG 4000 This creates a ground connection between the power supply of the power supply unit and the internal power supply for the sensors eliminating ...

Page 111: ... 925305 0 100 bar HDA 4748 HC 0100 000 Mat no 925299 0 160 bar HDA 4748 HC 0160 000 Mat no 925286 0 250 bar HDA 4748 HC 0250 000 Mat no 925304 0 400 bar HDA 4748 HC 0400 000 Mat no 925303 0 600 bar HDA 4748 HC 0600 000 Mat no 925301 0 1000 bar HDA 4748 HC 1000 000 Mat no 925300 Temperature measuring transducer with HSI interface 25 to 100 C ETS 4148 H 006 000 Mat no 923398 HCSItemperature measurin...

Page 112: ... pin 2m Mat no 6040852 17 3 Other accessories Case for HMG 4000 and accessories Mat no 6179836 ZBE 31 car battery charger for HMG 2x 3x 4x Mat no 909739 HCSI Y splitter Mat no 6178196 HCSI bus termination Mat no 6178198 ZBE 46 Pin adapter HMG for three wire signals AS Mat no 925725 ZBE 100 adapter for TFP 100 Mat no 925726 ZBE 38 Y adapter black for jack I J Mat no 3224436 ZBE 26 Y adapter blue fo...

Page 113: ...f respective input range end value Examples Sensor signal 0 5 V Input range 0 10 V Sensor signal 0 15 V Input range 0 50 V 1 with PT 100 PT 1000 18 1 2 Digital inputs Quantity 2 channels via one M12x1 Ultra Lock flanged jack 5 pin Description Channel I J Input signals Digital status high low Frequency 0 01 30 000 Hz PWM duty cycle Level Switching threshold switch back threshold 2 V 1 V Max input v...

Page 114: ... 8xx F31 ExS 3000 F31 AS 3xxx F31 HPG P1 000 18 3 Supply voltage Power supply 9 36 V DC via standard round plug 2 1 mm Battery Lithium Nickel Cobalt Aluminium Oxide 3 6 V 9300 mAh Charging status System monitored LED display Green Battery charged Orange Charging Red Error status Battery charging time approx 5 hours Service Life without sensors approx 11 hours with 2 sensors approx 9 hours with 4 s...

Page 115: ...ard 2 0 USB High speed Transmission rate 480 Mbit s Voltage supply 5 V DC Power supply 100 mA max Protection Short circuit protection against GND 0 V 18 6 Memory Main processor 2 MB Flash on board 260 kB internal RAM External memory 64 MB SDRAM Measured value memory 16 GB for min 500 measurements each containing 8 Million measured values 18 7 Technical standards EMC IEC 61000 4 2 3 4 5 6 8 Safety ...

Page 116: ...urement channels Socket Colour Chann el Pin 1 Pin 2 Pin 3 Pin 4 Pin 5 A G black A G UB n c Signal GND HSI H black H UB n c Signal GND HSI n c PT 100 Force PT 100 Sense PT 100 GND n c I J Blue I J UB Digital IN I Digital IN J GND n c CAN HCSI red K n c UB GND CANH CANL P yellow UB n c GND Q C n c ...

Page 117: ... Connection of slaves USB memory stick USB Slave Max 480 Mbit s USB High speed PC interface 18 9 3 Power supply Socket Connection Function DC IN UB 0 V Round plug 2 1 mm JEITA RC 5320 A Supply voltage 9 36 V 18 10 Dimensions and weight Dimensions approx 285 x 189 x 87 mm B x H x T Weight approx 1 850 g Housing material Plastic Elastollan R 3000 TPU GF ...

Page 118: ..._________________________________________ ____________________________________________ ____________________________________________ ____________________________________________ ____________________________________________ ____________________________________________ ____________________________________________ ____________________________________________ ___________________________________________...

Page 119: ..._________________________________________ ____________________________________________ ____________________________________________ ____________________________________________ ____________________________________________ ____________________________________________ ____________________________________________ ____________________________________________ ___________________________________________...

Page 120: ... Service HYDAC SERVICE GMBH Hauptstr 27 D 66128 Saarbrücken Germany Phone 49 0 6897 509 1936 Fax 49 0 6897 509 1933 NOTE The information and particulars provided in this manual apply to the operating conditions and applications described herein For applications and operating conditions not described please contact the relevant technical department If you have any questions suggestions or encounter...

Reviews: