6
English
Heater for external canister filters
HEATER is the first aquarium heater that works outside of the aquarium tank. We would like to congratulate you on choosing HEATER, and invite you to
read the following instructions carefully, to better understand the characteristics that make HEATER a unique product.
Description
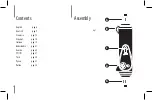
A.
Tube connector
B.
HEATER hanging eyelet
C.
Water flow indicator
D.
Temperature control knob
Installation
Caution
: Before placing your hands in the tank, disconnect all electrical appliances. Be sure that the voltage of the mains corresponds to the voltage shown on the heater label.
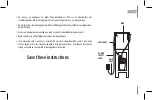
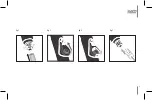
HEATER must be installed outside of your tank by cutting the outlet tube of the external filter, and by connecting the two parts of the tube onto both sides of the HEATER
-fig.
2-
. If the external filter is already installed, it is important to shut off the valve taps, to empty out all the water that it contains, before cutting the outlet tube. The presence of
air bubbles inside the heating unit can cause irreversible damages. Make sure that HEATER is installed in a vertical position and follow the flow direction of the water that is
indicated on the heater’s body with an arrow.
-fig. 3-
Reactivate the aquarium’s water circulation and connect the new heating system to the mains. After the first 24 hours of
operation it is advisable to check all connections are tight.
Temperature setting
To set the required temperature in your aquarium, turn the temperature control knob (D) until the indicator on the heater’s body shows the chosen value on the scale
-fig. 4-
.
You can set the temperature required between 18°C and 34°C (65°F - 93°F). Should the water temperature of your aquarium turn out to be lower than the value set on the
graduated scale, HEATER will start heating automatically and the indicator will turn on.


