


8
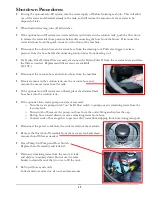
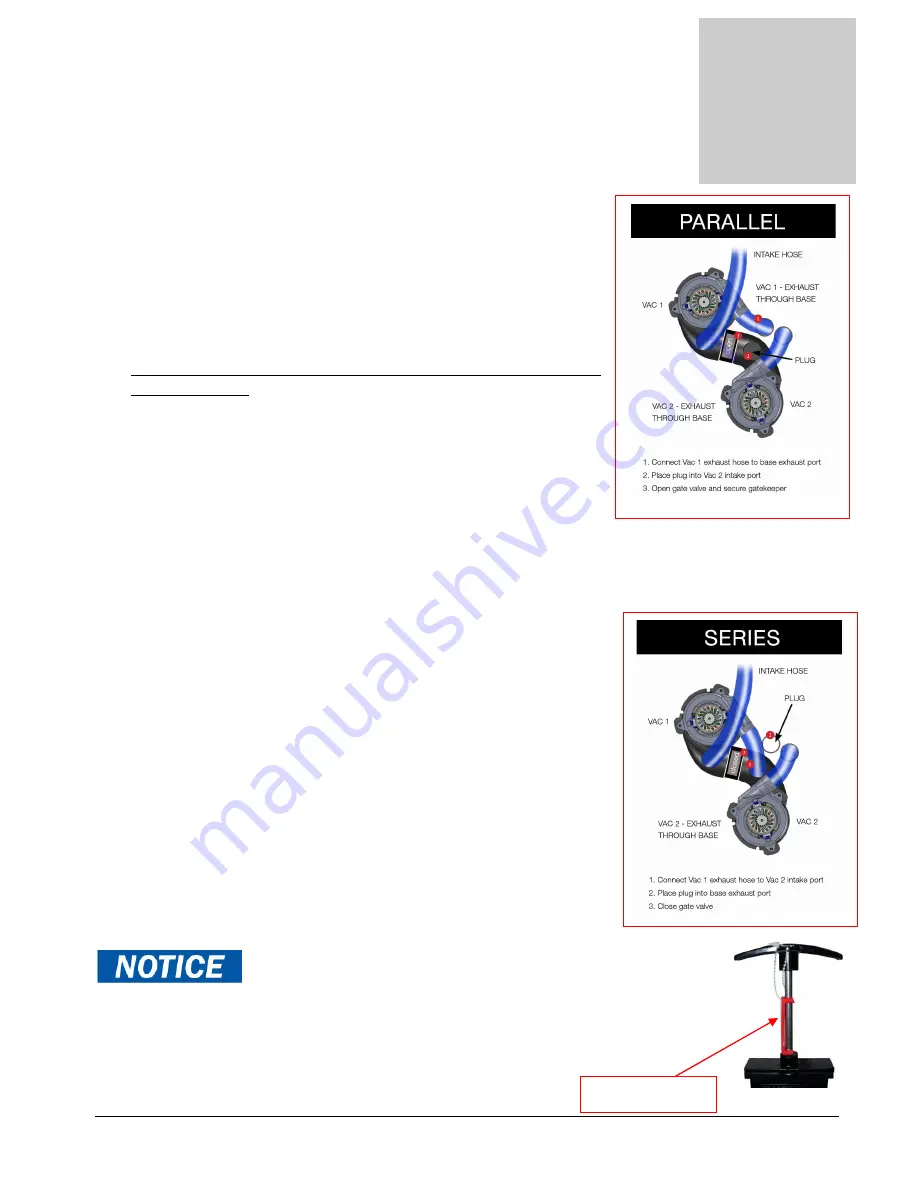
Vacuum Connections
The MXE-200E has a unique vacuum system which allows you to
connect your vacuums in either parallel or in series. Vacuum
connections can be changed quickly, with only a screw driver.
∗
THIS MUST BE PERFORMED BY A QUALIFIED
TECHNICIAN
While there is debate on which vacuum alignment provides the best
extraction, this much is true:
•
Two vacuums in series: The vacuum lift is increased by 1.6 times
the rating of a single vacuum, while the air flow stays the same as
a single vacuum.
•
Two vacuums in parallel: The vacuum air flow is increased by 2.0 times the rating of a single vacuum,
while the lift says the same.
Air flow is usually measured in cubic feet per minute, indicated as CFM.
Lift is usually measured in inches of water column, indicated as “H2O or “WC.
To connect vacuums in parallel:
1.
Connect the discharge / exhaust hose from vacuum #1 to the exhaust
pipe on machine base.
2.
Place the rubber stopper into the vacuum inlet port of vacuum manifold
number two.
3.
Open vacuum gate valve and attach the Gatekeeper to prevent
accidental valve closure.
When connected in parallel, both vacuums must be running during cleaning.
Vacuums cannot be operated individually.
To connect vacuums in series:
1.
Connect the discharge / exhaust hose from vacuum #1 to the vacuum
inlet port of vacuum manifold number two.
2.
Place rubber stopper into the exhaust pipe on machine base.
3.
Remove Gatekeeper and close vacuum gate valve.
When connected in series vacuums can be operated individually if desired during cleaning.
Always secure the Gate Valve Open with the
Gatekeeper when connecting the vacuums in Parallel. Closing
the Vacuum Gate Valve with the hoses connected in the
Parallel configuration may cause damage to Vacuum
#2.
Section
2
GATEKEEPER
Summary of Contents for Nautilus Extreme MXE-200E
Page 1: ...1 LMANN08 Revised 01 29 2015 Nautilus MXE 200E Operating Manual EXTREME ...
Page 37: ...37 OPTIONAL AUTO FILL FLOAT VALVE ASSEMBLY NM5740 ...
Page 38: ...38 Pump Out Pump PARTS ASSEMBLY ...
Page 39: ...39 1 4 4 6 7 8 9 10 11 3 3 8 9 12 8 9 39 8 9 2 2 5 ...
Page 49: ...49 92 91 95 94 112 13 14 14A 104 105 1 39 PUMP OUT CONNECTIONS ...
Page 50: ...50 124 34 36A 78 34 36A 123 39 127 128 129 2 1 125 32 123 119 39 130 ...


