background image

Page 10

PowerCut 5-85OT USER MANUAL EDITION II 2017-09-08

6. Maintenance

WARnInG!

When doing maintenance on the machine do always make sure that the machine is unplugged from 
the electrical net, pneumatic and do always press down the emergency switch. Taking these safety 
measurements ensures that no electrical tension is supplied to the machine that could make it start. 
Do always use protecting gloves when changing cutting blade. Do always use protective clothing and 
protective shoes to make certain that no injuries will happen if dropping the cutting blade on the 
body or feet. 

6.1 Replacing the cutting blade

1.

 Unplug the machine and press down the emergency switch.

2.

 Open the lid on the left side of the machine stand and 

open the front hatch.

3.

 Loosen the socket set screws and the socket head cap screws, 

outer carrier behind the lid. 

4.

 Dismantle the old blade and assemble a new one. Only use by

hydroscand Machine recommended cutting blades.

5.

 Assemble the centre socket head screw tightly;

torque 80 Nm. Tighten the two socket set screws to 
secure the cutting blade.

6.

 Reassemble the lid and the front hatch. Make sure that all screws are

severally tightened. The correct torque to use is 24 Nm. Use a torque
wrench to be sure the screws are correct tightened.

New cutting blades must be used with reduced speed 
for the feeding at about 200 cut. When the running-in 
has been done the cut can be performed at normal speed. 
As a basic rule the blade should never be overheated.
If excessive smoke or heat is generated or if the motor stalls
the cut sequencemust be interrupted immediately and the 
cause found.

Lid

Front hatch

Summary of Contents for PowerCut 5-85ot

Page 1: ...PowerCut 5 85ot UseR MAnUAL edition II 2017 09 08 serial number _________________...

Page 2: ...2 description 6 8 5 Starting up 9 10 5 1 Operator position 9 5 2 starting up 9 5 3 cutting 9 10 6 Maintenance 10 11 6 1 Replacing the cutting blade 10 6 2 After each working shift 11 6 3 regular maint...

Page 3: ...t examine in depth the topics of disassembly and extraordinary maintainance as these operations must always be carried out by our authorized Technical Service To handle the machine properly it is nece...

Page 4: ...make sure that the cutting blade rotates in the correct direction see rotation arrow and that the hose is placed steady towards the adjustable cutting support Also make sure that the hose is held ste...

Page 5: ...reement according to CE standards 3 1 Warranty The cutting machine is guaranteed for one 1 year following the date of purchase the war ranty is valid only if all of the instructions listed on the warr...

Page 6: ...machine consists of one unit equipped with a pneumatic cylinder which is manouvered by a foot pedal and flap doors that are pressed down by the hose during the cutting process The unit is also equippe...

Page 7: ...Page 7 PowerCut 5 85OT USER MANUAL EDITION II 2017 09 08 PowerCut 5 85OT USER MANUAL EDITION II 2017 09 08 1 2 3 4 7 11 10 9 14 8 6 5 12 13...

Page 8: ...s stopped at specified levels to prevent it from doing full return strokes when not necessary 12 The Front hatch The front hatch is operated by a pneumatic cylinder located at the top of the machine T...

Page 9: ...hen cutting hoses with outer diameters exceeding 2 make sure that the pre bend help system is working properly When the machine has started ensure that the direc tion of rotation of the cutting blade...

Page 10: ...and the socket head cap screws outer carrier behind the lid 4 Dismantle the old blade and assemble a new one Only use by hydroscand Machine recommended cutting blades 5 Assemble the centre socket head...

Page 11: ...ncy stop button Remove cutting residue Reset the counter 6 3 Regular maintenance Check the cutting blade for errors and that it is securely tightened Open the waste box and remove cutting waste Empty...

Page 12: ...R PowerCut 5 75 400V 3 phase 9010 00 00 SPARE PARTS PART NUMBER Cutting blade HSM 520x4x38 Smooth 9005 00 05 Cutting blade HSM 520x4x38 Toothed 9005 00 06 Adapter ring 50x38 9005 01 04 Smoke evacuatio...

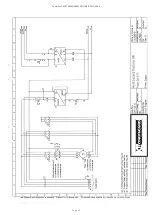
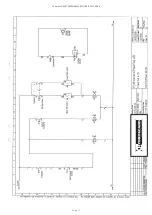
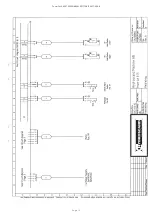
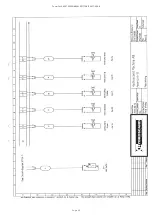
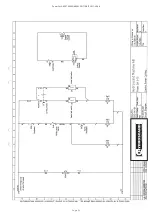
Page 13: ...Page 13 PowerCut 5 85OT USER MANUAL EDITION II 2017 09 08 8 1 A1 Wiring diagram Y D starter...

Page 14: ...Page 14 PowerCut 5 85OT USER MANUAL EDITION II 2017 09 08...

Page 15: ...Page 15 PowerCut 5 85OT USER MANUAL EDITION II 2017 09 08...

Page 16: ...Page 16 PowerCut 5 85OT USER MANUAL EDITION II 2017 09 08...

Page 17: ...Page 17 PowerCut 5 85OT USER MANUAL EDITION II 2017 09 08...

Page 18: ...Page 18 PowerCut 5 85OT USER MANUAL EDITION II 2017 09 08...

Page 19: ...Page 19 PowerCut 5 85OT USER MANUAL EDITION II 2017 09 08...

Page 20: ...Page 20 PowerCut 5 85OT USER MANUAL EDITION II 2017 09 08...

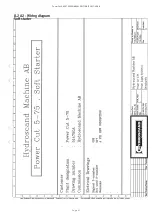
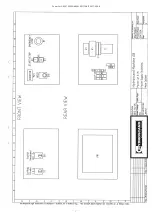
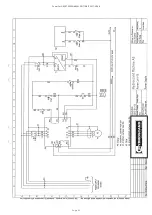
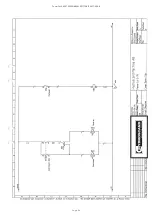
Page 21: ...Page 21 PowerCut 5 85OT USER MANUAL EDITION II 2017 09 08 8 2 A2 Wiring diagram Soft starter...

Page 22: ...Page 22 PowerCut 5 85OT USER MANUAL EDITION II 2017 09 08...

Page 23: ...Page 23 PowerCut 5 85OT USER MANUAL EDITION II 2017 09 08...

Page 24: ...Page 24 PowerCut 5 85OT USER MANUAL EDITION II 2017 09 08...

Page 25: ...Page 25 PowerCut 5 85OT USER MANUAL EDITION II 2017 09 08...

Page 26: ...Page 26 PowerCut 5 85OT USER MANUAL EDITION II 2017 09 08...

Page 27: ...Page 27 PowerCut 5 85OT USER MANUAL EDITION II 2017 09 08...

Page 28: ...90180066 90190019 90190069 90180426 W17320110125 W0952022180 1130160080CP 9041301 2100630050CP 1130160125CP 9061316 7072030130 7072030110 5612B442 Z3190311150 0227301201 0227301500 Cylinder 80 S125 In...

Page 29: ...23 QTY Material Date Part name Drw No Scale Approved by Drawing size Rev No Revision information Checked date Drawn by Rev Part no 1 8 A3 NH For measures without tolerances ISO 2768 mk is applied Gen...

Page 30: ...Height adjustment plate PC 1 29 90180017 D003060 Slip on flange 1 30 90180008 T0178 Air outlet ESNU 100 1 31 90184042 T0574 Plug 80x25 2 32 90184110 D003149 Scrap Funnel 1 33 90184111 D003150 Lock pla...

Page 31: ...without tolerances ISO 2768 mk is applied General surface finish is ra 3 2 Sharp edges broken Weight KG 347 46 2 2016 10 06 S003041 Powercut 5 75 ED II Sign THE INFORMATION CONTAINED IN THIS DRAWING I...

Reviews: