background image

Top right side panel 

1

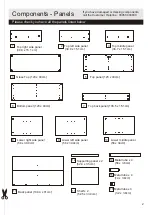
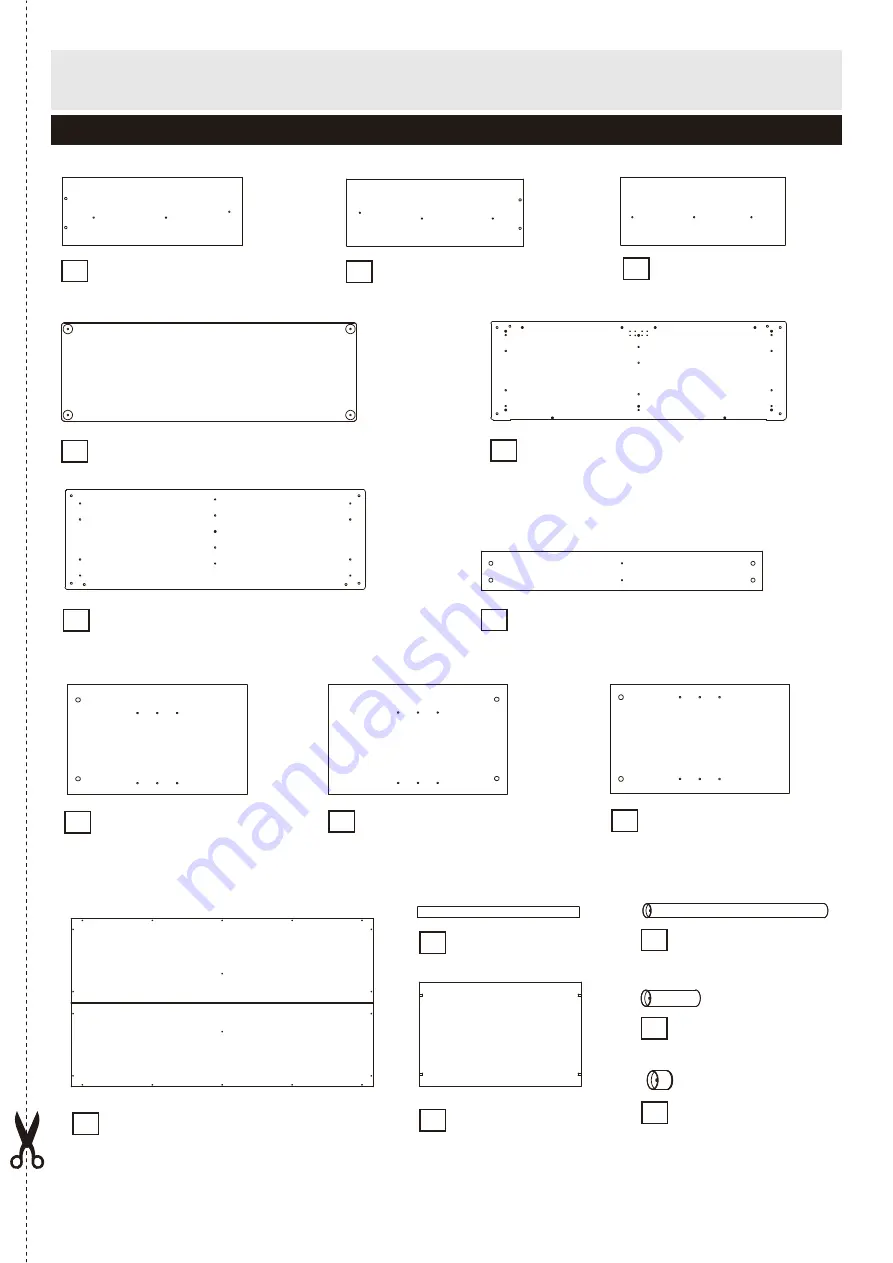
Components - Panels

Please check you have all the panels listed below

2

If you have damaged or missing components, 

call the Customer


Helpline

03456


400800

(

39

.

9 x 15

.

1 cm

(

39

.

9 x 15

.

1cm

2 Top left side panel 

3 Top middle panel 

(

36

.

7 x 15

.

1cm

4

Glass Top (120 x 40cm) 

5

Top panel (120 x 40cm) 

6

Bottom panel (120 x 40cm) 

7

Top back panel (106.5 x 15.1cm) 

8

Lower right side panel  

(

58 x 39

.

9cm

)  

9 Lower left side panel  

(

58 x 39

.

9cm

)  

10


Lower middle panel

(

58 x 34cm

)  

11


Back panel 

(

109

.

4 x 61cm

)  

13


Shelf x 2   

12


Supporting panel x 2   

 (

52

.

4 x 3

.

5cm

)   

14


Metal tube x 4   

 (

58 x 3

.

8cm

)   

15


Metal tube x 4   

 (

14 x 3

.

8cm

)   

 (

52

.

5 x 33

.

9cm

)   

16


Metal tube x 4   

 (

3

.

2 x 3

.

8cm

)   

Summary of Contents for 614/2151

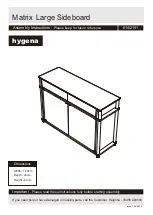
Page 1: ...Sideboard Assembly Instructions Please keep for future reference 614 2151 Important Please read these instructions fully before starting assembly If you need help or have damaged or missing parts call...

Page 2: ...mp cloth and mild detergent do no use bleach or abrasive cleaners From time to time check that there are no loose screws on this unit This product should not be discarded with household waste T ake to...

Page 3: ...el 3 Top middle panel 36 7 x 15 1cm 4 Glass Top 120 x 40cm 5 Top panel 120 x 40cm 6 Bottom panel 120 x 40cm 7 Top back panel 106 5 x 15 1cm 8 Lower right side panel 58 x 39 9cm 9 Lower left side panel...

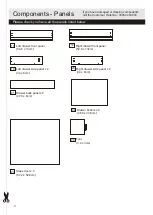
Page 4: ...the Customer Helpline 03456 400800 17 Left drawer front panel 52 8 x 13cm 18 Right drawer front panel 52 8 x 13cm 19 Left drawer side panel x 2 34 x 8cm 20 Right drawer side panel x 2 34 x 8cm Drawer...

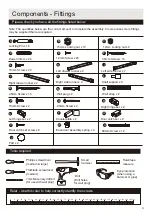
Page 5: ...may be supplied than are required 0 5 10 15 20 25 30 35 40 45 50 55 60 65 70 75 80 85 90 95 100 105 110 115 120 125 130 135 140 145 150 155 160 165 170 Left drawer runner x 2 12mm Screw x 20 I Left s...

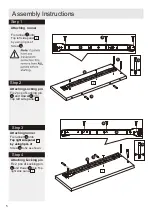
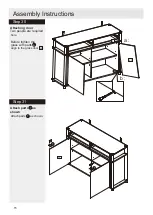
Page 6: ...shown 1 D A E A A A D E 1 2 I K Attaching runner Top left side panel by using 3 pcs of Screw I 2 G Step 2 Attaching Locking pin Fix 2 pcs of Locking pin A Step 3 2 Top right side panel by using 3 pcs...

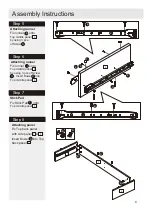
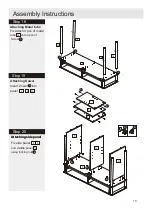
Page 7: ...le panel K by using 3 pcs G Attaching runner Fix runner onto Top middle panel by using 3 pcs of Screw E I G Step 5 Step 7 Stick Pad Fix Stick Pad onto Top middle panel Y Step 5 Step 8 3 Insert Dowel i...

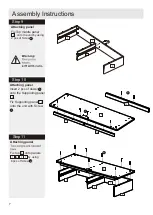
Page 8: ...x Top middle panel onto the unit by using 2 pcs of Screw 3 M Step 3 Step 10 Attaching panel Insert 2 pcs of dowel onto the Supporting panel Step 3 Step 11 Attaching panel 12 Fix top onto panels by usi...

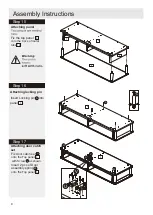
Page 9: ...Step 12 4 4 X 4 4 4 15 Assembly Instructions Fix 4 pcs of Screw onto glass top Attaching Screws 4 X Step 4 Step 13 Attaching Metal tube Fix 4 pcs of metal tube 15 onto the Screw X Step 4 Step 14 Atta...

Page 10: ...ng panel Fix the top panel onto the 4 pcs of metal tube 5 15 Step 16 Attaching locking pin Insert Locking pin into A 5 Step 17 Attaching door catch set Fix door catch set onto the Top panel with Screw...

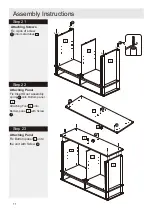
Page 11: ...ttaching Metal tube Fix attach 4 pcs of metal tube onto 4 pcs of Screw 14 Step 20 Attaching side panel Fix side panel 8 9 10 4 14 4 14 X X X X Step 19 Attaching side panel and middle panel 8 9 10 X At...

Page 12: ...ching Screws Fix 4 pcs of screw onto metal tubes X 4 14 Step 22 Attaching Panel Fix Insert Door assembly spring onto Bottom panel W W W 4 24 X X 4 8 4 10 4 9 4 6 Attaching Foot onto 4 24 Bottom panel...

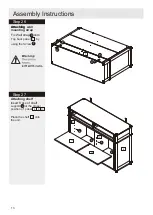
Page 13: ...ructions Assembly Instructions Step 24 12 4 6 4 16 4 11 G Attaching Metal tube Screwing metal tube 4 16 4 6 4 16 4 6 Step 25 Attaching back panel Fix back panel this unit by using Screw G onto panel 1...

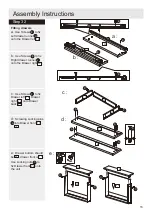
Page 14: ...P L L L L 13 13 13 Attaching wall Fix Wall strap onto Attaching mounting strap O Top back panel by using the Screw Step 27 Insert 8 pcs of shelf Attaching shelf support at the proper position of pane...

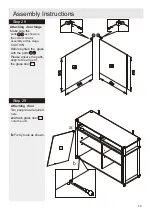
Page 15: ...re the parts as shown is S the correct one for assembly at this stage R CAUTION Before tighten the glass with the parts Please ensure the parts S R align to the edge of the glass door 23 2 3 Attaching...

Page 16: ...bly Instructions Step 30 15 a 5 2 3 23 2 3 b Step 31 Attaching door Before tighten the glass with parts S align to the glass door Two people are required here 23 2 3 Attach parts as shown Attach parts...

Page 17: ...ight onto Drawer back H J H E 19 b Use Screws to fix Right drawer runner onto the Drawer right E J 20 c F 19 20 21 d d Screwing Locking pins c into Drawer front A 17 e e Drawer bottom should be drawer...

Page 18: ...Assembly Instructions Step 33 17 17 18 Fitting drawers Sliding 2 drawers into the unit as shown 17 18...

Page 19: ...the unit in the intend position b Drill a hole in the wall at an appropriate position and insert Wall plug To secure the unit fix Wall strap to the wall using Screw O N Q Note It would be useful to a...

Page 20: ......

Reviews: