background image

5

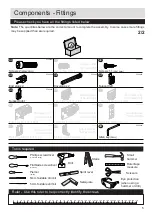
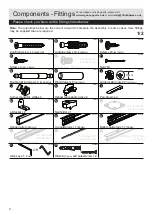
Screw x 11 

(3.5x16mm)

AC

ZF9995J

Euro screw x 24 

(6.3x12.5mm)

AB

ZF9995G

Screw x 2


(M6x20mm)

AA

ZF9995M

Support left

AF

ZF9995P

End stop x 2

AD

ZF9995K

Top roller back door left 

AH

ZF9995C

Top roller back door right 

Covercap x 2

AE

ZF9995L

Top roller front door left

AK

ZF9995B

Mounting plate guide x 4

AL

ZF9995F

AI

ZF9995D

Top roller front door right

AJ

ZF9995A

A

2/2

Please check you have all the fittings listed below

Components - Fittings

Note: 

The quantities below are the correct amount to complete the assembly. In some cases more fittings 

may be supplied than are required.

Ruler - Use this ruler to help correctly identify the screws

Tools required

0

5

10 15 20 25 30 35 40 45 50 55 60 65 70 75 80 85 90 95 100

110 115 120 125 130 135 140 145 150 155 160 165 170

105

Phillips screwdriver 

(medium & large)

Flatblade screwdriver 

Small 

hammer
Ruler/tape 

measure

Drill

Eye protection 

(when using a 

hammer or drill)

5mm Suitable drill bit 

5mm Suitable drill bit 

0

10

20

30

40

50

60

70

80

90

100

110

120

130 140

150

0

1

2

3

4

5

6

Stairs

Piercer

Scissors 

(medium)

(small)

Spirit level

Setsquare 

Support right

AG

ZF9995Q

Bottom guide back door x 2

AM

ZF9995H

Bottom guide front door x 2

AN

ZF9995E

Allen key 

(5mm)

AO

ZF9995U

Not used until

door assembly

Not used until

door assembly

Not used until

door assembly

Not used until

door assembly

Not used until

door assembly
Not used until

door assembly
Not used until

door assembly

Not used until

door assembly
Summary of Contents for 805/3877

Page 1: ...1 OAK MIRROR doors 814 9767 WAL MIRROR doors 826 7508 HG WHT MIRROR doors Doors foil foil Mirror doors Dimensions Width 180cm Depth 59 5cm Height 199 8cm Issue 1 18 12 17 HG doors 806 5872 826 7508 80...

Page 2: ...llowed Make sure you have enough space to layout the parts before starting Do not stand or put weight on the product this could cause damage Assemble the item as close room as possible Assemble on a s...

Page 3: ...973 Foldy back x2 194 x 89cm 4 Top bottom x2 177 x 51cm 5 P1896 Shelf x2 87 7 x 48 8cm 6 P1898 Plinth x2 177 x 5 2cm 7 P7245 For damaged or missing parts please visit www argos support co uk or email...

Page 4: ...Q PM1731 Bottom guide rail x 1 1768mm R PM1727 Hanger rail x 2 P PM182830 869mm Brush x 3 1952mm T PM1619D Door trim x 1 1952mm U PM1619C Door handle x 3 1952mm S PM1619B Wall plug 6mm and parkerscre...

Page 5: ...ify the screws Tools required 0 5 10 15 20 25 30 35 40 45 50 55 60 65 70 75 80 85 90 95 100 110 115 120 125 130 135 140 145 150 155 160 165 170 105 Phillips screwdriver medium large Flatblade screwdri...

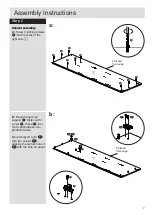
Page 6: ...nstructions Step 1 Cabinet assembly b Mount hanger rail support K fasten with 1 screw D Screw D into the board between two predrilled holes Mount Support left f with two screws c aligning the bottom h...

Page 7: ...B into the holes of the right side 2 b Mount hanger rail support K fasten with 1 screw D Screw D into the board between two predrilled holes Mount Support right g with two screws c aligning the botto...

Page 8: ...screw D 1x Screw D into the board between two predrilled holes 3 a b c 180 Assembly Instructions Step 3 Cabinet assembly a Mount hanger rail support K on the upright 3 fasten with screw D Screw D into...

Page 9: ...is pointing towards the hole in the edge of the top 5 Step 6 Insert 6x Large locking nuts I into the shelf 6 2x Make sure the arrow on I is pointing towards the hole in the edge of the bottom 6 Insert...

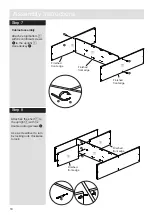
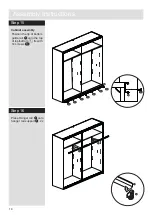
Page 10: ...f 6 to the upright 3 with 3x double locking screws G Use a screwdriver to turn 6x locking nuts clockwise to lock Assembly Instructions Step 7 Step 8 Cabinet assembly 10 Finished front edge Finished fr...

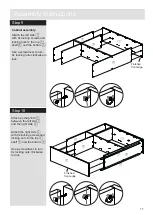
Page 11: ...p 5 shelf 8 and the bottom 6 Use a screwdriver to turn 9x locking nuts clockwise to lock Attach 2x the plinth 7 between the left site 1 and the right side 2 Attach the right side 2 with 9x locking scr...

Page 12: ...correct distance as you secure the 2x foldy back 4 Nails F should be spaced about 150mm apart Stand up the unit 2 people required to stand up unit Important Cabinet MUST be square when back is attach...

Page 13: ...ith the ends fitting into support left f and support right g Fix top guide Q rail with 7x screws C to the top bottom 5 Insert covercap e into slots of top guide rail Q Attach End stop d to covercap e...

Page 14: ...ructions Step 15 Step 16 Place Hanger rail P onto hanger rail support K 2x 14 Cabinet assembly Position the lip of bottom guide rail R onto the top of top bottom 5 fix with 7x screws c c c c c c c c c...

Page 15: ...please see last page for more information a Before fixing the unit to the wall use a spirit level to check if the base of this unit is level front to back and side to side in the three positions shown...

Page 16: ...ing From time to time check the tting to ensure the wall plugs or screws do not become loose You can use one of the following types of wall plug if your walls are made of brick breeze block concrete s...

Reviews: