background image

Cleaning

Before starting to clean your oven, be sure that 
all control buttons are off and your appliance 
has cooled. Unplug the appliance.

Do not use cleaning materials containing 
particles that might scratch the enamelled and
painted parts of your oven. Use cream 
cleaners or liquid cleaners, which do not 
contain particles. As they might harm the 
surfaces, do not use caustic creams, abrasive 
cleaning powders, rough wire wool or hard 
tools. In the event  the excess liquids spilling 
over your oven should burn, it may cause a 
damage to the enamel. Immediately clean up 
the split liquids. Do not use steam cleaners for 
cleaning the oven.


Cleaning the interior of the oven

Make sure to unplug the oven before starting 
to clean it. You will obtain best results if you 
clean the oven interior while the oven is slightly 
warm. Wipe your oven with a soft piece of 
cloth dampened with soap water after each 
use. Then wipe it again, this time with a wetted 
cloth, and wipe it dry. A complete clean using 
dry and powder type cleaners. For product 
with catalytic enamel frames, the rear and side 
walls of the inner frame 

do not

 require 

cleaning. However; depending on usage, it is 
recommended that you replace them after a 
certain period of time. 

The door seal may be cleaned using a sponge 
that has been soaked in lukewarm water. 

Do 

not

 use abrasive cleaners and do not crumble 

the seal. 

Check the door seals around the oven 
periodically. If the seals are damaged, please 
contact your nearest Technical Service Center, 
to get a replacement seal helpline number 

0845 600 4632.

Maintenance

Replacing the Oven Light

It is recommended that you leave this 
operation to the Authorized Service agent. 
Unplug the oven first and make sure that it is 
cold. After removing the lid in front of the light, 
take the bulb of its place. Insert the new bulb 
resistant to 300ºC, which you will find at 
Authorized Services, into the place of the 
bulb(230V, 25W, Type E14) you  have  
removed. Then fit the light protecting glass 
back into its place. After that, your oven will 
be ready for use.

I

f you need to transport your oven, keep the 

original case of product and carry in its 
original case when needed to be carried. 
Follow the transport signs on case. Tape the 
oven to the cooking panel. Place a paper 
between on the oven door, then tape it to the 
side surfaces of oven. Tape cardboard or 
paper onto the front cover on interior glass of 
oven as it will be suitable to the tray.


If it does 

not have the original case; prepare a carriage 
box so that the appliance, especially  external 
surfaces (glass and painted surfaces) of oven 
is protected against external forces.

 Transporting the oven

15

Cleaning and Maintenance 

Customer Helpline 

0845 600 4632

Cleaning & Maintenance 

Summary of Contents for AE6BSMP

Page 1: ...instructions fully before using These instructions contain important information which will help you get the best from your appliance and help to ensure safe and correct installation use and maintanen...

Page 2: ...ectrical connection User instructions Using the oven Using the timer Accessories Cleaning and Maintenance Cleaning and Maintenance Transporting the oven Trouble Shooting Technical specifications Guara...

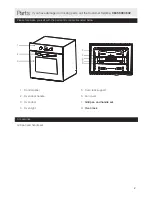
Page 3: ...ed below 1 2 3 4 5 6 7 8 1 Control panel 2 Oven door handle 3 Oven door 4 Oven light 5 Oven rack support 6 Fan cover 7 Grill pan and handle set 8 Oven rack Accessories Grill pan and handle set If you...

Page 4: ...not be made by children without supervision WARNING The appliance and its accessible parts become hot during use Care should be taken to avoid touching heating elements Children less than 8 years of a...

Page 5: ...kaging nylon staplers styrofoam etc may cause harmful effects to children they should be collected and removed immediately Protect your appliance against atmospheric effects Do not expose it to effect...

Page 6: ...er is not recommended Otherwise the performance of the above mentioned appliances will be negatively affected due to emanating heat IMPORTANT Contact an authorised service agent for installation of yo...

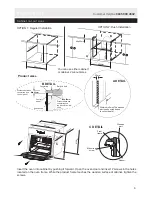
Page 7: ...50mm Built in hob Distance between countertop snd top panel of built in oven C DETAIL Front frame Spacer Mounting screw Wooden part Insert the oven into cabinet by pushing it forward Open the oven doo...

Page 8: ...vicinity of the appliance Never use an extension cord IMPORTANT The supply cable should not contact the products hot surface IMPORTANT must IMPORTANT Wiring of the appliance must be performed by the...

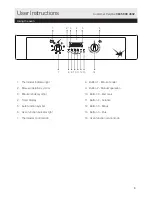
Page 9: ...cator light 2 Manual operation symbol 3 Minute minder symbol 4 Timer Display 5 Auto function symbol 6 Oven function indicator light 7 Thermostat control knob 8 Button 1 Minute minder 9 Button 2 Manual...

Page 10: ...operating To use the defrost function take your frozen food and place it in the oven on a shelf placed in the third slot from the bottom It is recommended that you can place an oven tray under the de...

Page 11: ...st be closed and the oven temperature should 0 be adjusted to 200 C s thermostat and warning s thermostat and warning s thermostat and warning Double grill and Fan function The oven lights will be tur...

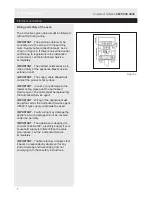
Page 12: ...t is advisable to remove all the food residues with a wet sponge 5 It is advisable to wipe the oven over with a sponge soaked in warm water after each pyrolytic cleaning cycle is carried out 6 During...

Page 13: ...ill show a value of 00 00 Set time of day that you wish the oven to stop cooking by using the button 5 and 6 The timer will calculate how long the cooking time will be based on the time of day After y...

Page 14: ...ing that you require Press the button 4 and the display will show a value of 00 00 Set the period of time that you wish to cook for by using the button 5 and 6 The word A will appear on the timer disp...

Page 15: ...ven we recommend you use the grill that was given in the tray provided If your product includes this material If you use the big wire grill put a tray onto one of the lower shelves for oils to be coll...

Page 16: ...ng a sponge that has been soaked in lukewarm water Do not use abrasive cleaners and do not crumble the seal Check the door seals around the oven periodically If the seals are damaged please contact yo...

Page 17: ...e oven door is closed Avoid opening frequently during cooking Oven light does not operate Lamp has failed Electrical supply is disconnected or switched off Replace lamp according to the instructions o...

Page 18: ...es that this product may not be treated as household waste Instead it shall be handed over to the applicable collection point for the recycling of electrical and electronic equipment Disposal informat...

Page 19: ...52093022 01 13...
Reviews: