background image

Assembly Instructions

21

Step


22

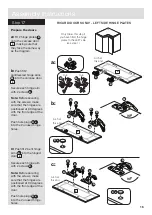
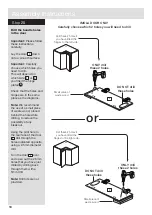
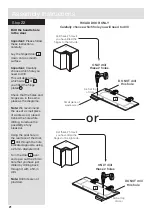
Drill these 2 holes if 

you have fitted the 

hinges to the left side.

ONLY drill 

these 2 holes 

Drill these 2 holes if 

you have fitted the 

hinges to the right side.

or

Small piece of 

waste wood

DO NOT drill 

this hole

ONLY drill 

these 2 holes 

DO NOT drill 

this hole

RICADI DOOR ONLY

Carefully choose which hole you will need to drill

Drill the handle hole 

in the door

Important:


Please follow 

these instructions

carefully.

Lay the hinged door       

down onto a smooth 

surface.

Important: 

Carefully 

choose which hole you 

need to drill.

This will depend on 

which side       or        

you fitted the hinge 

plates     . 

Check that the holes and 

hinges are in the same 

place as the diagrams.

Note:

 We recommend 

the use of a small piece 

of waste wood, placed 

behind the hole while 

drilling, to reduce the 

possibility of any

breakout.

Using the pilot hole in 

the rear face of the door, 

.     drill through the hole 

indicated opposite, using 

a 2.5mm diameter drill.

Turn the door       over 

and open out the 2.5mm 

hole that you have just 

drilled by drilling back 

through it with a 5mm 

drill.

Note:

 Drill bits are not 

provided.

8

2

K

1

8

8

Arch at top 

of door

Arch at top 

of door

8

8

Summary of Contents for Imola

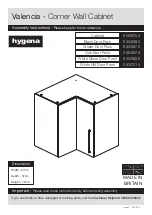
Page 1: ...l Cabinet Assembly Instructions Please keep for future reference If you need help or have damaged or missing parts call the Customer Helpline 08456 400800 Issue 1 03 09 10 Important Please read these...

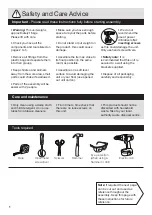
Page 2: ...t level surface to avoid damaging the unit or your floor use opened out unit carton We do not recommend the use of power drill drivers for inserting screws as this could damage the unit Only use hand...

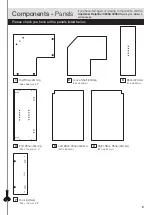
Page 3: ...ng components call the Customer Helpline 08456 400800 quoting the reference numbers below 4 2 3 Top Base DPF101A 566 x 566mm x 2 Loose Shelf DPF102A 545 x 545mm Back DPF103A 205 x 684mm End Panel DPF1...

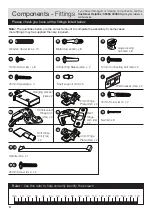
Page 4: ...more fittings may be supplied than are required A Wooden dowel F22 x 12 B Metal dowel F901 x 8 C D Large locking nut F900 x 8 F G H K I 13mm Screw F63 x 8 E 19mm Connecting bolt F461 x 2 25mm Screw F5...

Page 5: ...ng the reference numbers below Doors and handles are supplied separately in fascia packs Please see below for the correct fascia code for this unit in your chosen fascia design Please check you have a...

Page 6: ...ow for the correct fascia code for this unit in your chosen fascia design Monza Oak Monza Beech Imola Black Gloss Imola Cream Gloss Imola White Gloss Pesaro Cream Pesaro Oak Ricadi 656 6304 656 6294 6...

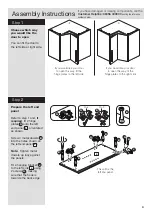
Page 7: ...left side If you would like your door to open this way fit the hinge plates to the right side Q Prepare the left end panel Refer to step 1 and if required fit 2 hinge plates onto the left end panel o...

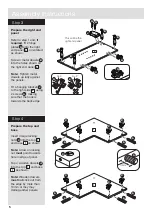
Page 8: ...or they may damage other panels C C 1 1 10mm A A 1 1 B B B B 4 This will be the right end panel Q Prepare the right end panel Refer to step 1 and if required fit 2 hinge plates onto the right end pan...

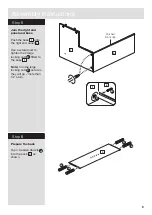
Page 9: ...to the right end panel Use a screwdriver to tighten the 2 large locking nuts fitted to the base Note Turn the large locking nuts as far as they will go more than 1 2 a turn 1 1 4 C C B C 1 5 Finished...

Page 10: ...ecure with screw Fit the top Push the top onto the right end panel and back Use a screwdriver to tighten the 2 large locking nuts fitted to the top Note Turn the large locking nuts as far as they will...

Page 11: ...end panel onto the base and top Use a screwdriver to tighten the 4 large locking nuts fitted to the base and top Note Turn the large locking nuts as far as they will go more than 1 2 a turn 1 1 4 1 1...

Page 12: ...shelf Insert 5 shelf studs at the required height Lift and then lower the loose shelf down onto the shelf studs H H 2 2 Fit the backs Slide the left back and right back along the grooves in the top a...

Page 13: ...Assembly Instructions 12 Step 13 O Fit right back Secure the left back and right back to the sides of the back using 8 nails 5 6 5 6 3 O O O O O O O O 3...

Page 14: ...e top corners of the unit with a pencil Fit the 2 wall brackets to the dimensions shown in the top diagram The screws and plugs are not supplied as they need to be the correct type to suit your wall P...

Page 15: ...her unit up against first unit and ensure both units are level Check that the ends are flush and in line then clamp them together Using a 5mm drill bit drill 2 holes approximate positions shown circle...

Page 16: ...ing with the screws make sure that the hinges are positioned at 90 degrees with the front edge of the door c Push fit 2 bent hinge arms into the other door Secure each hinge arm with 2 screws Note Bef...

Page 17: ...h hole plugs into the 2 unused hinge holes c Push fit 2 bent hinge arms into the hinged door Secure each hinge arm with 2 screws Note Before securing with the screws make sure that the hinges are posi...

Page 18: ...gram b Push fit 2 cantilevered hinge arms into the carcase door Secure each hinge arm with 2 screws Note Before securing with the screws make sure that the hinges are positioned at 90 degrees with the...

Page 19: ...ou fitted the hinge plates Check that the holes and hinges are in the same place as the diagrams Note We recommend the use of a small piece of waste wood placed behind the hole while drilling to reduc...

Page 20: ...ote We recommend the use of a small piece of waste wood placed behind the hole while drilling to reduce the possibility of any breakout Using the pilot hole in the rear face of the door drill through...

Page 21: ...heck that the holes and hinges are in the same place as the diagrams Note We recommend the use of a small piece of waste wood placed behind the hole while drilling to reduce the possibility of any bre...

Page 22: ...nto a smooth surface Important Carefully choose which hole you need to drill This will depend on which side or you fitted the hinge plates Check that the holes and hinges are in the same place as the...

Page 23: ...the other hinge a Push the hooks on the cantilevered hinge arm underneath the front of the hinge plate b Press the front of the hinge arm against the hinge plate until it clicks into place c If you ne...

Page 24: ...hooks on the bent hinge arm underneath the front of the hinge plate b Press the front of the hinge arm against the hinge plate until it clicks into place c If you need to seperate the hinge arm from...

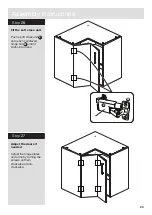
Page 25: ...the soft close unit Push a soft close unit onto each cantileved hinge arm until it clicks into place P M Step 27 P M Adjust the doors if needed Adjust the hinge plates and arms by turning the screws...

Page 26: ...ers on the component pages Argos Ltd 489 499 Avebury Boulevard Central Milton Keynes MK9 2NW Step 28 Fit other products to the unit To fit other products to this unit please follow the instructions pa...

Page 27: ......

Page 28: ...ALR2527...

Page 29: ...ence If you need help or have damaged or missing parts call the Customer Helpline 08456 400800 Issue 2 05 08 14 Important Please read these instructions fully before starting assembly 656 5752 633 299...

Page 30: ...void damaging the unit or your floor use opened out unit carton 1 Care and maintenance Only clean using a damp cloth and mild detergent do no use bleach or abrasive cleaners From time to time check th...

Page 31: ...all the Customer Helpline 08456 400800 quoting the reference numbers below 4 2 3 Top Base DPF101A 566 x 566mm x 2 Loose Shelf DPF102A 545 x 545mm Back DPF103A 205 x 684mm End Panel DPF141A 320 x 716 m...

Page 32: ...el F901 x 8 C D Large locking nut F900 x 8 F G H K I 13mm Screw F63 x 8 E 19mm Connecting bolt F461 x 2 25mm Screw F50 x 4 Connecting Sleeve F432 x 2 Shelf support F110 x 5 J Wall bracket F198 x 2 Han...

Page 33: ...left side If you would like your door to open this way fit the hinge plates to the right side Q Prepare the left end panel Refer to step 1 and if required fit 2 hinge plates onto the left end panel o...

Page 34: ...may damage other panels C C 1 1 10mm A A 1 1 B B B B 4 This will be the right end panel Q Prepare the right end panel Refer to step 1 and if required fit 2 hinge plates onto the right end panel orient...

Page 35: ...to the right end panel Use a screwdriver to tighten the 2 large locking nuts fitted to the base Note Turn the large locking nuts as far as they will go more than 1 2 a turn 1 1 4 C C B C 1 4 1 4 A A P...

Page 36: ...ecure with screw Fit the top Push the top onto the right end panel and back Use a screwdriver to tighten the 2 large locking nuts fitted to the top Note Turn the large locking nuts as far as they will...

Page 37: ...end panel onto the base and top Use a screwdriver to tighten the 4 large locking nuts fitted to the base and top Note Turn the large locking nuts as far as they will go more than 1 2 a turn 1 1 4 1 1...

Page 38: ...shelf Insert 5 shelf studs at the required height Lift and then lower the loose shelf down onto the shelf studs H H 2 2 Fit the backs Slide the left back and right back along the grooves in the top an...

Page 39: ...Assembly Instructions 10 Step 13 O Fit right back Secure the left back and right back to the sides of the back using 8 nails 5 6 5 6 3 O O O O O O O O 3...

Page 40: ...e top corners of the unit with a pencil Fit the 2 wall brackets to the dimensions shown in the top diagram The screws and plugs are not supplied as they need to be the correct type to suit your wall P...

Page 41: ...her unit up against first unit and ensure both units are level Check that the ends are flush and in line then clamp them together Using a 5mm drill bit drill 2 holes approximate positions shown circle...

Page 42: ...Fit 2 hinge plates onto a door making sure that they face the same way as the diagram b Push fit 2 cantilevered hinge arms into the door Secure each hinge arm with 2 screws Note Before securing with...

Page 43: ...nderneath the front of the hinge plate b Press the front of the hinge arm against the hinge plate until it clicks into place c If you need to seperate the hinge arm from the hinge plate press the butt...

Page 44: ...he other door to be the hinged door Push fit 2 bent hinge arms into the other door Secure each hinge arm with 2 screws Note Before securing with the screws make sure that the hinges are positioned at...

Page 45: ...eakout Using the pilot hole in the rear face of the door drill through the holes indicated opposite using a 2 5mm diameter drill Turn the door over and open out the 2 5mm holes that you have just dril...

Page 46: ...fit the other hinge a Push the hooks on the bent hinge arm underneath the front of the hinge plate b Press the front of the hinge arm against the hinge plate until it clicks into place c If you need...

Page 47: ...the soft close unit Push a soft close unit onto each cantileved hinge arm until it clicks into place P M Step 22 P M Adjust the doors if needed Adjust the hinge plates and arms by turning the screws...

Page 48: ...ference numbers on the component pages Argos Ltd 489 499 Avebury Boulevard Central Milton Keynes MK9 2NW Fit other products to the unit To fit other products to this unit please follow the instruction...

Reviews: