background image

4

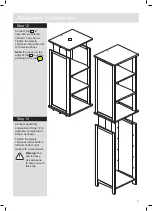
Assembly Instructions

Step 3

Screw 2 x male camlock 

A

 into reverse of drawer 

front 

13

 as shown. 

Step 4 

Connect hinges 

B

 to 

top door 

5

 and bottom 

door 

6

 using 15mm 

screws 

F

 as shown.

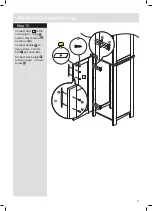
Step 5 

Insert 4 x 15mm female 
camlock 

E

 into under 

side of top base 

7

 as 

shown.

Insert 4 x small wooden 
dowel 

D

 into top shelf 

9

 as shown.

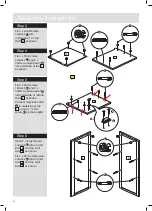
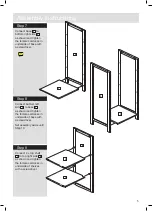
Assembly Instructions

Step 3

Fix 4 x small female 
camlock 

C

 into 

underside of 2 x top  
shelf 

11

 as shown.

Step 4 

Fix 4 x 35mm male 
camlock 

A

 and 2 x 

30mm wooden dowel 

D

into underside of top 

7


as shown. 

Step 5 

Fix 4 x 35mm male 
camlock 

A

 and 2 x 

30mm wooden dowel 

D

into underside of middle 
shelf 

2

 as shown. 

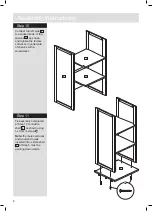
Connect magnetic catch 

F

 to underside of top 

7

 using 2 x 14mm 

screw 

E

 as shown (

a:

).

Step 6

Insert 2 x large female 
camlock 

B

 into top left 

side 

5

 and top right 

side 

6

 as shown.

Fix 4 x 35mm male male 
camlock 

A

 into top left 

side 

5

 and top right 

side 

6

 as shown.

2

A

D

a:

F

E

C

11

A

D

7

B

A

5

6

Summary of Contents for Tallboy 833/4448

Page 1: ...9 5cm Important Please read these instructions fully before starting assembly Assembly Instructions please keep for future reference 833 4448 Issue 1 26 04 11 If you need help or have damaged or missi...

Page 2: ...ould cause damage Assemble the item as close to its final position in the same room as possible Assemble on a soft level surface to avoid damaging the unit or your floor Parts of the assembly will be...

Page 3: ...m x 28 5 d cm 4 Bottom right side x 1 89 h cm x 28 5 d cm 5 Top left side x 1 77 5 h cm x 28 5 d cm 6 Top right side x 1 77 5 h cm x 28 5 d cm 7 Top x 1 35 w cm x 30 d cm 8 Bottom back panel x 1 80 2...

Page 4: ...amlock x 8 30mm Wooden dowel x 4 E F G H 14mm Screw x 2 Magnetic catch x 1 10mm Screw x 9 Hinge x 2 I J K L 16mm Screw x 2 Handle x 1 Magentic catch plate x 1 Back panel screw x 22 M N O P 35mm Screw...

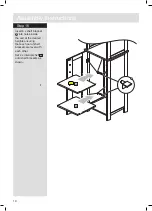
Page 5: ...s Step 1 Connect the male camlock as directed in the assembly instructions using a screwdriver Step 2 Insert the female camlock as shown in the instructions Note ensure that the arrow on the top of th...

Page 6: ...small female camlock C into underside of 2 x top shelf 11 as shown Step 4 Fix 4 x 35mm male camlock A and 2 x 30mm wooden dowel D into underside of top 7 as shown Step 5 Fix 4 x 35mm male camlock A an...

Page 7: ...er side of top 10 as shown Step 9 Connect top 10 as shown Tighten female camlocks with a screwdriver Assembly Instructions Step 7 Connect base 1 to bottom right side 4 as shown and tighten the female...

Page 8: ...shown and tighten the female camlocks in underside of shelves with a screwdriver Step 11 Fix assembly completed at Step 10 to middle shelf 2 as shown using 4 x 35mm screw M Note the male camlocks and...

Page 9: ...t with a screwdriver Note the groove in the edge of top 7 must be pointing to the rear Step 13 Connect assembly completed at Step 12 to assembly completed at Step 8 as shown Tighten the female camlock...

Page 10: ...8 Assembly Instructions Step 14 Fix bottom back panel 8 and top back panel 9 to the rear of the unit using back panel screws L as shown 8 9 L...

Page 11: ...ons Step 15 Connect door 10 to the unit using 2 x hinge H and 8 x 10mm screw G as shown b Connect handle J to door using 2 x 16mm bolt I as shown c Connect catch plate K to door using 1 x 10mm screw G...

Page 12: ...ions Step 16 Insert 8 x shelf bracket P into holes inside the unit at the desired heights ensuring that each set of shelf brackets are level with each other Set 2 x internal shelf 12 onto shelf bracke...

Page 13: ...rew N Fix the other end of the safety strap to a wall using 1 x rawl plug S 1 x washer R and 1 x 35mm wall screw Q Note see the back cover for more information on wall mounting and the suitable use of...

Page 14: ...12...

Page 15: ...13...

Page 16: ...rom plastic or sometimes wood fiber No 2 General Purpose Wall Plug Aerated Breeze Block Generally aerated blocks should not be used to support heavy loads use a specialist fitting in this case For lig...

Reviews: