background image


39 


For  all  antifreeze  fully 

drained  off  from  the  system, 
remove  the  exhaust  bolt 

which 

need 

to 

use 

high-pressure  air  to  blow  the 
exhaust bolt connection on the 
left side of the engine cylinder 
head. 

There  is  a  seal  gasket  on 

the draining bolt 

. If the seal 

gasket  is  damaged,  it  must  be 
replaced.   


When 

drain 

completed, 

assemble  and  tighten  the  drain 
bolt 

.   

3.Open  the  antifreeze  radiator 
cover 

 
  Slowly  add  0.7L  antifreeze  into 
radiator  cover  using  measuring 
glass, at same time observe the 
exhaust  bolt 

  connection  on 

the  engine.  When  antifreeze 
outflow  from  the  connection  on 
the  engine,  plug  in  the  exhaust 
bolt 

,  continue  to  add  liquid 

until  all  of  0.7L  antifreeze  is  into 
the radiator. 
 
4.Tighten  the  radiator  cover, 
start 

the 

engine, 

repeated 

acceleration  and  deceleration  of 

the  engine  in  place  until  the  fan 
of  cooling  system  turned  on  (or 
the  needle  of  water  temperature 
meter  point  to  above  the  middle 
of  the  scale),  then  turn  off  the 
engine. 
 
5.Until  engine  cool  down  and 
water  temperature  is  at  80 
degrees  (middle  scale  line)  or 
less, observe the antifreeze from 
the water tank. If the water level 
is low, add antifreeze until to the 
middle of upper and lower  scale 
line.  Then  tighten  the  radiator 
cover. 


First  add  liquid  antifreeze 

is  about  0.75L,  replacement 
and maintenance add at about 
0.7 L. 

Antifreeze  level  shall  not 

exceed  the  upper  scale  line, 
nor below the lower scale line. 

Antifreeze  liquid  level  should 

be the water tank between two 
scale  marks,  if  necessary,  add 
or remove.   


Summary of Contents for GV125S

Page 1: ...t of the motorcycle and should remain with the motorcycle when resold or otherwise transferred to a new owner or operator The manual contains important safety information and instructions which should...

Page 2: ...reliability of the battery Install the battery to the motorcycle STANDARD CHARGING TIME 1 0 A for 10 hours Do not use the battery without the battery initial charging Otherwise the batteryservice life...

Page 3: ...ou should become thoroughly familiar with the information presented in this Owner s Manual before riding the motorcycle The proper care and maintenance that your motorcycle requires is out lined in th...

Page 4: ...ation in this manual and your motorcycle Hyosung reserves the right to make changes at any time without notice and without incurring any obligation to make the same or similar changes to motorcycles p...

Page 5: ...ially important that you avoid operating the engine in a manner which could expose the engine parts to excessive heat Please refer to the BREAK IN section for specific break in recommendations WARNING...

Page 6: ...o its any sale or delivery to the ultimate purchaser or while it is in use b The use of the vehicle after such device or element of design has been removed or rendered inoperative by any person MAINTE...

Page 7: ...ully to become familiar with the motorcycle features and safety and maintenance requirements Review all instructions requirements and warnings Before the rider s first use of the motorcycle make sure...

Page 8: ...requirements Your authorized dealer is trained and equipped to perform this ser vice Drain gasoline from the fuel tank prior to transporting the motorcycle Caution the rider and others near the motorc...

Page 9: ...result in loss of control and an accident Keep both hands on the hand grips at all times when riding Removing your hands from the handgrips reduces your ability to control the motorcycle and could re...

Page 10: ...l when riding your motorcycle INSPECTION BEFORE RIDING Review thoroughly the instruct ions in the INSPECTION BEFORE RIDING section of this manual Do not forget to perform an entire safety inspection t...

Page 11: ...slow down ACCESSORY INSTALLATION AND PRECAUTION SAFETY TIPS There are a great variety of accessories available to Hyosung owners Hyosung can not have direct control over the quality or suitability of...

Page 12: ...orcycle and as near the center of gravity as is feasible The mounting brackets and other attachment hardware should be carefully checked to ensure that it provides for a rigid unmovable mount Weak mou...

Page 13: ...rol ability 6 Additional electrical accessories may damage the existing electrical system Severe overloads may damage the wiring harness or create a dangerous situation due to the loss of electrical p...

Page 14: ...LE SWITCHES RIGHT HANDLE SWITCHES REAR BRAKE PEDAL GEAR LEVER STAND REAR SHOCK ABSORBER 4 FUEL AND OIL AND ANTIFREEZE RECOMMENDATION 30 FUEL ENGINE OIL ANTIFREEZE 5 RIDING TIPS 41 STARTING THE ENGINE...

Page 15: ...CTOR EXHAUST PIPE AND MUFFLER FRONT AND REAR SUSPENSIONS BATTERY AIR CLEANER SPARK PLUG IDLING ADJUSTMENT THROTTLE CABLE PLAY ADJUSTMENT CLUTCH CABLE ADJUSTMENT DRIVE CHAIN BRAKES TIRE BULBS 10 TROUBL...

Page 16: ...cation Number The frame serial number is stamped on the right side of the steering head tube The engine serial number is stamped on the right upside of the crankcase assembly Metal nameplate is on the...

Page 17: ...nt 1 Left handle switches 6 Front brake fluid reservoir 2 Clutch lever 7 Front brake lever 3 Rear view mirror 8 Throttle grip 4 Instrument panel 9 Right handle switches 5 Ignition switch 10 Fuel tank...

Page 18: ...gnal lamp 12 Front turn signal lamp 20 Drive chain 13 Exhaust bolt 21 Passenger footrests 14 Ignition coil Front and rear 22 Side stand 15 ECU fuse box 23 Footrests 16 Battery 24 Gearshift lever 17 Se...

Page 19: ...Spark plug Rear 35 Engine oil level lens 29 Air cleaner element 36 Engine oil drain bolt 30 Water tank 37 Engine oil filler plug 31 Antifreeze filler plug 38 Rear brake fluid reservoir 32 Draining bol...

Page 20: ...g can be hazardous ON POSITION In this position the ignition circuit is closed and the engine can be started The key cannot be removed from the ignition switch in this position N O T E Start the engin...

Page 21: ...u could drop the motorcycle Stop the motorcycle and place it on the side stand if equipped before locking the steering Never attempt to move the motorcycle when the steering is locked Comes equipped w...

Page 22: ...itch is set to position with the engine stopped or fail to go out after the engine start contact an authorized dealer Riding the motorcycle with the engine warning lamp lit after starting the engine c...

Page 23: ...Continue to press select for 5sec Key off FUEL METER FUNCTION TYPE Gradation type LCD Fuel gauge standard symbol 1 10 Operational way When fuel gauge is not connected the fuel gauge standard symbol do...

Page 24: ...portunity to avoid running out of fuel For checking the fuel meter hold the motorcycle vertically and the ignition switch SPEEDOMETER The speedometer indicates the road speed in kilometers or miles pe...

Page 25: ...select Press select Press select Press reset PRESS RESET Each adjust modes Press reset for 3sec 11 RESET SWITCH Use this switch to adjust the following In the Normalmode Push it for Adjustment 1 secon...

Page 26: ...tch in the ON position push the PASS switch to operate the head lamp high beam This switch does not work when the dimmer switch is set to position DIMMER SWITCH Change the direction of the head lamp l...

Page 27: ...may be shortened due to electrical consumption TURN SIGNAL SWITCH Using when left right turn or change direction Position Flash the left turn signallamp Position Flash the right turn signal lamp OFF...

Page 28: ...r for more than five seconds at a time as it may over heat the wiring harness and starting motor If the engine does not start after several attempts check the fuel supply and ignition system Do not at...

Page 29: ...l disk brake system Do not brake excessively so as to cause the front wheel to lock up or skid The brake lamp will come on when the lever is squeezed Apply the brake lightly and with great care on sli...

Page 30: ...and with great care on slippery surfaces to avoid skidding The motorcycle is provided with a 5 speed gear transmission which operates as shown To shift properly squeeze the clutch lever and close the...

Page 31: ...e train components and the rear tire When the transmission is in neutral the green indicator lamp on the instrument panel will be lit However even though the light is lit luminated cautiously release...

Page 32: ...load turn the adjuster clockwise or count er clockwise to the desired position with the pin spanner Position 1 provides the softest spring pre load and position 5 pro vides the stiffest The motorcycle...

Page 33: ...fill the fuel tank Do not fill gasoline above the fueltankentrancelowerend To open the fuel tank cap insert the ignition key into the cap lock and turn it clockwise With the key inserted pull back the...

Page 34: ...longed contact with skin and breathing of gasoline vapors Keep children and pets away during refueling Oil quality is a major contributor to your engine s performance and life Always selectgoodquality...

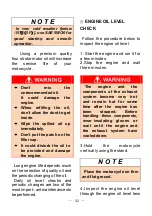
Page 35: ...riodic changing of the oil Daily oil level checks and periodic changes are two of the most import antmaintenances to beperformed ENGINE OIL LEVEL CHECK Follow the procedure below to inspect the engine...

Page 36: ...e of the motorcycle Never operate the motorcycle if the engine oil level is below the Lower line mark L in the engine oil level lens Never fill the engine oil above the Upper line mark F Engine oil le...

Page 37: ...l change 1 100ml Oil and filter change 1 300ml Engine overhaul 1 400ml In case of the engine oil being over filled the engine output will be reduced Be careful not to over fill the engine oil 1 Hold t...

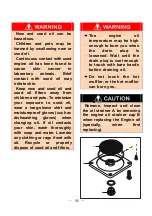
Page 38: ...oves such as dishwashing gloves when changing oil If oil contacts your skin wash thoroughly with soap and water Launder any clothing or rags if wet with oil Recycle or properly dispose of used oil and...

Page 39: ...through the engine oil filler hole Approximately 1 100 ml of the engine oil will be required Approximately 1 100 ml of the engine oil must be required when changing the engine oil only without replac...

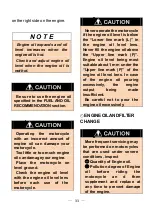
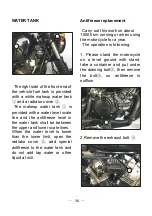
Page 40: ...p drain plug has been properly installed have the motorcycle inspected by your dealer or qualified mechanic This motorcycle engine is water cooling system During motorcycle running the antifreeze is h...

Page 41: ...s When the water level is lower than the lower limit open the radiator cover add special antifreeze to the water tank and do not add tap water or other liquid at will Antifreeze replacement Carry out...

Page 42: ...all of 0 7L antifreeze is into the radiator 4 Tighten the radiator cover start the engine repeated acceleration and deceleration of the engine in place until the fan of cooling system turned on or the...

Page 43: ...ution is low and unqualified Replace anti freezing solution 2 The antifreeze is too little Please add antifreeze to the specified liquid level 3 There is accumulated gas in cooling system Please loose...

Page 44: ...doors where there is a fresh air Running the engine too long without riding may cause the engine to overheat Overheating can result in dam age to internal engine components and discoloration of exhaus...

Page 45: ...e position lamp meter lamp tail lamp and license plate lamp on this motorcycle always comes on when the ignition switch is turned to the position The head lamp is always lit when starting the engine P...

Page 46: ...on when the ignition switch is set to position with the engine stopped or fail to go out after the engine start contact an authorized dealer The engine warning lamp comes on and remains on when the i...

Page 47: ...both hands on the handlebars and both feet on the footrests of your motorcycle during operation Squeeze the clutch lever and pause momentarily Engage first gear by depressing the gearshift lever downw...

Page 48: ...sen to meet the characteristics of the engine The rider should always select the most suit able gear for the prevailingconditions Downshifting when engine speed is too high can Cause the rear wheel to...

Page 49: ...completely 2 Apply the front and rear brakes evenly at the same time 3 Downshift through the gears as road speeddecreases 4 Select neutral with the clutch lever squeezed towards thegrip disengaged po...

Page 50: ...s progressively Be sure you have a safe stop ping distance between you and the vehicle in front of you 5 Park the motorcycle on a firm flat surface where it will not fall over A hot muffler can burn y...

Page 51: ...elerate freely through the gears without exceeding the recommended maximum limits Do not however use full throttle for the first 1 600 km 1 000 miles VARY THE ENGINE SPEED The engine speed should be v...

Page 52: ...ibed in this section and avoid hard acceleration hard cornering and hard braking for the first 160 km 100 miles OBSERVE YOUR FIRST AND MOST IMPORTANT1 000 km SERVICE The 1 000 km 600 miles service is...

Page 53: ...ect the motorcycle before operating it can be hazardous Failure to perform proper maintenance can also be hazardous Failure to inspect and maintain your motorcycle increases the chances of an accident...

Page 54: ...ECTION AND MAINTENANCE section Operating this motorcycle with improper modifications can be hazardous Improper installation of accessories or modification of this motorcycle may cause changes in handl...

Page 55: ...of the motorcycle Checking maintenance items when the engine is running can be hazardous You could be severely injured if your hands or clothing gets caught in moving engine parts Shut the engine off...

Page 56: ...e planned distance of operation Fuel hoses connected securely No damage to fuel tank or cap Tank cap closed securely WHAT TO CHECK CHECK FOR Gerashift lever No damage lever Smooth operation Drive chai...

Page 57: ...d require very special and careful servicing For maximum safety we suggest that you have these items inspected and serviced by your authorized dealer or a qualified service mechanic Improper maintenan...

Page 58: ...se your motorcycle under severe conditions perform maintenance more often than shown in the chart If you have any questions regarding maintenance intervals consult your dealer or a qualified mechanic...

Page 59: ...G 7 O 5 G 3 O Clutchleverholder Clutchcable Front brake lever holder Passenger footrests pivot Throttle cable Drive chain Speedo sensor Side stand pivot and spring hook Rear brake pedal pivot Footres...

Page 60: ...Tighten Tighten General lubrication Lubricate Lubricate Interval Item First 1 000 km Every 4 000 km Every 8 000 km Air cleaner element Cleanevery3 000km Replaceevery12 000km Exhaustpipenutsandmuffler...

Page 61: ...Spark plug wrench 4 Combination screw driver 5 Screw driver handle Check if there is leakage from the crankcase oil hoses and oil cooler Inspect the fuel hoses for damage and fuel leakage If any defec...

Page 62: ...the status of the cable s rubber cap assembly and must be assembled in the correct position Check the location of the cable s rubber cap after adjusting thethrottle cable play Check if the mirror sho...

Page 63: ...moving front fork up downwards and or forward backward In the event of malfunction or if the suspension needs expert servicing contact an authorized dealer INSPECTION OF BATTERY SOLUTION LEVEL The ba...

Page 64: ...Remove the battery 6 Clean the terminal 7 If there is white dust clean it with warm water 8 Connect the battery wires and grease the terminal lightly When reinstalling the battery be sure to connect...

Page 65: ...completely and the electrical problem such as a short circuit may occur Keep the battery away from fires When disconnecting the battery wire be sure to remove the negative battery wire first with the...

Page 66: ...he engine with out the element in position Operating the engine without the air cleaner element will increase engine wear Always be sure that the air cleaner element is in excellent operational condit...

Page 67: ...leaner element is not installed correctly dust can go inside and severely damage the engine Be careful not to allow water to go into the element while washing Before and during the cleaning operation...

Page 68: ...and oil at the periodic maintenance interval The air cleaner chamber s oil drain plug is located beneath the air cleaner chamber case Check the spark plug every time a scheduled maintenance serviceis...

Page 69: ...emoved residues from getting into the engine Change the spark plugs if it shows cracks on the insulating material corroded electrodes or excessive deposits 5 Check the electrode gap with a thickness g...

Page 70: ...onic fuel injection The idle speed is not adjustable Do not attempt to make any adjustment to the idle speed as it may permanently damage the EFI system There should be 0 5 1 0 mm 0 02 0 04 in free pl...

Page 71: ...that the throttle grip when opened and then released returns smoothly to the closedposition At each maintenance interval adjust the clutch cable play by means of clutch cable adjuster The cable play...

Page 72: ...e clutch cable adjuster lock nut Turn the clutch cable adjuster in or out to acquire the specified play After end of adjustment tighten the lock nut The clutch cable should be lubricatedwithalight wei...

Page 73: ...ain means thatthesprocketsmay alsobedam aged Inspectthesprocketsforthe following Excessively worn teeth Broken or damagedteeth Loose sprocket mounting nuts If you find any of these problems with your...

Page 74: ...ignment of the front wheel and rear wheel there are reference mark on the same position right and left Aligning and adjusting the slack in the drive chain to 20 30 mm 0 79 1 18 in retighten the right...

Page 75: ...be shortened Kerosene is a petroleum product and will provide some lubrication as well as cleaning action Kerosene can be hazardous Kerosene is flammable Children or pets may be harmed from contact wi...

Page 76: ...iding Be sure to perform the brake inspection requirements as schedules The brakes should be inspected at periodic inspection by your authorized dealer Failure to properly inspect and maintain your mo...

Page 77: ...d in the MAINTENANCE SCHEDULE BRAKE FLUID Be sure to check the brake fluid level in the master cylinder If the levelwasfoundtobelowerthan the lower mark holding the motorcycle upright inspect the brak...

Page 78: ...will damage the surface severely Never use any brake fluid that has been stored in a used or unsealed container Never reuse brake fluid left over from the last servicing and stored for long period as...

Page 79: ...rized dealer for safety as they operate at high pressure Riding with worn brake pads will reduce braking performance and will increase your chance of having accident Inspect brake pad wear before each...

Page 80: ...ce the motorcycle on a level surface and keep the handlebars straight 2 Clean the front brake fluid reservoir around not to allow dust to get inside of it 3 Loosen the screws and open the cap 4 Replen...

Page 81: ...turns on the brake lamp after the brake pedal begins to be depressed Inspect the tire pressure and the tire thread depth periodically Inspect frequently the tire pressure for the safety and the tire...

Page 82: ...the tire pressure is within the specified limits at all times Tire pressure should only be adjusted when the tire is cold If you see the problem with the tire adjust the pressure with the pressure gau...

Page 83: ...ity and can lead to loss of control Inspect storage of tire thread s depth by the tire wear indicator Replace the front and rear tires at once when appear the tire wear indicator The standard tire on...

Page 84: ...may result brake fluid leak age 3 Loosen the front axle pinch bolt 4 Loosen the front axle shaft 5 Place carefully a jack or block under the engine and raise until the front wheel is slightly off the...

Page 85: ...hain adjuster lock nuts and chain adjusting nuts left and right and disengage the drive chain from the rear sprocket 5 Loosen the rear axle nut 3 4 5 3 4 A hot muffler can burn you The muffler will be...

Page 86: ...ng a bulb set the ignition switch to position and allow a few minutes for the bulb to cool down Wear clean gloves or use a clean dry cloth to handle the new bulb Do not put your fingerprints on the bu...

Page 87: ...if the head lamp tail lamp turn signal lamp and brake lamp are dusty or dam aged The position lamp meter lamp tail lamp and license plate lamp on this motorcycle always comes on when the ignition swit...

Page 88: ...p reverse the above sequence CHANGINGTHETURN SIGNAL LAMP BULB 1 Remove the lens by pushing the groove of the turn signal lamp housing using a small flat screw driver 2 Turn the bulb while pushing coun...

Page 89: ...ts 20A ECU M RELAY fuse protects all electrical circuits including the ECU 10A HEAD L METER fuse protects the head lamp low beam and instrument panel circuits 10A HEAD H fuse protects the head lamp hi...

Page 90: ...e the spark plug and reattach it to the spark plug lead 2 Put the engine stop switch in the position and the ignition switch in the position Holding the spark plug base firmly against the engine the t...

Page 91: ...ce maker INSPECTION OF OIL SYSTEM 1 Place the engine flameout switch in position and the ignition switch in position There is the click of pull in from the oil pump relay and there is the buzz of rota...

Page 92: ...ENGINE STALLING 1 Check the fuel supply in the fuel tank 2 Check the ignition system for intermittent spark 3 Check the idlespeed When occur any trouble the best way is to consult your dealer for repa...

Page 93: ...mful to human health Ensure the area is well ventilated before proceeding Do not inhale fuel vapors Do not smoke nor use naked flames Place the motorcycle on the stand on firm and level ground Stop th...

Page 94: ...e engine and exhaust system can reduce engine cooling conceal damage or increase wear of certain parts It is important to remove all debris during cleaning High pressure washers can dam age your motor...

Page 95: ...and debris without excessive water pressure Cloth rags washing mitts or cleaning brushes can be used be careful with brushes as they may scratch plastic or painted surfaces Rinse the motorcycle thoro...

Page 96: ...rakes This could lead to an accident Test your brakes after washing motorcycle riding at slow speed If necessary apply brakes sever al times to let friction dry out the pads Follow the procedures in t...

Page 97: ...rs all the way to the left and lock the steering and remove the ignitionkey FUEL Fill the fuel tank to the top with fuel BATTERY 1 Remove the battery from the motorcycle N O T E Be sure to remove the...

Page 98: ...l filter engine oil with a newone 3 Reinstall the battery N O T E Be sure connect the positive terminal first then connect the negative terminal 4 Adjust the pressure of tires as described in the TIRE...

Page 99: ...ompression ratio 11 6 12 0 1 Max power and corresponding speed kW r min 8 9 9500 Max torque and corresponding speed N m r min 9 5 7500 Min fuel consumption g kW h 264 Min stable idle speed r min 1600...

Page 100: ...2V 10Ah Horn model Electromagnetic vibration type 12V 3A 105dB A Model or type of speedometer Electronic Vehicle performance Braking force N front rear 480 852 Acceleration noise dB A Type inspection...

Page 101: ...98 Circuit Diagram...

Reviews: