ENGINE 3-28
CONROD
▣
▣
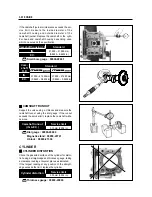
CONROD SMALL END INSIDE DIAME-
TER INSPECTION
Using a dial calipers, measure the conrod small end
inside diameter both in vertical and horizontal direc-
tions.
If any of the measurements exceeds the service limit,
replace the conrod.
19.006 ~ 19.014 mm
(0.7483 ~ 0.7486 in)
Standard
Standard
19.040 mm
(0.7496 in)
Service limit
Service limit
Conrod small
end I.D.
15.006 ~ 15.014 mm
(0.5908 ~ 0.5911 in)
15.040 mm
(0.5921 in)
Conrod small
end I.D.
Dial calipers : 09900-20605
▣
▣
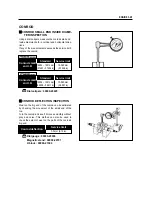
CONROD DEFLECTION INSPECTION
Wear on the big end of the conrod can be estimated
by checking the movement of the small end of the
rod.
Turn the conrod and see if it moves smoothly without
play and noise. This method can also be used to
check the extent of wear on the parts of the conrod’s
big end.
Conrod deflection
Service limit
3.0 mm (0.12 in)
Dial gauge : 09900-20606
Magnetic stand : 09900-20701
V-block : 09900-21304
Summary of Contents for MS3 125
Page 6: ...NOTE Difference between photographs and actual motorcycles depends on the markets ...
Page 134: ...5 1 FUEL SYSTEM AND THROTTLE BODY FUEL SYSTEM ...
Page 139: ...FUEL SYSTEM AND THROTTLE BODY 5 6 THROTTLE BODY ...
Page 249: ...9 31 SERVICING INFORMATION WIRE AND CABLE ROUTING ...
Page 250: ...SERVICING INFORMATION 9 32 ...
Page 251: ...9 33 SERVICING INFORMATION ...
Page 252: ...SERVICING INFORMATION 9 34 ...
Page 253: ...9 35 SERVICING INFORMATION WIRING DIAGRAM ...
Page 254: ...SERVICING INFORMATION 9 36 ...
Page 257: ...Prepared by 1st Ed DEC 2007 Manual No 99000HP8810 Printed in Korea ...


