background image

Seite 6

Best.-Nr. / Item-No. / art. 028-1060

3. Hinweise zur Bedienung / How To Use / istruzioni d'uso

3.1 Laufrichtung der Ruder / Steering Direction Of Flight Controls / direzione dei piani mobili

Vor dem Erstflug des Modells muß unbedingt die Laufrichtung aller Ruder überprüft werden. / Before the first flight of the model, the 

steering direction must be checked carefully! / prima del primo volo dovrete controllare il senso di escursione dei piani mobili

Höhenruder / Elevator / piano di quota

Wird der Höhenruderknüppel am Sender nach hinten gezogen, muß das Höhenruder nach oben ausschlagen. Wird der Höhenru-
derknüppel nach vorn gedrückt, muß das Höhenruder nach unten ausschlagen. / When you pull the elevator stick, the elevator has 
to move up, the model will climb. When you push the elevator stick, the elevator has to move down, the model will decline. / Tirando 
lo stick del piano di quota, il piano mobile deve andare in sù, spingendolo in avanti, il piano deve andare giù.

Seitenruder / Rudder / direzionale

Das Modell wird von hinten betrachtet. Wird der Seitenruderknüppel am Sender nach links bewegt, muß das Seitenruder nach links 
ausschlagen. Entsprechend umgekehrt erfolgt der Ausschlag für die andere Richtung. / Take a look to the model from behind. When 
you move the rudder stick to the left, the rudder has to move to the left. For the right side it works accordingly. /Guardare il modello 
da dietro: muovendo lo stick del direzionale a sinistra, il piano mobile si muove a sinistra  e vice versa.

Querruder / Aileron / alettoni

Das Modell wird von hinten betrachtet. Wird der Querruderknüppel am Sender nach links bewegt, muß die linke Querruderklappe 
nach oben und die rechte Querruderklappe nach unten ausschlagen. Entsprechend umgekehrt erfolgen die Ausschläge für die an-

dere Richtung. / Take a look to the model from behind. When you move the aileron stick to the left, the left flap has to move up and 
the right flap has to move down. For the right side it works accordingly. / Guardando il modello da dietro e muovendo lo stick degli 

alettoni a sinistra, l'alettone sinistra deve andare sù e quello destro in giù. E vice versa. 

Motor / Motor / motore

Wird der Gasknüppel in die Leerlauf Position gebracht, muß der Motor stillstehen. Bei Vollgas muss der Motor seine maximale Dreh-
zahl erreichen. / When you move the throttle stick to idle, the motor has to stop completely. Putting the throttle stick to full power, the 
motor has to reach its maximum rpm. / Portando lo stick motore in posizione minimo, il motore si deve fermare, in posizione massi-
ma invece deve andare ai massimi giri.

3.2 Startvorgang / Take Off / partenza

• Starten Sie prinzipiell immer gegen den Wind! / Alwas start the model against the wind! / Partite sempre contro il vento.
• Überprüfen Sie die Funktion aller Ruder vor jedem(!) Start. / Check all rudder controls before each(!) start. / Controllate tutti i piani 

mobili prima della partenza.

• Geben Sie Vollgas und korrigieren Sie in Bodennähe nur mit kleinen Steuerausschlägen. / For take off always use maximum pow

-

er. When you are near the ground only small control action is recommended. / Per la partenza accelerare al massimo.

• Steigen Sie in einem flachen Winkel. / Climb in a smooth angle. / Salire in un angolo piatto.

3.3 Landevorgang / Landing Procedure / Atterraggio

• Drosseln Sie den Motor und fliegen Sie in 30 m Entfernung mit Rückenwind parallel zur Landebahn. / Reduce motor power and 
fly parallel to the runway in a distance of 30 meters. / Diminuire i giri motore e volare a 30 m di distanza parallelamente alla pista di 

atterraggio. 

• Fliegen Sie eine 90° Kurve in Richtung Landebahn und bauen Sie Höhe ab. / Turn 90° to the runway and decline continously. / 
Effettuate ora una virata a 90° in direzione della pista di atterraggio e diminuite la quota.
• Fliegen Sie erneut eine 90° Kurve, Sie fliegen nun direkt auf die Landebahn zu. Turn again 90° to the runway and decline conti

-

nously. You are now approaching the runway. / Effettuate un'ulteriore virata a 90° in direzione della pista e continuate a scendere.
• Lassen Sie das Modell weiter sinken bis das Modell 1 m über der Landebahn schwebt. / Decline until you are about 1 meter over 
the runway.  / Continuate la discesa fino a librarvi 1 m sulla pista.
• Ziehen Sie den Höhenruderknüppel etwas stärker und halten Sie ihn gezogen. / Pull the elevator carefully and keep it pulled. / 

Tirate lo stick del piano di quota un po' di più e tenetelo tirato. 

• Je mehr sich das Modell dem Boden nähert, desto mehr muß der Höhenruderknüppel gezogen werden. Da das Modell ständig 

langsamer wird, setzt es sich praktisch von allein auf die Landebahn. / The closer you come to the ground the more you have to pull 
the elevator. As the model gets slower, it will land more or less automatically. / Più vi avvicinate al suolo, più dovrete tirare il piano di 
quota. Il modello rallenta continuamente atterrando praticamente da solo sulla pista.

Summary of Contents for G-103 Twin III Acro

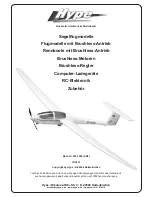
Page 1: ...Tragflächen sind geteilt aufgebaut und verfügen über eine Karbon Flächensteckung Der Motor wird durch einen Skywalker 40A Regler made by Hobbywing geregelt Damit setzt sich das Modell auch bei windiger Wetterlage eindrucksvoll in Szene und verfügt über eine sehr ansprechende Performance The original Grob G 103 is a two seated glider from the German manufacturer Grob Aircraft AG located in Mindelhe...

Page 2: ...itshinweise Safety Instructions per la vostra sicurezza 5 Ersatzteile Spare Parts ricambi 6 Garantiebedingungen Warranty garanzia Entsorgung Disposal smaltimento Bitte entsorgen Sie Elektronik ausschließlich in den dafür vorgesehenen Behältnissen Please dispose defective electronic parts in special marked containers I rifiuti elettronici vanno smaltiti negli appositi contenitori e seguendo le legg...

Page 3: ...re le ali 2 Die Montage des Modells The Assembly L assemblaggio Nehmen Sie das Höhenleitwerk zur Hand und montieren Sie es am Rumpf wie dargestellt Schraube gut festzie hen Install the elevator on the fuselage and tighten the screw firmly Prendere il piano di quota e montarlo sulla fusoliera Serrare bene la vite Hängen Sie die das Höhenrudergestänge am Servo ein und verbinden Sie den Gabelkopf mit...

Page 4: ...ch den gelade nen Antriebsakku im Modell anschließen Betätigen Sie der Reihe nach alle Funktionen am Sender Vorsicht im Umgang mit dem drehenden Propeller Check the function of all rudders Switch on the transmitter first and connect then the LiPo Battery to the speed controller in the model Move all rudders one by one Attention Be careful with the rotating propeller Verificate ora che tutte le par...

Page 5: ...chten Sie wie das Modell auspendelt Die Nase des Modells sollte sich leicht nach unten neigen Dann ist der Schwerpunkt optimal justiert Before the first flight you have to check the center of gravity For doing so you have to mount all components also the battery in to the model The CG is placed 50 mm behind the nose cone of the main wing Support the model exactly at the marked spots on the bottom ...

Page 6: ... idle the motor has to stop completely Putting the throttle stick to full power the motor has to reach its maximum rpm Portando lo stick motore in posizione minimo il motore si deve fermare in posizione massi ma invece deve andare ai massimi giri 3 2 Startvorgang Take Off partenza Starten Sie prinzipiell immer gegen den Wind Alwas start the model against the wind Partite sempre contro il vento Übe...

Page 7: ...sache falls Sie keine Kontrolle mehr über das Modell haben Berühren Sie keine rotierenden und oder heißen Motorteile während des Betriebes oder der Abkühlphase Warten Sie Ihr Modell nach jedem Einsatz und ersetzen Sie Verschleißteile um einen sicheren Betrieb zu gewährleisten Fassen Sie das Modell während und nach dem Betrieb stets so an daß Sie keinesfalls mit Teilen des Antriebs in Berührung kom...

Page 8: ...tor parts during action Let all components cool down before you handle them Check your model carefully after each flight Replace parts if they are worn out or if they are defective Keep your hands out of reach from rotating or hot parts of the model Keep in mind that plastic parts easily break under cold temperature conditions If you are a novice in flying you should ask experienced pilots for ass...

Page 9: ...ere il problema state attenti a non toccare parti calde motore silenziatore batteria motore o parti rotanti del modello controllate tutte le parti del modello dopo ogni uso e sostituite parti che mostrano segni di logoramento assicuratevi di non venire a contatto durante e dopo l uso con parti della propulsione e trasmissione a temperature basse le parti in plastica perdono di resistenza e diventa...

Page 10: ...e der Akku unbrauch bar und zu entsorgen 5 Beschädigte Zellen Keine Weiterverwendung von beschädigten Zellen Kennzeichen beschädigter Zellen Verformung beschädigte Folie Geruch oder Auslauf von Elektrolyten Gesetzliche Entsorgungsvorschriften Akku Sondermüll beachten 6 Warnhinweise Nicht ins Feuer werfen Nicht in Flüssigkeiten jeglicher Art eintauchen jeglichen Kontakt mit Flüssigkeiten vermeiden ...

Page 11: ...nattended Charge in an isolated area away from flammable materials Let the battery cool down to ambient temperature before charging Do not charge battery packs in series Charge each battery pack individually Overcharging of one or the other battery may occur resulting in fire When selecting the cell count or voltage for charging purposes select the cell count and voltage as it appears on the batte...

Page 12: ... se la pellicola è danneggiata non usare più la batteria montare la batteria in maniera tale che non si deforma temperature sopra 70 C possono danneggiare la cassa in quest caso smaltire la batteria e non usarla più 5 batterie danneggiate non usare batterie danneggiate come si riconoscono celle danneggiate deformazione pellicola rotta odore strano fuoriuscita dell elettrolyt smaltire secondo le re...

Page 13: ...028 1063 Höhenleitwerk Horizontal Stabilizer piano di quota 028 1064 Seitenruder Rudder direzionale 028 1065 Kabinenhaube Canopy cabina di pilotaggio 028 1066 Spinner Spinner ogiva 028 1067 Luftschraubenzentralstück Propeller Main Bar parte centrale dell elica 028 1068 Klappluftschraube Folding Prop elica ripieghevole 028 1069 Räder Wheels carrello di atterraggio 028 1070 BL Motor BL Motor motore ...

Page 14: ...rte Geltendmachung der Garantie zurückzuführen sind übernehmen wir keine Garantie 2 Zur Geltendmachung der Garantie ist die Vorlage eines Garantiebelegs und des beanstandeten Modells oder Bauteils erforderlich Als Garantiebeleg gilt der Servicebegleitschein sowie auch der Verkaufsbeleg wenn auf dem Verkaufsbeleg der Modelltyp mit der Bestellnummer vom autorisierten Hype Fachhändler vermerkt ist un...

Page 15: ...itabili nei confronti di KYOSHO Deutschland GmbH ai sensi della presente garanzia sussistono in aggiunta ai diritti spettanti per legge e non limitano in alcun modo questi ultimi 4 Durata della garanzia 1 La garanzia ha una durata di due anni a decorrere dalla data dell acquisto presso il rivenditore autorizzato KYOSHO 2 L esecuzione di prestazioni in garanzia non comporta una nuova decorrenza del...

Page 16: ...er Ladegeräte RC Elektronik Zubehör Best Nr 028 1060 ARF 12 2013 Copyright by Hype D 24568 Kaltenkirchen Technische Änderungen sind ohne vorherige Ankündigungen möglich Jeder Nachdruck auch auszugsweise bedarf unserer ausdrücklichen schriftlichen Genehmigung Hype Nikolaus Otto Str 4 D 24568 Kaltenkirchen helpdesk hype rc de www hype rc de Helpdesk 04191 932678 ...

Reviews: