background image

Exhaust System Repair

100 SRM 449

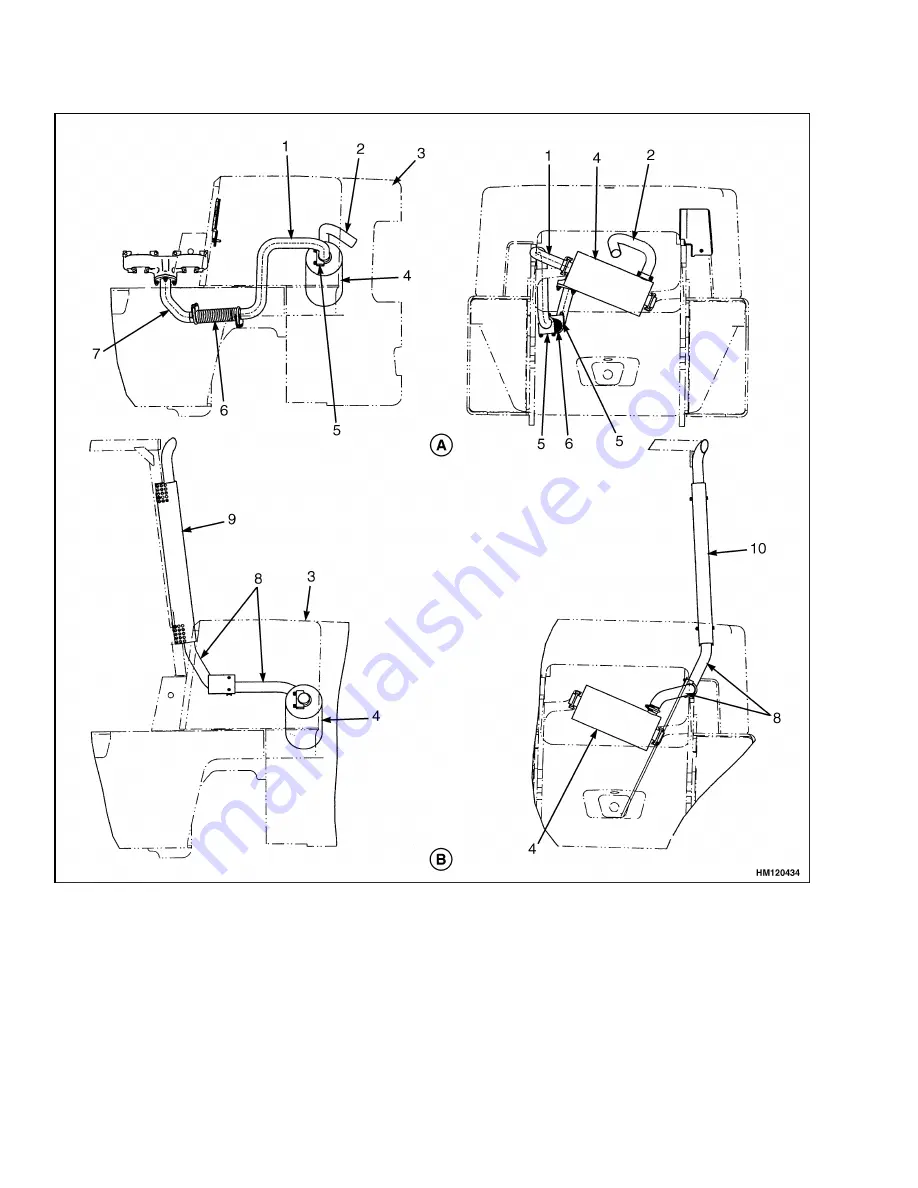
A. DIESEL COUNTERWEIGHT EXHAUST EPA COMPLIANT
B. GAS/LPG/DIESEL OVERHEAD EXHAUST

1.

UPPER EXHAUST PIPE

2.

TAIL PIPE

3.

COUNTERWEIGHT

4.

MUFFLER

5.

CLAMP

6.

FLEX PIPE

7.

LOWER EXHAUST PIPE

8.

OVERHEAD TAIL PIPE

9.

OUTER SHIELD

10. INNER SHIELD

Figure 7. Exhaust System, Diesel EPA Compliant

10

Summary of Contents for C024

Page 1: ...Hyster C024 S135XL2 S155XL2 Forklift ...

Page 2: ...FRAME S6 00 7 00XL S135 155XL B024 C024 PART NO 897390 100 SRM 449 ...

Page 3: ...d condition Always use HYSTER APPROVED parts when making repairs Replacement parts must meet or exceed the specifications of the original equipment manufacturer Make sure all nuts bolts snap rings and other fastening devices are removed before using force to remove parts Always fasten a DO NOT OPERATE tag to the controls of the unit when making repairs or if the unit needs repairs Be sure to follo...

Page 4: ... Hydraulic Tanks Repair 5 Inspect 5 Small Leaks Repair 5 Large Leaks Repair 5 Clean 6 Steam Method of Cleaning 6 Chemical Solution Method of Cleaning 6 Additional Preparations for Repair 6 Radiator Repair 7 Remove 7 Install 7 Exhaust System Repair 7 Muffler Remove 7 Install 7 Engine Repair 11 Remove 11 Install 11 Safety Labels 13 This section is for the following models S6 00 7 00XL S135 155XL B02...

Page 5: ...more information Please click here Then get the complete manual NOTE If there is no response to click on the link above please download the PDF document first and then click on it Have any questions please write to me admin servicemanualperfect com ...

Page 6: ... THE QUALITY KEEPERS HYSTER APPROVED PARTS ...

Page 7: ...lic and fuel tanks radiator and exhaust system Also included are the instructions for removal and installation of the engine Description The frame is a one piece weldment and has mounts for the counterweight upright overhead guard engine and transmission axles and other parts See Figure 1 1 HOOD 2 FLOOR PLATE 3 OVERHEAD GUARD 4 COUNTERWEIGHT 5 FRAME Figure 1 Frame and Connected Parts 1 ...

Page 8: ...emove the LPG tank and bracket so that the counter weight can be removed See Figure 2 WARNING LPG can cause an explosion Do not cause sparks or permit flammable material near the LPG system LPG fuel systems can be discon nected indoors only if the lift truck is at least 8 m 25 ft from any open flame motor vehicles electrical equipment or ignition source Close the fuel valve on the LPG tank before ...

Page 9: ... 3 Raise the hood and disconnect the gas assist cylinder at the hood Remove the hood transi tion plate and access door INSTALL 1 Install the hood transition plate and access door in position on the lift truck Install the capscrews for the transition plate Connect the gas assist cylinder to the hood Align the hood for the latch on the front cover Tighten the capscrews for the transition plate 2 Ins...

Page 10: ...d with this lift truck Connect a lifting device to the top of the overhead guard If installed remove the overhead exhaust and LPG fuel line clamps If installed disconnect the light wiring harness Remove the capscrews that hold the overhead guard to the frame Remove the capscrews that hold the overhead guard to the cowl Lift the overhead guard from the lift truck INSTALL 1 Connect a lifting device ...

Page 11: ... be fastened to the lift truck frame Try to lift the hood to make sure it is fastened correctly and will not move Adjust the hood hood latch and latch striker when any of the parts of the operator restraint system are installed or replaced See the Hood Repair section for more details 1 OPEN COVER 2 SEAT BELT RETRACTOR 3 SEAT BELT 4 BAR Figure 4 Release Jammed Seat Belt Fuel and Hydraulic Tanks Rep...

Page 12: ...aterial is removed from the inside of the tank 6 Make an inspection of the inside of the tank If it is not clean repeat Step 4 and Step 5 and make another inspection When making inspections use a light that is approved for locations with flammable vapors 7 Put plugs in all the openings in the tank Wait 15 minutes then remove the inlet and outlet plugs Test a sample of the vapor with a special indi...

Page 13: ...ove the exhaust pipe for clearance to the radiator flange 2 Install the capscrews that fasten the radiator In stall the muffler and inlet exhaust pipe at the muffler 3 Install the engine water outlet on diesel units Tighten the exhaust band clamp on gasoline or LPG units Install the fan and fan shroud In stall the hood and transition plate as described in the Hood Repair Install section 4 Connect ...

Page 14: ...Exhaust System Repair 100 SRM 449 Figure 5 Exhaust System 8 ...

Page 15: ...T EXHAUST EPA COMPLIANT B GAS LPG COUNTERWEIGHT EXHAUST NON EPA COMPLIANT 1 UPPER EXHAUST PIPE 2 TAIL PIPE 3 COUNTERWEIGHT 4 MUFFLER 5 GASKET 6 LOWER EXHAUST PIPE 7 RAW GAS CHECK PORT 8 OXYGEN SENSOR PORT 9 CROSSOVER PIPE 10 FLEX PIPE 11 CLAMP Figure 6 Exhaust System EPA Compliant Engine 3 Install the grill and align the end of the counter weight exhaust pipe so that it is between the grill bars 9...

Page 16: ...T EXHAUST EPA COMPLIANT B GAS LPG DIESEL OVERHEAD EXHAUST 1 UPPER EXHAUST PIPE 2 TAIL PIPE 3 COUNTERWEIGHT 4 MUFFLER 5 CLAMP 6 FLEX PIPE 7 LOWER EXHAUST PIPE 8 OVERHEAD TAIL PIPE 9 OUTER SHIELD 10 INNER SHIELD Figure 7 Exhaust System Diesel EPA Compliant 10 ...

Page 17: ...rake line at the booster Dis connect the electrical wiring d Remove the pedal bracket e On units without the MONOTROL pedal disconnect the direction control linkage at the transmission f Disconnect the drive line at the universal joint 7 Manual transmission Do the following proce dure a Disconnect the drive line at the universal joint near the clutch b Disconnect the hydraulic and brake lines Disc...

Page 18: ...the capscrews and tighten the capscrews that hold the engine mounts to the fan end of the engine to 65 N m 48 lbf ft CAUTION Apply a sealant Hyster Part Number 264159 to the flange of the flywheel housing Make sure the torque converter or clutch is installed cor rectly and engaged with the oil pump If the parts are not engaged the oil pump or torque converter will be damaged 2 If removed install t...

Page 19: ...nnect the throttle linkage at the engine 9 Connect the exhaust pipe at the exhaust header Install the fan and fan shroud 10 Connect the engine crankcase breather and the brake fluid reservoir lines Install the battery tray air cleaner inlet duct and battery Connect the cables at the battery 11 Install the floor plates Install the overhead guard and the hood transition plate and access door See the...

Reviews: