background image

4

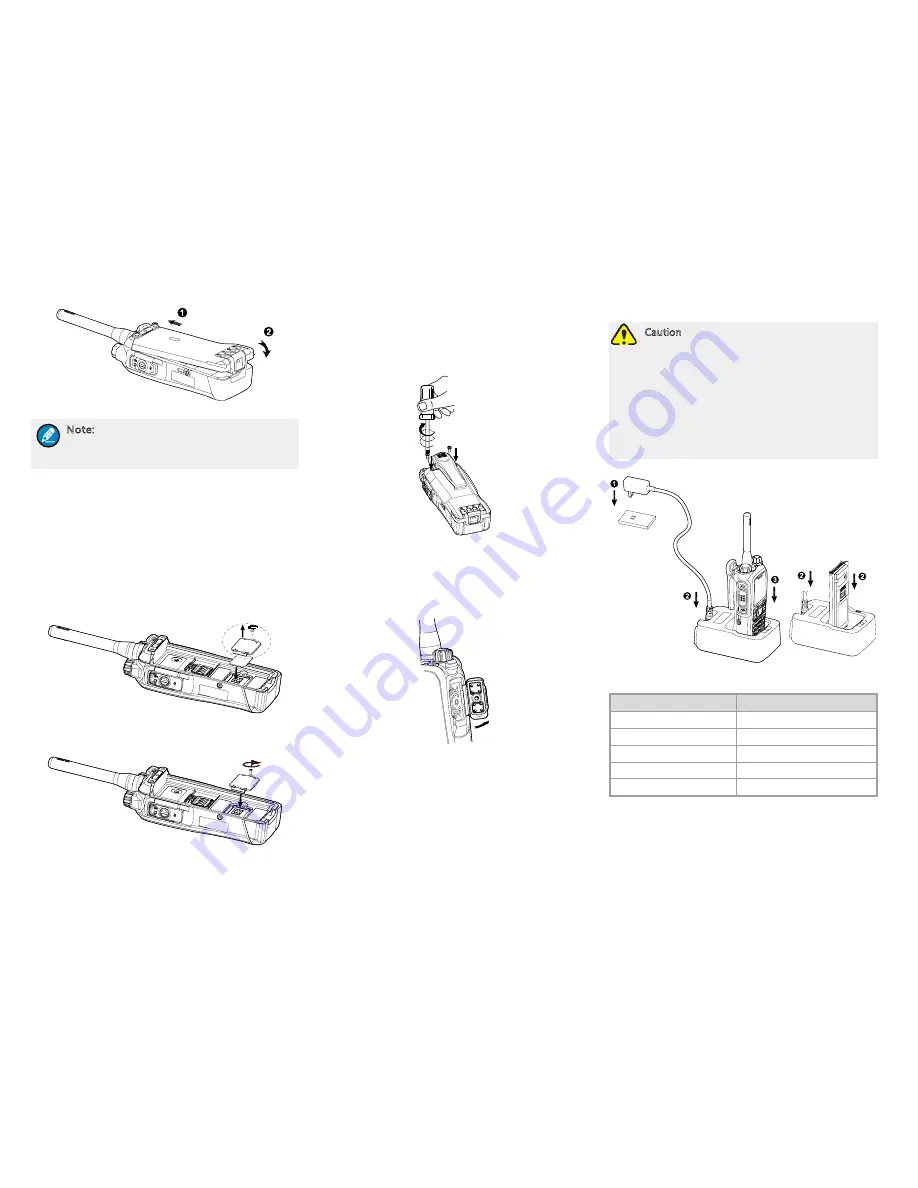
Attaching the Battery

Note:  To remove the battery, turn off the 
terminal first. Then lift the battery latch and 
remove the battery. 

Installing the SIM Card

If you have purchased the End-to-End Encryption 
(E2EE) feature which is realized via a SIM card, please 

buy a SIM card and install it first. 

1.  Remove the battery. 

2.  Loosen the screw fixing the SIM card cover, open the 

cover, and then place the card into the slot properly, 

as shown in the figure below.

3.  Replace the cover and tighten the screw as shown in 

the figure below. 

Attaching the Belt Clip

1.  Remove the two screws on the back of the terminal.
2.  Align the screw holes on the belt clip with those on 

the terminal, and then tighten the screws, as shown 

in the figure below. 

Attaching the Accessories

1.  Loosen the screw on the accessory connector cover, 

and open the cover as the arrow shows in the figure 

below. 

2.  Align the accessory (such as audio accessory 

and programming cable) plug with the accessory 
connector. 

3.  Secure the screw of the accessory. 

Charging the Battery

Caution


Use the charger specified by the Company 
to charge the battery. 


Make sure the terminal is powered 
off before charging. Read the Safety 
Information Booklet in advance to get 
necessary safety information. 


Charge a new battery for at least 5 hours 
before initial use for best performance. 

Charging status indication on charger: 

LED Indication

Charging Status

Flashes red slowly

Standby (no load)

Glows red

Charging

Glows orange

90% charged

Glows green

Fully charged

Flashes red rapidly

Charging failed

Summary of Contents for PT580H Plus

Page 1: ...ptimum performance from the product please read this manual the corresponding TETRA Terminal Series Feature Book and the Safety Information Booklet carefully before use This manual is applicable to th...

Page 2: ...tions or would like to learn more details please visit our website at http www hytera com FCC Regulations Federal Communication Commission FCC requires that all radio communication products should mee...

Page 3: ...ry 4 Basic Operations 5 Turning On Off the Terminal 5 Switching Operation Mode 5 Adjusting the Call Volume 5 Selecting a Group 5 Inputting via Keypad 5 Locking Unlocking the Keypad 5 PIN Enable 5 Mana...

Page 4: ...23 Accessory Connector No Part Name No Part Name 10 Func OK Key 24 Strap Hole 11 Answer Call Key 25 Belt Clip 12 Half duplex Speaker 26 Battery 13 Numeric Keypad 27 Charging Piece 14 Full duplex Micr...

Page 5: ...cted in DMO The keypad is locked The SIM card E2EE is in use The microphone is disabled AIE Air Interface Encryption is in use E2EE End to End Encryption is in use Both AIE and E2EE are in use The ong...

Page 6: ...minal and then tighten the screws as shown in the figure below Attaching the Accessories 1 Loosen the screw on the accessory connector cover and open the cover as the arrow shows in the figure below 2...

Page 7: ...ttings Function Security PIN Enable Off and then input the PIN code With this feature enabled each time you turn on the terminal PIN code is required If you input wrong code for continuous three times...

Page 8: ...party can press to exit the group call PABX PSTN Call A PABX PSTN call is a full duplex individual call with Hook Signaling established between an individual user and a PABX or PSTN user outside the T...

Page 9: ...ter the call is established Answering an Individual Call You can answer the call without any operation Ending an Individual Call Press to end the call Group Call The group call operations in DMO are s...

Page 10: ...annel may be assigned to emergency calls or other calls with higher priority Wait until the channel becomes available and try again A half duplex call cannot be established The predefined time period...

Page 11: ...fine particles on the product surface and charging piece with a clean and dry lint free cloth or a brush regularly Use neutral cleanser and a non woven fabric to clean the keys control knobs and fron...

Page 12: ...PT580H Plus...

Page 13: ...H y t e r a http www hytera com 400 830 7020 50 1999 5 EC...

Page 14: ...1 2 2 2 LCD 2 LED 3 3 3 3 SIM 3 4 4 4 4 4 4 4 4 5 5 PIN 5 5 5 5 5 PABX PSTN 5 6 6 6 6 6 6 6 7 7 7 8...

Page 15: ...2 1 SK1 1 15 2 PTT 16 3 SK2 2 17 4 18 5 LED 19 6 20 7 21 8 22 9 LCD 23 10 24 11 25 12 26 13 27 14 0 9 SK1 SK2 LCD WAP WAP TMO DMO...

Page 16: ...3 G P S G P S GLONASS G P S G P S GLONASS SIM LED LED SIM E2EE SIM SIM 1 2 SIM SIM SIM...

Page 17: ...4 3 SIM SIM 1 2 1 2 3 5 LED LED 90 ON OFF...

Page 18: ...IN PIN PIN PIN 1234 PIN PUK PIN PUK 12345678 PIN PIN PIN PIN PABX TETRA 1 2 PTT 3 PTT 1 2 3 DIRECT HOOK PTT PTT DIRECT HOOK PTT PTT PABX PSTN PABX PSTN TETRA PABX PSTN HOOK PABX PSTN PABX PSTN PABX PS...

Page 19: ...6 2 3 PABX 4 PABX PSTN PABX PSTN PABX PSTN 1 2 3 1 2 1 2 PTT 3 PTT...

Page 20: ...7 ID ID ID 24 12...

Page 21: ...8 400 830 7020...

Reviews: