background image

Contents

Symbols On The Machine..............4

Safety Information.....................5-15

Understand Your Machine...............................5
Personal Safety.............................................5-6
Inspect Your Machine...................................6-7

Work Area.....................................................7-8
During Use....................................................8-9
Noise..............................................................10
Power Tool Use And Care.............................10
Battery Use And Care....................................11
Battery Charger..............................................11
Vibrations.......................................................12
Electrical Safety..............................................13
Personal Protective Equipment......................14
Getting To Know The Machine.......................15

Features.........................................16

Unboxing........................................17

Assembly..................................18-22

Assembly Safety............................................18
Attach The Handle Bar.............................18-19
Attach The Grass Collector............................19
Insert The Mulching Plug...............................20
Adjusting The Cutting Height.........................21
Inserting / Replacing The Battery...................22

Safety Key......................................23

Starting / Stopping .......................24

Battery............................................25

Checking Charge Status................................25
Charging The Battery.....................................25

Emptying Grass Collector............26

Lawn Care......................................27

General Tips...................................................27
How Often Should I Mow...............................27
How Does Mulching Work.............................27

Specifications................................28

Maintenance And Care...........29-31

Maintenance Safety.......................................29 
Checking Your Machine.................................29
Blade Maintenance.........................................30
Cleaning..........................................................30
Storage...........................................................31
Transportation And Handling.........................31

Troubleshooting............................32

Spare Parts...............................33-38

Disposal..........................................39

Our Product Range.......................40

Declaration Of Conformity...........41

Useful Information........................42

Our YouTube Channel...................................42
Warranty........................................................42
Manual Updates............................................42
Returning your Product.................................42
Ordering Spare Parts....................................42

Contact Us.....................................43

Summary of Contents for HYM40Li420P

Page 1: ...40V LAWNMOWER HYM40Li420P Instruction Manual...

Page 2: ...be kept with the product Please read and understand these instructions before you use your product Failure to do this may result in personal injury or damage to the product The safety precautions and...

Page 3: ...0 Adjusting The Cutting Height 21 Inserting Replacing The Battery 22 Safety Key 23 Starting Stopping 24 Battery 25 Checking Charge Status 25 Charging The Battery 25 Emptying Grass Collector 26 Lawn Ca...

Page 4: ...feet away from cutting parts DANGER AREA Keep away from the danger area PROTECT FROM MOISTURE Do not expose the product to rain or wet conditions WEEE SYMBOL Waste electrical products should not be d...

Page 5: ...force the machine beyond its limits Use the correct machine for your application Know how to stop the machine quickly in case of emergency Understand the use of all controls ALL MAINTENANCE other than...

Page 6: ...intenance repairing or moving Start the machine carefully according to instructions and with feet away from the moving parts Do not place your hands or feet near or under rotating parts Keep away from...

Page 7: ...ices are in working order and warning labels are in place These items are installed for your safety Be sure the safety covers are in place Make sure you thoroughly inspect the entire work area and rem...

Page 8: ...es Switch the lawnmower off before tilting or transporting it e g from to lawn or over paths Do not operate power tools in explosive atmospheres such as in the presence of flammable liquids gases or d...

Page 9: ...nmower when switching on the motor If the lawnmower is running do not lift or transport If the attachments tools are not installed in their seats do not use the machine You must remove the safety key...

Page 10: ...angerous and must be repaired Disconnect the plug from the power source and or the battery pack from the power tool before making any adjustments changing accessories or storing power tools Such preve...

Page 11: ...er may cause burns or a fire Under abusive conditions liquid may be ejected from the battery avoid contact If contact accidentally occurs flush with water If liquid contacts eyes additionally seek med...

Page 12: ...ther smoking and other diseases that affect blood vessels and blood circulation as well as large and long lasting impact of shocks are considered factors in the formation of white finger Note the foll...

Page 13: ...wer tools Unmodified plugs and matching outlets will reduce risk of electric shock Avoid body contact with earthed or grounded surfaces such as pipes radiators ranges and refrigerators There is an inc...

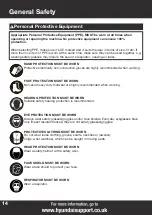
Page 14: ...othing gloves scarfs neckties or jewellery rings wrist watches which can be caught in moving parts HEAD PROTECTION MUST BE WORN Wear a safety helmet with a safety visor FACE SHIELD MUST BE WORN Wear a...

Page 15: ...ors The machine is intended for DIY and domestic use only This garden tool is not intended for use by persons including children with reduced physical sensory or mental capabilities or lack of experie...

Page 16: ...Features 16 Upper Handle Lower Handle Grass Collector Battery Cover Wheel Start Button OPC Operator Presence Control Lever Cutting Height Adjuster Adjuster HYM40Li420P Features...

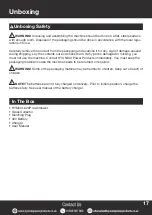
Page 17: ...If any part is damaged or missing you must not use the machine Contact HYUNDAI Power Products immediately You must keep the packaging material in case the machine needs to be returned or repaired WAR...

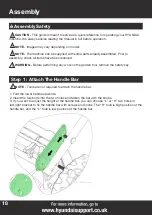
Page 18: ...ARNING Before performing any work on the garden tool remove the safety key NOTE Tools are not required to attach the handle bar 1 Fold the lower handle upwards 2 Insert the two bolts into the two hole...

Page 19: ...e lower handle 7 Fasten the screw with the triangle knob Step 2 Attach The Grass Collector 1 Slide the grass bag frame into the grass bag and attach the clips as shown 2 Lift the rear discharge guard...

Page 20: ...icient mulching 1 Install and remove the mulching plug by lifting the rear discharge guard as shown 2 The mulching plug only fits one way Remove the mulching plug when using the grass collector REAR D...

Page 21: ...ng height can be adjusted in 6 steps from 25mm to 75mm with the cutting height adjustment 1 Pull the handle outwards slightly 2 Set the required cutting height 3 Release the lever again Step 4 Adjusti...

Page 22: ...arger 2 Open the battery cover 3 Press the charged battery into the power tool until it clicks into place 4 Close the battery cover To remove lift the battery release lever and pull out the battery CA...

Page 23: ...ge and have any damage repaired by a qualified technician or service centre if the unit starts vibrating excessively To remove the key rotate the key to position O and remove To insert the safety key...

Page 24: ...terlock switch A 2 Pull back On Off lever B towards the handle to start the motor Release switch A 1 Release the On Off lever B WARNING After release of the On Off switch the blade will continue movin...

Page 25: ...y pressing and holding the latch button and sliding out of the charger 6 Do not leave the battery on the charger Remove it when it is fully charged 7 Lithium ion batteries have no memory effect a part...

Page 26: ...immediately 1 Switch the motor off 2 Wait until the blade stops 3 Lift the rear discharge guard 4 Remove the grass collector 5 Lower the rear discharge guard down again 6 Empty the grass collector 7...

Page 27: ...mow slowly Spring March April May Mow once a week on a high to medium height setting Summer June July August Mow twice a week under good growing conditions on a low setting In dry conditions mow once...

Page 28: ...m 6 Heights Grass Collector Capacity 45L Motor Speed 2800 3600rpm Height Adjustment Single Lever Cutting Width 415mm 41 5cm Wheel Size Front 152mm Wheel Size Rear 178mm Measured Sound Power 84dB A Gua...

Page 29: ...the work is done correctly maintaining the machine s original safety level Any operations performed in unauthorised centres or by unqualified persons will invalidate the Warranty and all obligations a...

Page 30: ...agents or harsh solvents these may damage the plastic parts in the equipment Ensure that no water penetrates the equipment s interior 2 Remove grass and mud from inside the deck to prevent it from dr...

Page 31: ...ion and varying changes in temperature DO NOT store a machine that has not been given time to fully cool down Store the machine in a safe place out of the reach of children 4 Store the battery and the...

Page 32: ...re 5 Contact an authorised service centre 6 Start motor on shorter grass or previously mowed area change cutting height if necessary 7 Clean housing so that the blade can run freely 8 Insert safety ke...

Page 33: ...machine may cause accidents or injuries for which the manufacturer is under no circumstance liable or responsible 1 2 Find the part you are looking for in the drawings Information about the parts can...

Page 34: ...34 Spare Parts Drawing B Drawing C...

Page 35: ...35 Spare Parts Drawing D Drawing E...

Page 36: ...t 1290009 HYM40Li420P A11 Bolt 1290010 HYM40Li420P A12 Bolt 1290052 HYM40Li420P A13 Nut 1290011 HYM40Li420P A14 Button 1290017 HYM40Li420P A15 Spring 1290018 HYM40Li420P A16 Upper Cover 1290019 HYM40L...

Page 37: ...rawing Number Spare Part Name Part Number HYM40Li420P C1 Bolt 1290090 HYM40Li420P C2 Height Adjustment Plate 1288048 HYM40Li420P C3 Nut 1290064 HYM40Li420P C4 Right Bracket 1288050 HYM40Li420P C5 Bolt...

Page 38: ...D10 Shaft Sleeve 1287062 HYM40Li420P D11 Front Wheel Shaft 1288080 HYM40Li420P D12 Shaft Sleeve 1288081 HYM40Li420P D13 6 Wheel 1288082 HYM40Li420P D14 6 Wheel Cover 1288083 HYM40Li420P D15 Bolt 1287...

Page 39: ...ALPAK National Compliance Scheme and our registration number is RM08660 For further information about disposal please contact your Local Authority You can also get more advice and guidance about recyc...

Page 40: ...rs Compactor Plates Petrol Compactor Plates Cement Mixers Portable Electric Cement Mixers If you would like more information on any of these products please contact our sales team on 01646 687880 or v...

Page 41: ...missions in the Environment by Equipment for use Outdoors Notified Body for EC Directive 2000 14 EC Intertek Shanghai Model Type Motor Size Measured Sound Power Guaranteed Sound Power Cutting Width HY...

Page 42: ...us for assistance We reserve the right to make any modifications without prior notice whenever necessary Our latest manuals are also placed online All our manuals can be downloaded at www hyundaipower...

Page 43: ...u Phone Call our team on 01646 687880 open Monday Friday 8 30am 5pm Email aftersales hyundaipowerproducts co uk Online Live Chat Go to www hyundaipowerproducts co uk Live chat is open Monday Friday fr...

Page 44: ...mbroke Dock UNITED KINGDOM SA72 4RW T 44 0 1646 687 880 F 44 0 1646 686 198 E info hyundaipowerproducts co uk www hyundaipowerproducts co uk Imported Distributed by Genpower Ltd for The United Kingdom...

Reviews: