background image

www.hyundaipowerproducts.co.uk

01646 687 880

aftersales@hyundaipowerproducts.co.uk

Maintenance

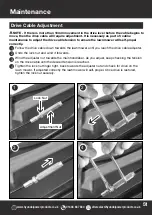
OPC Cable Adjustment

    NOTE - If there is more than 10mm movement in the OPC lever before the cable begins to 
move, then the OPC cable will require adjustment. It is necessary as part of routine
maintenance to adjust the OPC cable tension to ensure the lawnmower will start correctly. 

  50

Follow the OPC cable to the adjuster located on the side of the engine.
Undo the lock nut and wind it forwards.
Move the adjustment nut towards the lock nut and continually check the cable tension at the
lever.
Once the movement has been removed, hold the adjustment nut in place and tighten the lock 
nut back towards the adjustment lever to lock the cable in place. Check the cable adjustment 
has worked by starting the mower. If the mower still fails to start, re-adjust until the lawn 
mower starts. Also check that when the OPC lever is released, that the blade stops promptly.

1
2
3

4

1

2

3

4

Adjustment Nut

Lock Nut

Summary of Contents for HYM460SPE

Page 1: ...PETROL LAWNMOWER HYM460SPE Instruction Manual ...

Page 2: ...uced by Hyundai Power Products and should be kept with the product Please read and understand these instructions before you use your product Failure to do this may result in personal injury or damage to the product The safety precautions and warnings are to ensure your safety and protect you from harm or damage to the product The information contained in this manual was accurate at the time of pro...

Page 3: ... Our YouTube Channel 64 Warranty 64 Manual Updates 64 Returning Your Product 64 Leaving A Review 64 Ordering Spare Parts 64 Contact Us 67 Troubleshooting 52 Technical Data 53 Spare Parts 54 61 Recycling And Disposal 62 Declaration Of Conformity 63 Preparation 30 31 Adding Oil 30 Checking Oil Level 30 Adding Fuel 31 Grass Collection 32 Mulching 33 Side Discharge 34 Rear Discharge 35 Cutting Height ...

Page 4: ... to property Do not force the machine beyond its limits Use the correct machine for your application Know how to stop the machine quickly in case of emergency Understand the use of all controls ALL MAINTENANCE other than that listed in this manual should be carried out by professionally trained and certified personnel When using this machine for the first time and before actual work you MUST learn...

Page 5: ...n be caught in moving parts Protect eyes face and head from objects that may be thrown from the unit Always wear safety goggles or safety glasses with side shields when operating Always keep hands and feet away from all moving parts during operation Moving parts can cut or crush body parts Always keep hands and feet away from all pinch points Do not touch parts that might be hot from operation All...

Page 6: ...ore starting it A wrench or a key that is left attached to a rotating part of the machine may result in personal injury If the machine should start to vibrate abnormally stop the engine and check immediately for the cause Vibration is generally a warning sign of trouble Avoid accidental starting Be sure the engine s switch is off before transporting the machine or performing any maintenance or ser...

Page 7: ...me caution when changing direction on slopes When changing direction you need to be careful that the wheels do not hit any obstacles such as roots branches stones etc that can cause the machine to slide sideways or make you lose control of it Avoid driving on slopes steeper than 15 Make sure on slopes you have a steady foothold Find and locate all fixed objects in the ground such as sprinkler syst...

Page 8: ...d measures most suitable for the situation immediately and contact the medical authorities for any necessary health care Carefully remove any debris that might cause damage or harm persons or animals should it not be seen Disengage clutch lever before starting the engine Use extreme caution when reversing or pulling the machine backwards Do not carry passengers Never operate the machine at a fast ...

Page 9: ... Before refuelling Before adjusting the cutting height After striking a foreign object you must inspect the machine for damage and make repairs before using it again Before checking or working on the machine Before clearing blockages When transporting the machine Whenever you leave the machine unattended When crossing surfaces other than grass Before emptying the grass collector Before changing th...

Page 10: ...m engine speed is preset by the manufacturer and is within safety limits Keep a fire extinguisher on hand when operating this machine in dry areas as a precautionary measure Never leave the operating position when the engine is running The engine parts get very hot when running do not touch Danger of burns Follow the instructions to ignite the engine carefully whilst keeping feet away from moving ...

Page 11: ... carbon monoxide poisoning DO NOT use Petrol Diesel powered equipment inside any of the following Home garage tent camper van mobile home caravan or boat DO NOT use in an enclosed area or moving vehicle This is not exhaustive and if you are in any doubt contact your dealer If you think you have or someone around you has been affected by carbon monoxide poisoning Get them fresh air immediately by l...

Page 12: ...moke each time fuel is handled ALWAYS avoid inhaling fumes ALWAYS carry fuel in the correct and clearly marked container ALWAYS wear correct suitable and fit for purpose Personal Protective Equipment PPE suggested items are but not limited to safety gloves and overalls To avoid sparking or arcing keep grounded conductive objects such as tools away from exposed live electrical parts and connections...

Page 13: ...ther sources of ignition near the area of operation Always stop the engine and allow it to cool before filling the fuel tank Never remove the cap of the fuel tank or add fuel while the engine is running or when the engine is hot Loosen the fuel tank cap slowly to relieve any pressure in the tank ALWAYS keep the handles dry clean and free of oil and fuel After fueling ensure to tighten the cap secu...

Page 14: ...d battery dilute sulphuric acid Nickel cadmium potassium hydroxide alkali electrolyte Use fresh running water to wash off excess electrolyte continue this until medical assistance arrives Make sure that you do not wash the electrolyte to another part of your body or face If electrolyte comes in to contact with Eyes the electrolyte needs to be immediately washed away with large amounts of water Mak...

Page 15: ...o use and with all electrical supplies isolated you MUST check all electrical cables plugs and connectors for the following Are intact and have no signs of damage to include but not limited to bare wires chaffing cuts and loose wiring If there are any signs of damage the damaged item MUST be taken out of service until the damage has been repaired by an electrically competent person All trailing ca...

Page 16: ...ar breaks All of the above precautions may help reduce the risk of white finger disease but not rule out the carpal tunnel syndrome Long term and regular users are therefore recommended to observe the condition of your hands and fingers Seek medical attention immediately if any of the above symptoms should occur Vibrations Where Applicable The operating noise of the machine can damage your hearing...

Page 17: ...ommended when working PROTECTIVE CLOTHING MUST BE WORN Do not wear loose clothing gloves scarfs neckties or jewellery rings wrist watches which can be caught in moving parts HEAD PROTECTION MUST BE WORN Wear a safety helmet with a safety visor FACE SHIELD MUST BE WORN Wear a face shield to protect your face RESPIRATOR MUST BE WORN Wear a respirator Appropriate Personal Protective Equipment PPE MUS...

Page 18: ...go of the OPC lever Every precaution is only effective when it is followed exactly Intended Use This machine was designed and manufactured for cutting and collecting grass in gardens and grassy areas in areas in proportion to its cutting capacity controlled by a pedestrian operator The presence of attachments or specific devices can prevent cut grass from being collected or produce a mulching effe...

Page 19: ... parts Keep a 15 metre safety distance BYSTANDERS Never allow any bystanders in front of the unit Keep a 15 metre safety distance ROTATING PARTS The rotating parts are capable of amputating fingers toes and feet Failure to observe could result in serious injury or death UNATTENDED UNIT Always disengage the levers turn off the engine and remove the spark plug when the unit is left unattended CE SYM...

Page 20: ...www hyundaipowerproducts co uk 01646 687 880 aftersales hyundaipowerproducts co uk Features HYM460SPE Features 20 1 2 3 4 5 6 7 8 9 10 11 12 13 14 15 16 ...

Page 21: ...e The machine will stop if you let go of this lever 3 4 5 Recoil Starter Cord 6 Air Filter Prevents dust dirt and other contaminants from getting into the engine 7 Spark Plug 8 Exhaust This will get very hot Do not touch 9 HYM460SPE Features 10 Grass Collector This collects the grass whilst you mow Oil Filler Fill oil here 12 11 Cutting Height Adjustment Lever You can choose different cutting heig...

Page 22: ... done in accordance with the local regulations in force WARNING Some of the packaging material may be harmful to children Keep out of reach of children Unboxing Safety Carefully remove the product from the packaging and examine it for any sign of damage caused during shipping Lay the contents out and check them If any part is damaged or missing you must not use the machine Contact HYUNDAI Power Pr...

Page 23: ...rea NOTE Images may vary depending on model NOTE The machine may be supplied with some parts already assembled Prior to assembly check all items have been received The mulching plug may already be installed for transport NOTE This machine is shipped without fuel and oil and MUST be filled before use Failure to do so may cause damage to the engine that will not be covered by warranty Assembly Safet...

Page 24: ...n Hyundai HYM460SPE assembly 24 Attach the lower handle to the deck of the mower and tighten the lower bolts securely See image 1 2 1 Align the height adjuster knob with the desired height location hole There is a choice of 2 positions The bottom hole is the tallest position and the top hole is the shortest position See image 3 4 2 You will need a 13mm spanner or an adjustable spanner for assembly...

Page 25: ...powerproducts co uk 3 4 Attach the upper handle to the lower handle and tighten the quick release handle bolts securely See image 5 6 Slowly pull the recoil start handle up to the cord loop on the handlebar See image 7 8 Assembly 25 Image 5 Image 6 Image 8 Image 7 ...

Page 26: ...www hyundaipowerproducts co uk 01646 687 880 aftersales hyundaipowerproducts co uk Assembly 26 Step 2 Grass Collector Assembly Slot the metal pole into the plastic parts around the grass collector 1 ...

Page 27: ...ndlebar and if traced will enter the deck of the lawnmower behind the engine Follow the cable you want to attach and determine which lever it will attach to Gently prise the lever inwards from its locating hole in the main handlebar Insert the end of the cable in to the location hole on the lever Position the cable until it lies flat in the lever Refit the lever back into its location hole on the ...

Page 28: ...owerproducts co uk 01646 687 880 aftersales hyundaipowerproducts co uk Assembly 28 Step 4 Cable Clip 1 Use the plastic cable clip to attach the cables to the left hand handlebar if you are stood behind the machine ...

Page 29: ...www hyundaipowerproducts co uk 01646 687 880 aftersales hyundaipowerproducts co uk Assembly 29 Step 5 Attach Central Panel 1 Use the screws and screw the central panel into place ...

Page 30: ... occasionally to check the level DO NOT overfill 2 Once the correct amount of oil has been added refit the dipstick securely 3 Checking Oil Level Remove the oil filler cap and wipe the dipstick clean 1 Remove the dipstick and check the oil level It should be up to the upper mark on the dipstick 2 If the oil level is too low add SAE 30 or 15W40 engine oil to the upper mark on the dipstick DO NOT ov...

Page 31: ...NOT mix petrol with oil and clean up any spills immediately NOTE DO NOT overfill The fuel tank only needs to contain enough fuel to complete the days work If you run out of fuel refilling must only be done once the engine has cooled down Fuel stored within the machine for 28 days or more can go stale and should be drained before further use NOTE Make sure not to drip petrol onto the plastic parts ...

Page 32: ...rproducts co uk Operation 32 Lift the rear discharge flap Remove the mulching plug if installed Grass Collection 1 2 Lift the back end of the grass collector up high to get the front hooks over the bars 3 Lower the rear discharge flap so it rests on the grass collector ...

Page 33: ...lector Mulching 1 2 Install the mulching plug 3 Lower the rear discharge flap What Is Mulching Mulching is the intelligent way to keep your lawn healthy This is when the grass clippings are cut into fine pieces which then fall back into the soil These fine pieces are rich in nutrients and act as a natural fertiliser This will keep your lawn healthy ...

Page 34: ...t the rear discharge flap and remove the grass collector 1 2 3 Install the mulching plug and lower the rear discharge flap Lift the catch on the side discharge flap and lift the flap 4 Hook the side discharge chute over the mounting points and lower the side discharge flap until it rests on the side discharge chute ...

Page 35: ...35 Rear Discharge Lift the rear discharge flap and remove the grass collector 1 2 Install the 2 rear discharge supports and rest the rear discharge flap onto the supports These are the rear discharge plugs They will keep the rear discharge flap open slightly for the grass clippings to discharge ...

Page 36: ...oducts co uk Operation 36 Cutting Height Adjustment Pull the adjustment lever outwards and select the required height 2 3 The height is automatically adjusted for all wheels This is the lowest height setting This is the highest height setting Make sure the engine is off 1 ...

Page 37: ...3 It may also be necessary to reduce ground speed and or push the lawnmower over the area a second time For extremely heavy cutting reduce the width of cut by overlapping the pre viously cut path and mow slowly Recommended Mowing Schedule Spring March April May Mow once a week on a high to medium height setting Summer June July August Mow twice a week under good growing conditions on a low setting...

Page 38: ...d by warranty 38 Before Each Use Always ensure that the machine is in a safe working condition Inspect and check safety devices and guards and check all nuts bolts and screws are secure 1 Check the oil level and fill the fuel tank 2 Make sure you know how to stop the machine and ensure you are familiar with emergency stop 3 Start the machine following the instructions and stay clear of the machine...

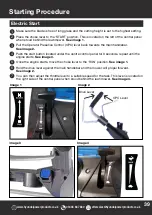
Page 39: ...he mower will propel forward See image 2 Image 3 Make sure the blade is free of long grass and the cutting height is set to the highest setting 1 2 Place the choke lever to the START position This is located on the left of the central panel when stood behind the lawnmower See image 1 Image 1 Image 2 Image 4 7 You can then adjust the throttle level to a suitable speed for the task This lever is loc...

Page 40: ... swiftly until the lawnmower starts See image 3 2 Place the choke lever to the START position This is located on the left of the central panel when stood behind the lawnmower See image 1 6 Hold the drive lever against the main handlebar and the mower will propel forward See image 2 Image 1 Image 2 Image 3 Image 4 7 You can then adjust the throttle level to a suitable speed for the task This lever ...

Page 41: ... The engine and exhaust will remain hot for a while after use Ensure the engine and exhaust has cooled before carrying out any maintenance refuelling or storage Before stopping the machine you must allow the engine to idle for 30 seconds You do not need to do this if you need to emergency stop the engine 1 Image 2 3 You can remove the start button for safety and to child proof the mower See image ...

Page 42: ... no circumstance liable or responsible Any maintenance operations or adjustments not explained in this manual must be carried out by your Dealer or a specialised Service Centre with the necessary knowledge and equipment to ensure that the work is done correctly maintaining the machine s original safety level Any operations performed in unauthorised centres or by unqualified persons will invalidate...

Page 43: ...ng them and remove all traces of spilt petrol immediately The warranty will not cover damage to plastic parts caused by petrol Regularly Paint on internal chassis parts may start to flake over time due to abrasive action of cut grass If this happens you should touch up with rust proof paint to prevent rusting that could corrode the metal You can use a light spray oil such as WD40 on exposed parts ...

Page 44: ...excessive grease Do not leave containers full of cut grass inside storage areas DO NOT store the machine with fuel in the tank in an area where the fuel vapours could reach an open flame a strong heat source or a spark DO NOT store a machine that has not been given time to fully cool down Engine must be cooled down fully before storage 44 Whenever the machine is to be handled lifted transported or...

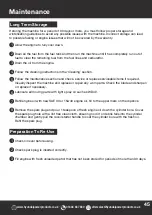
Page 45: ... 4 Follow the maintenance section and check service or replace serviceable items if required Visually inspect the machine and replace or repair any worn parts Check the blade and sharpen or replace if necessary 5 Lubricate all moving parts with light spray oil such as WD40 6 Refill engine oil with new SAE 30 or 15w40 engine oil fill to the upper mark on the dipstick 7 Remove the spark plug and pou...

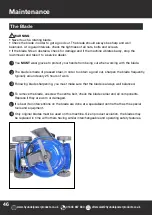
Page 46: ...l components Replace if they are worn or damaged 4 46 WARNING Never touch a rotating blade Check the blade in order to get a good cut The blade should always be sharp and well balanced At regular intervals check the tightness of all nuts bolts and screws If the blade hits an obstacle check for damage and if the machine vibrates badly stop the lawnmower and take it to a service dealer It is best if...

Page 47: ...pre filter Wash in detergent and let dry 4 Never use a brush to clean the filter it will only drive dirt into the fibres of the filter Wipe dirt from the air cleaner body by using a moist rag be careful to prevent dirt or debris entering in to the carburettor 5 Reinstall the filter and cover 6 CAUTION A dirty air filter will restrict the air flow to the carburettor which will reduce engine efficie...

Page 48: ...ug wrench 3 Remove spark plug using the supplied spark plug wrench 4 Clean the spark plug electrode with a soft wire brush making sure there is no damage to the insulator or electrode 5 The spark plug gap should be 0 70mm to 0 80mm Check the gap by using a feeler gauge Adjust as necessary by carefully bending the side electrode to achieve the correct gap 6 Refit the cleaned and adjusted spark plug...

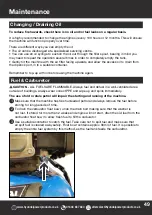
Page 49: ...unning of the machine Make sure that the machine has fresh unleaded petrol and always remove the fuel before storing for long periods of time 1 To drain the carburetor float bowl undo the drain bolt making sure that the washer is not lost If stored for more than 2 weeks and engine will not start drain the old fuel from the carburetor float bowl to allow fresh fuel to fill the carburetor 2 Use a su...

Page 50: ...able to the adjuster located on the side of the engine Undo the lock nut and wind it forwards Move the adjustment nut towards the lock nut and continually check the cable tension at the lever Once the movement has been removed hold the adjustment nut in place and tighten the lock nut back towards the adjustment lever to lock the cable in place Check the cable adjustment has worked by starting the ...

Page 51: ... self propel correctly Follow the drive cable down towards the lawnmower until you reach the drive cable adjuster Undo the lock nut and wind it forwards Wind the adjuster nut towards the main handlebar As you adjust keep checking the tension on the drive cable until the desired tension is reached Tighten the lock nut finger tight back towards the adjuster nut and check for drive on the lawn mower ...

Page 52: ...rvice dealer 1 2 3 Spark plug cap is incorrect Carburetor is flooded with fuel Faulty ignition module Engine difficult to start or loses power 1 2 3 Fit new correctly gapped spark plug Set plug gap to 0 7 0 8mm Clean or replace air filter element Engine idles poorly 1 2 3 Air filter element is dirty Air slots in engine are blocked Cooling fins and air passages under engine housing are blocked 1 2 ...

Page 53: ...apacity Fuel Type 1L Straight Unleaded Petrol Oil Capacity Oil Type 600ml SAE30 or 15W40 Start Method Recoil Start Electric Start Height Adjustment 5 Positions Cutting Height 25 75mm Cutting Width 46cm 460mm Grass Collector Capacity 70L Drive Self Propelled Functions Rear Discharge Side Discharge Mulching Collect Handle Type Soft Grip Foldable Measured Sound Level 95dB A Guaranteed Sound Level 96d...

Page 54: ...arts will jeopardise the safety of the machine may cause accidents or injuries for which the manufacturer is under no circumstance liable or responsible 1 2 Find the part you are looking for in the drawings Information about the parts can be found in the tables below or visit power spares co uk 3 Use this information to order the part 4 Contact us if you need help finding the correct part Drawing ...

Page 55: ...www hyundaipowerproducts co uk 01646 687 880 aftersales hyundaipowerproducts co uk Spare Parts 55 Drawing B Drawing C ...

Page 56: ...www hyundaipowerproducts co uk 01646 687 880 aftersales hyundaipowerproducts co uk 56 Spare Parts Drawing D ...

Page 57: ...www hyundaipowerproducts co uk 01646 687 880 aftersales hyundaipowerproducts co uk Spare Parts 57 Drawing E Drawing F ...

Page 58: ...SPE A13 Nut 1290033 HYM460SPE A14 Rope Guide 1001010 HYM460SPE A15 Cable Support 1290009 HYM460SPE A16 Bolt 1001013 HYM460SPE A17 Nut 1290011 HYM460SPE A18 Handle Plug 1288008 Drawing Number Spare Part Name Part Number HYM460SPE B1 Upper Cover of Left Panel 1149019 HYM460SPE B2 Bolt 1149020 HYM460SPE B3 Spring 1149021 HYM460SPE B4 Handle Assy 1149022 HYM460SPE B5 Cable for Throttle 1145023 HYM460S...

Page 59: ...M460SPE C15 Screw 1149057 HYM460SPE C16 Fuel filter Tube 1149059 HYM460SPE C17 Clip Ring 1149060 Drawing C Drawing Number Spare Part Name Part Number HYM460SPE B18 Button 1149041 HYM460SPE B19 Cable Holder 1290028 HYM460SPE B20 Cable 1148039 HYM460SPE B21 Lower Cover of Right Panel 1149044 HYM460SPE B22 Cup Holder 1149031 Drawing B Continued Drawing Number Spare Part Name Part Number HYM460SPE D1 ...

Page 60: ...SPE D28 Bolt 1143089 HYM460SPE D29 Side Discharge Cover Shaft 1290078 HYM460SPE D30 Side Discharge Cover Spring 1290079 HYM460SPE D31 Cover of button 1290081 HYM460SPE D32 Spring for button 1290082 HYM460SPE D33 Side Discharge Cover 1290083 HYM460SPE D34 Locking Button 1290084 HYM460SPE D35 Side Discharge Guiding Board 1290085 HYM460SPE D36 Window Repair 1149085 HYM460SPE D37 Charger 1149086 HYM46...

Page 61: ...plit Pin 1290096 HYM460SPE E12 Belt Li650 1290097 HYM460SPE E13 Gearbox 2020 Models 1141271 HYM460SPE E14 Spring 1148114 HYM460SPE E15 Pin 1290100 HYM460SPE E16 Nut 1141114 HYM460SPE E17 Shaft Sleeve 1290102 HYM460SPE E17 1 Bearing 1290103 HYM460SPE E18 Bolt 1290077 HYM460SPE E19 Lock Ring 1290105 HYM460SPE E20 Flat Washer 1290106 HYM460SPE E21 Left Gear 1290107 HYM460SPE E22 Right Gear 1290108 HY...

Page 62: ...is compatible with the environment We are a Member of the VALPAK National Compliance Scheme and our registration number is RM08660 For further information about disposal please contact your Local Authority You can also get more advice and guidance about recycling at the following website http www recycle more co uk Should you pass this product on to another user either sold or loaned you MUST pass...

Page 63: ...ents of the following documents EN ISO 3744 2010 EN ISO 11094 1991 EN ISO 5395 1 2013 EN ISO 5395 2 2013 EN ISO 14982 2009 Delclaration for 2000 14 EC Noise Emissions in the Environment by Equipment for use Outdoors Notified Body for EC Directive 2000 14 EC TÜV Rheinland Shanghai Co Ltd Model Type Cutting Width Measured Sound Power Guaranteed Sound Power Engine Speed rpm HYM430SP E HYM460SP E HYM5...

Page 64: ...n or something unclear please contact us for assistance We reserve the right to make any modifications without prior notice whenever necessary Our latest manuals are also placed online All our manuals can be downloaded at www hyundaipowerproducts co uk Returning Your Product If you are returning your product please contact the dealer for their returns policy Leaving A Review We work very hard to g...

Page 65: ...nd Heavy Duty Trenchers Compactor Plates Petrol Compactor Plates Cement Mixers Portable Electric Cement Mixers If you would like more information on any of these products please contact our sales team on 01646 687880 or visit our website www hyundaipowerproducts co uk Mini Dumpers 4 Wheel Drive Mini Dumpers And Tracked Dumpers Yard Sweeper Self Propelled Yard Sweeper Power Brush Scarifiers Petrol ...

Page 66: ...llowing If you need to contact an authorised dealer or customer service for information on servicing you may need to provide the following information The model number and serial number can be found on the grey specification sticker on your machine 1st Service Date Of Service Next Service Due 2nd Service Date Of Service Next Service Due 3rd Service Date Of Service Next Service Due 4th Service Date...

Page 67: ...aftersales team will be more than happy to help you Phone Call our team on 01646 687880 open Monday Friday 8 30am 5pm Email aftersales hyundaipowerproducts co uk Online Live Chat Go to www hyundaipowerproducts co uk Live chat is open Monday Friday from 8 30am 5pm Post Genpower Limited Isaac Way Pembroke Dock Pembrokeshire SA72 4RW UK 67 ...

Page 68: ...embroke Dock UNITED KINGDOM SA72 4RW T 44 0 1646 687 880 F 44 0 1646 686 198 E info hyundaipowerproducts co uk www hyundaipowerproducts co uk Imported Distributed by Genpower Ltd for The United Kingdom Ireland Licensed by Hyundai Corporation Korea ...

Reviews: