background image

EN   21 


damaged  or  worn  blade  needs  to  be 
replaced. Only use original accessory. 

  Remove foreign objects such as stones, 

sticks,  branches,  bones  and  wires  from 
the area you are going to mow. 


Power Plug 

  The  voltage  of  the  current  source  must 

be the same as the voltage indicated on 
the nameplate of the device. 

  The  current  source  must  be  sufficiently 

fused.  Recommended  fuse  rating  is  30 
mA max. 

  For  the  extension,  a  cable  designed  for 

outdoor  use  with  a  sufficient  cross-
section  and  splash-proof plugs  must be 
used.  Recommended  cross-section  for 
cable lengths up to 20m - 1.5 mm2, up to 
50m - 2.5 mm2. 

  The  extension  cable  must  have  a 

protective conductor which is connected 
to  the  protective  conductor  of  your 
electrical device via the power plug. 

  Be  careful  not  to  expose  the  cable  to 

heat, oil, or sharp objects. 

  When using a cable reel, the cable must 

be  completely  rolled  out  before  use. 
Coiled cable may overheat. 

  Do not use any adapters that do not have 

splash  protection  and  are  not  intended 
for outdoor use. 

  When  unrolling,  the  cable  should  be 

checked  for  damage.  Damaged  cable 
should  be  replaced  immediately  and 
completely. 

  Never plug or touch the power plug with 

wet hands or during rain. 

  To prevent an accidental start-up of the 

device,  make  sure  that  the  motor  lever 
and the safety button on the device are 
not  actuated  before  inserting  the  power 
plug. 

  Never pull the cable itself to pull the plug 

out of the socket. 

  Make  sure  that  you  don't  run  over  the 

cable during the mowing. If this happens, 
however,  get  away  from  the  device 

immediately  and unplug the  power  plug 
from the socket before touching the cable 
or the device again. 

  The  device  must  be  switched  off 

immediately and the power plug must be 
unplugged,  if  you  leave  the  device 
unattended,  or  during  maintenance, 
repair and cleaning work, before removal 
of 

blockages, 

when 

lifting 

and 

transporting  the  device,  after  a  collision 
with foreign objects or when abnormally 
high vibrations occur. 

Caution: After switching off the device, 
the  blade  continues  to  rotate  for  a  few 
seconds.  Make  sure  the  blade  has 
stopped  completely  before  working  on 
the device. Never touch a rotating blade. 


Use 

  Only  work  during  the  day  or  with 

sufficient artificial lighting. 

  Do not use the lawn mower during rain or 

on wet grass.  

  Do not tilt the lawn mower when you are 

starting the engine. 

  Damaged  protective  guards,  covers  or 

machine  parts  need  to  be  repaired  or 
replaced before use.  

  Use the lawn mower calmly, do not run. 

  Keep  an  eye  on  persons,  children  and 

animals near you. The person operating 
the lawn mower is responsible for injuries 
to  other  persons  or  damage  to  their 
property. 

  If you need to mow a graded surface, be 

careful  to  walk  and  stand  safely  and  to 
work at right angles to the grade, never 
upwards  or  downwards.    Working  on 
areas with a grade of more than 15° is not 
allowed. 

  Be  particularly  careful  when  changing 

direction. Backwarding is to be avoided. 
Pay particular attention to not stumbling 
over the cable or running over the cable 

  Turn the lawn mower off when you need 

to cross an unplanted area.  

Summary of Contents for LM3601E

Page 1: ...1ES LM4001E LM4001ES ORIGINAL BETRIEBSANLEITUNG EN ELECTRIC LAWN MOWER ORIGINAL OPERATION INSTRUCTIONS FR TONDEUSE ELECTRIQUE MODE D EMLOI D ORIGINE IT RASAERBA ELETTRICO ISTRUZIONI PER L USO ORIGINAL...

Page 2: ...er from your specific model Subject to technical changes FR REMARQUE Les donn es et illustrations de ce manuel sont fournies pour votre r f rence uniquement et peuvent diff rer en fonction du mod le S...

Page 3: ...3 1 2 3 10 9 7 8 5 12 4 6 11 B1...

Page 4: ...4 C1 x 1 x 1 x 2 x 2 x 2 x 1...

Page 5: ...5 D1 D2 D3...

Page 6: ...6 D4 D5 D7 D6 D8...

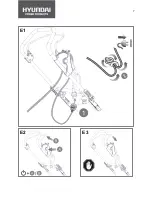
Page 7: ...7 E1 E2 E3...

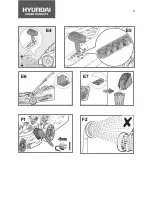
Page 8: ...8 E4 E5 E6 E7 F1 F2...

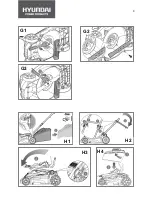
Page 9: ...9 G1 G2 G3 H1 H2 H3 H4...

Page 10: ...700 U min 3700 U min Schnittweite 360 mm 400 mm Min Max Schnitth he 20 70 mm 20 70 mm Schnitth hepositionen 5 5 Grasfangkorb Volumen 45 l 50 l Raddurchmesser vorne hinten 140 180 mm 140 200 mm Schalld...

Page 11: ...Auch wenn Sie das Ger t unbeaufsichtigt stehen lassen muss der Netzstecker gezogen werden A5 Gefahr durch elektrischen Stromschlag Achten Sie auf das Stromkabel und halten Sie es fern von dem Schneide...

Page 12: ...n in Ber hrung kommt Beim Verwenden einer Kabelrolle muss das Kabel vor der Anwendung komplett ausgerollt werden Zusammengerolltes Kabel kann berhitzen Verwenden Sie keine Adapter die keinen Spritzwas...

Page 13: ...he fahren m ssen Heben oder kippen Sie das Ger t niemals beim laufenden Motor Achten Sie darauf dass Ihre H nde und F sse mit rotierenden Teilen nicht in Ber hrung kommen Wartung Schalten Sie das Ger...

Page 14: ...ichtet werden D3 Klappen Sie die Exzenterspanner auf den beiden Seiten zu D4 Montieren Sie den oberen Griffb gel W hlen Sie die Bohrung aus die Ihrer gew nschten H he des Griffb gels entspricht D5 Zie...

Page 15: ...m glichst in geraden Bahnen Dabei sollen die Bahnen um einige Zentimeter berlappen Fangen Sie mit M hen immer an dem Rand der Rasenfl che der am n chsten zur Steckdose liegt Bewegen Sie das Ger t von...

Page 16: ...r gewaschen und getrocknet werden Stellen Sie sicher dass der Grasfangkorb komplett trocken ist bevor Sie ihn wieder benutzen Messerwartung Bild G Vor der Messerwartung soll das Ger t vom Netz getrenn...

Page 17: ...burg Pf ffikon SZ den 01 03 2017 Dr E Ilinich Managing Director PROBLEMBEHEBUNG Wichtig Wenn Sie am Ger t arbeiten achten Sie unbedingt darauf dass das Ger t ausgeschaltet und abgek hlt ist Klemmen Si...

Page 18: ...hild des Ger tes bereinstimmt entstehen Unsere Produkte werden unter strengsten Qualit tsanforderungen produziert Sollte Ihr Ger t jedoch unerwarteter Weise ausfallen bedauern wir das sehr In diesem F...

Page 19: ...d 3700 U min 3700 U min Cutting Width 360 mm 400 mm Cutting Height 20 70 mm 20 70 mm Cutting Height Positions 5 5 Grass Catcher Capacity 45 l 50 l Wheel Diameter front rear 140 180 mm 140 200 mm Sound...

Page 20: ...cutting blade A6 The device must not be used during rain or exposed to rain A7 A8 During mowing wear hearing protection and safety glasses General Information This machine is exclusively intended for...

Page 21: ...e that you don t run over the cable during the mowing If this happens however get away from the device immediately and unplug the power plug from the socket before touching the cable or the device aga...

Page 22: ...me the lawn mower is used The lawn mower may not be tilted Oil and petrol are at risk of leaking FUNCTION Machine Components Image B B1 Upper Handlebar B2 Engine Lever B3 Safety Button B4 Power Plug B...

Page 23: ...the engine lever the blade keeps moving for a few seconds Be sure to wait until the engine and the blade have come to a complete standstill before transporting the device or performing any work on the...

Page 24: ...e device Remove remaining grass clippings dust and dirt with a brush from the lawn mower surface Alternatively you can use pressurized air While doing that wear hearing protection and eye protection M...

Page 25: ...device can be stored permanently CONFORMITY We hereby declare on our sole and exclusive responsibility that the models LM3601E LM3601ES LM4001E LM4001ES manufactured in series by our facility comply w...

Page 26: ...it is used exclusively for private non commercial or non artisanal purposes The warranty applies to the repair of material defects and manufacturing defects The guarantee does not include wearing part...

Page 27: ...di taglio 360 mm 400 mm Altezza di taglio 20 70 mm 20 70 mm Posizioni regolazione altezza di taglio 5 5 Volume del raccoglierba 45 l 50 l Diametro delle ruote anteriore posteriore 140 180 mm 140 200...

Page 28: ...zione al cavo elettrico e tenerlo lontano dalla lama di taglio A6 Il dispositivo non deve essere utilizzato con la pioggia n deve essere esposto ad essa A7 Indossare cuffie e occhiali di protezione du...

Page 29: ...sotto la pioggia Per evitare un avviamento involontario della macchina controllare che la leva del motore e il pulsante di sicurezza non siano premuti prima di inserire la spina Non tirare mai il cavo...

Page 30: ...sul coltello necessario proteggere accuratamente le mani Indossare guanti di protezione adeguati Assicurarsi che dadi bulloni e viti siano assicurati correttamente all apparecchio FUNZIONE Componenti...

Page 31: ...lsante di sicurezza e tirare la leva di cambio del motore Dopo l avvio dell apparecchio possibile rilasciare il pulsante E3 Lasciar andare la leva di cambio del motore Il motore si fermer Attenzione D...

Page 32: ...necessaria un ordinaria operazione di cura e manutenzione Raccomandiamo di pulire l apparecchio dopo ogni utilizzo Attenzione L apparecchio pu essere sottoposto a manutenzione solo se gi spento e raff...

Page 33: ...alla portata dei bambini H1 Staccare l apparecchio dalla presa elettrica e lasciare raffreddare Rimuovere il cesto raccoglierba H2 Rimuovere le madreviti ad alette e aprire entrambi gli stringi pezzo...

Page 34: ...cesto raccolta erba non sia troppo pieno o intasato GARANZIA L apparecchio dispone di un periodo di garanzia legale di 2 anni In aggiunta a questa garanzia vi promettiamo ad un uso esclusivamente pri...

Page 35: ...pparecchio Secondo la direttiva 2002 96 CE anche il vostro apparecchio non pi funzionante deve essere acquisito e smaltito separatamente dai rifiuti domestici Il proprietario deve avere cura di uno sm...

Page 36: ...e de rotation du moteur 3700 tr min 3700 tr min Largeur 360 mm 400 mm Hauteur 20 70 mm 20 70 mm Positions de hauteur 5 5 Panier de ramassage de gazon 45 l 50 l Diam tre de roue avant arri re 140 180 m...

Page 37: ...e choc lectrique Recherchez le c ble d alimentation et gardez le loin du couteau de coupe A6 L appareil ne doit pas tre utilis en cas de pluie ou d exposition la pluie A7 Porter une protection mute et...

Page 38: ...tion l ext rieur Lors du d roulement v rifiez que le c ble n est pas endommag Le c ble endommag doit tre remplac imm diatement et compl tement Ne jamais brancher ou d brancher la fiche secteur avec le...

Page 39: ...uli rement Remplacez les pi ces endommag es ou us es uniquement par des accessoires d origine Lors de l utilisation d accessoires non originaux le fabricant d cline toute responsabilit en cas de domma...

Page 40: ...e de la poign e D5 Serrer les crous oreilles Pliez les deux pinces excentriques sup rieures vers vous D6 Fixer le cordon d alimentation avec les pinces de c ble sur le guidon Assurez vous que le c bl...

Page 41: ...teur s teint automatiquement Si cela se produit D branchez le cordon d alimentation de la prise murale Laisser refroidir l appareil pendant 5 10 minutes Inspecter l appareil pour les dommages et les b...

Page 42: ...tionn e sur le support Ins rez la rondelle et serrez l g rement la vis G3 Resserrer le bloc de fa on ce que la lame ne puisse pas tourner Serrez fermement la vis avec la cl Utilisez toujours une cl dy...

Page 43: ...er une hauteur de coupe plus importante v rifier si la lame est tranchante Si n cessaire remplacez la lame Si l herbe fauch e n est pas compl tement r colt e v rifiez si le panier d herbe est trop rem...

Page 44: ...ment la directive europ enne 2002 96 CE votre appareil qui n est plus utilisable doit galement tre collect et limin s par ment des ordures m nag res Le propri taire doit prendre soin de l limination...

Reviews: