


HYUNDAI Video Door Phone
| HA-201 / HAC-201
16|17
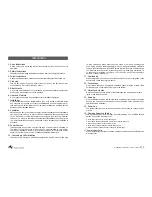
TROUBLE SHOOTING
If a problem persists after trying the remedies suggested below, contact your local
dealer or our technical support or sales department
Unit totally dead (Power Lamp OFF)
- The power cord is not properly inserted in the AC outlet, or the power is not
supplied.
- Check that the power ON/OFF switch is in the ON position.
Cannot gain enough volume when talking to other units
- Adjust volume with the button on the monitor (See page 6.)
Poor picture appears on the screen
- Make sure that the lens of outdoor camera is clean (Remove the transparent
tape attached on the outdoor camera after installation)
- After rain or when outside temperatures are very low, the camera lens may
temporarily fog over and cause a blurry image, but this is not malfunction and
normal operation will be restored when the moisture evaporates.
- The camera lens may be affected if it is in very bright direct sunlight from the sun
or artificial street or house light. When installing, if possible, choose a site that is
partially sheltered from direct light.
Can call and communicate, however, there is no audio signal
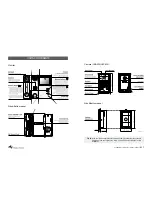
- Make sure the wiring between the monitor station and the camera station is
connected properly.
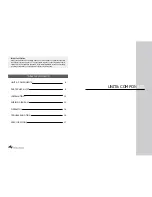
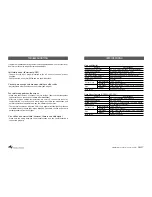
SPECIFICATIONS
Main unit Monitor
Flush Mount Camera (HCB-300/HCC-300)
Remark
Specifications
Voltage Requirements
DC 12V, 1.5A or 90~250V AC 50/60Hz(Smps)
Power Consumption
Maximum 8.5W, Stand by 1.0W
Monitor Screen
B&W Flat 4 Flat type C.R.T/4
Maximum Wiring Distance
50m/165 feet (22 AWG, 0.65mm 4wire)
Audio Communication
Duplex handset
Extensions Monitor
Environment
Temperature
-10 C to +40 C
Humidity
Below 90% (relative)
Size
Dimension
188W 208H 60D(mm) / 7-2/5W 8-1/5H 2-1/3D(Inches)
Weight
1.3 kg / 2.86 Ibs
Installation
Surface Mount Type
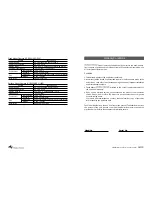
Remark
Specifications
Power Source
DC 12V (Supplied from Monitor)
Power Consumption
DC 12V, 0.25A
Display Output
1Vp-p/75, Composite EIA / CCIR, PAL/NTSC
Illuminance
0.1 Lux(B/W)/3Lux(Color)
Environment
Temperature
-10 C ~ 40 C
Humidity
Below 90% (relative)
Size
Dimension
120W 184H 16D(mm) / 4-3/4W 7-1/4H 3/5D(Inches)
Weight
0.5kg / 1.10 Ibs
Installation
Flush Mount Type
Summary of Contents for HA-201
Page 12: ...Memo ...


