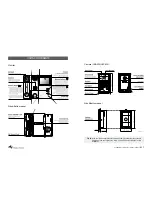
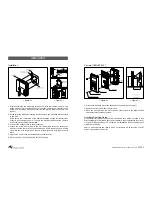
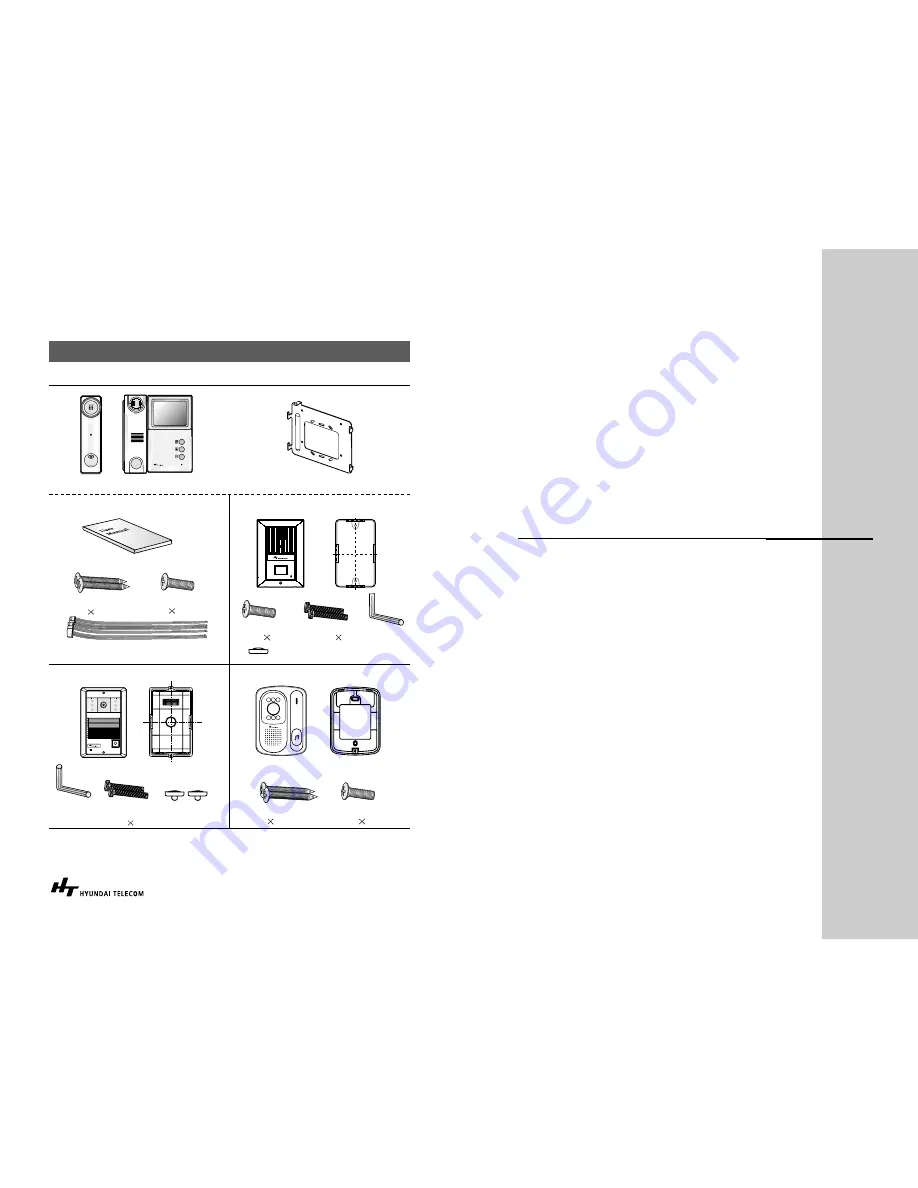
background image

INSTALLA

TION

PARTS CHECK-LIST

The parts shown below are provided by the manufacturer and are enclosed in the box.

Handset

HCB-300/HCC-300

HCB-150/HCC-150

Bracket

Flush Box

Tamper Proof 

Screws (3

30 mm)

Tamper Proof 

Screws (3 8 mm)

Monitor Mounting Screws

(3

8 mm)

Mounting Screw

(4

20 mm)

Mounting Screws

(4

20 mm)

Camera Mounting

Screw (3

8 mm)

Wrench 

Rubber screw

Covers

Rubber screw Cover

Main

Camera (HCB/HCC-300)

Camera (HCB/HCC-150E)

Camera (HCB/HCC-500)

User Manual

Cable

Mounting Bracket

< Figure 1>

HCB/HCC-500

Wall Bracket

Screw(4 30mm)

Wrench 

Summary of Contents for HA-201

Page 1: ...se instructions completely and keep it for future reference HA 201 HAC 201 Hanmi Building 45 Pang E Dong Songpa Ku Seoul 138 724 Korea Tel 82 2 2240 9234 9271 9273 Web site www hyundaitel com 6320000033H Hyundai Telecom Printed in Korea ...

Page 2: ... not installed and used in accordance with the instructions may cause harmful interference to radio communication There is no guarantee that interference will not occur in a particular installation If this equipment does cause harmful interference to radio or television reception which can be determined by turning equipment off and on The user is encouraged to try to correct the interference by on...

Page 3: ...it by battery of another power source consult the operating instructions 10 Grounding and Polarization This unit may be equipped with either a polarized 2 wire DC adaptor line plug a plug having one blade wider than the other or a 3 wire grounding type plug a plug having a third grounding pin The 2 wire polarized plug will fit into the power outlet only one way This is a safety feature If you are ...

Page 4: ...S 17 Important Notice Always use discretion when installing video and audio surveillance equipment especially when there is perceived privacy or an expectation of privacy Inquire regarding federal state and or local regulations applicable to the lawful installation of video and or audio recording or surveillance equipment Party consent may be required ...

Page 5: ...S Monitor Side Bottom panel UNIT COMPONENTS Camera HCB 300 HCC 300 Side Bottom panel Note If the camera lens angle requires adjustment simply position the lever of angle adjustment and then tighten the screw on it with a philip screwdriver before installation ...

Page 6: ...sh Box Tamper Proof Screws 3 30 mm Tamper Proof Screws 3 8 mm Monitor Mounting Screws 3 8 mm Mounting Screw 4 20 mm Mounting Screws 4 20 mm Camera Mounting Screw 3 8 mm Wrench Rubber screw Covers Rubber screw Cover Main Camera HCB HCC 300 Camera HCB HCC 150E Camera HCB HCC 500 User Manual Cable Mounting Bracket Figure 1 HCB HCC 500 Wall Bracket Screw 4 30mm Wrench ...

Page 7: ...acket hook and slide it down Insert the tiny machine screw into the hole in the tab at the top of the bracket to hold the monitor in place 5 Plug the AC power cord into a standard household outlet 6 Place the Power On Off switch in the On position Figure 2 Figure 3 INSTALLATION Camera HCB HCC 300 1 It is recommended to mount the flush box of the camera into the wall 2 Remove the front panel from t...

Page 8: ...deo Doorphone System Use only AWG 22 wire 0 65mm TIV wire 0 80mm and follow the appropriate wiring diagrams exactly for optimum system performance and safety When planning the initial HA 201 HAC 201 System wiring installation consider future system expansion The total wire length for a single camera and monitor system or any combination of additional cameras or monitors must not exceed 50m 165feet...

Page 9: ...l be replaced after another visitor presses the Call button of the secondary camera while you speak to previous caller at the master camera If you press Monitor button again your call returns to the previous caller at the master camera Monitoring Function 1 Press Monitor button to see the camera viewing area 2 If you install more than two cameras it will function in the following way Press Monitor...

Page 10: ...rtificial street or house light When installing if possible choose a site that is partially sheltered from direct light Can call and communicate however there is no audio signal Make sure the wiring between the monitor station and the camera station is connected properly SPECIFICATIONS Main unit Monitor Flush Mount Camera HCB 300 HCC 300 Remark Specifications Voltage Requirements DC 12V 1 5A or 90...

Page 11: ...s receipt showing the purchase date The Model Number is on the box and front of the manual The Serial Number is on the bottom of the unit Record the Model and Serial Numbers in the spaces provided below Refer to these numbers for warranty service Model No Serial No Flush Mount Camera HCB 500 HCC 500 Surface Mount Camera HCB 150E HCC 150E Remark Specifications Power Source DC 12V Supplied from Moni...

Page 12: ...Memo ...

Reviews: