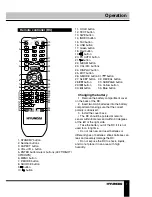
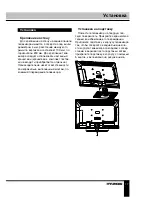
background image

12

13

General information

General information

Troubleshooting

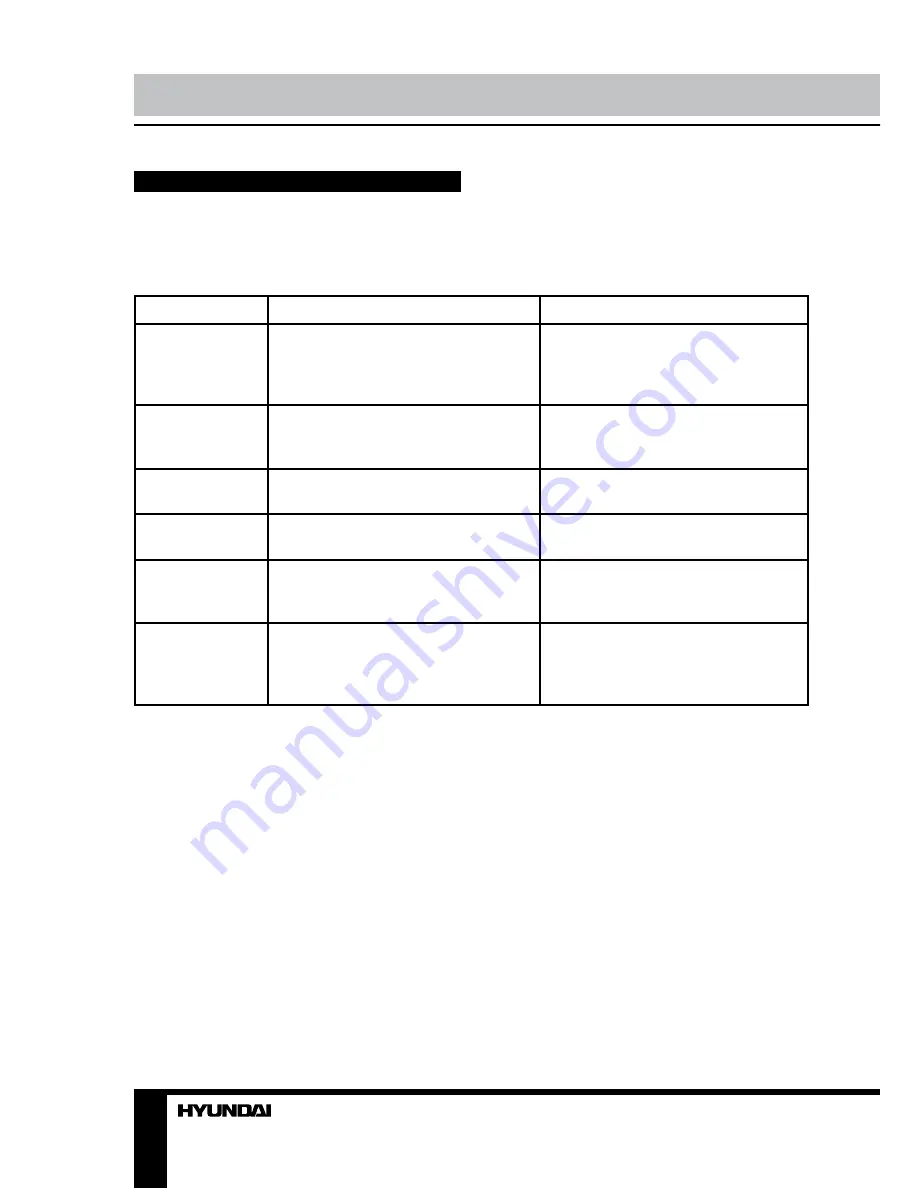
Below is a table describing simple measures that can help you eliminate most problems likely 

to emerge when this unit is in use. If below measures do not help, turn to a service center or to the 
nearest dealer.

Symptom

Cause

Solution

No picture, no 

sound, and no 

indicator light

The power cord is not plugged in.

Contrast, brightness, color and 

volume are all in the minimum value 

or TV is in mute mode.

Plug the power cord in.

Alter the value of contrast, 

brightness, color and volume.

Picture and 

sound with 

abnormity

Contrast and color are set improperly.

Color system is set improperly.

Sound system is set improperly.

Set the value of Contrast and color 

properly.

Set the sound system properly.

Picture is spotted 

or with snow

Signal source is low-grade or the 

signal is in a lower quality.

Use the qualified signal cord.

Blue background No video signal or the signal cord is 

improperly/not connected.

Connect the signal cord properly.

No sound

No audio signal or the signal cord is 

improperly/not connected.

Connect the audio signal cord 

properly.

Set the sound system properly.

The RC does not 

work

Batteries are improperly installed or 

exhausted.

Make sure the positive and the 

negative polarities are correct.

Reattach the battery lid.

Replace the batteries.

Causes of interference

Incorporated in your TV receiver are the most up-to-date devices to eliminate interference. 

Local radiation however, can create disturbances, which visibly affect your picture. Proper 
installations, a good aerial are your best safeguards against these disturbances.

•  RF INTERFERENCE: Moving ripples across the screen are caused by nearby transmitting or 

receiving short-wave radio equipment.

•  DIATHERMY: Herringbone pattern and partial picture loss can result from the operation of 

diathermy equipment from a nearby doctor’s surgery or hospital.

•  SNOW: Weak TV signals from long distant stations result in an instead picture and give the 

effect of falling snow. An antenna adjustment or antenna amplifier may be needed.

•  GHOST: Multiple image, caused by TV signals reflected back from surrounding buildings, 

hills, aircraft, etc. is minimized by correct aerial positioning.

•  CAR IGNITION: Nearby cars and electrical motors can cause small streaks across the picture 

or make the picture roll.

Summary of Contents for H-LED32V16

Page 1: ...LED TV Руководство по эксплуатации Instruction manual H LED32V16 ТЕЛЕВИЗОР ЦВЕТНОГО ИЗОБРАЖЕНИЯ ЖИДКОКРИСТАЛЛИЧЕСКИЙ LCD ...

Page 2: ...nnel setting Picture setting Sound setting Timer setting Option setting Screen setting USB operation General operatoins of file playback General information Troubleshooting Causes of interference Accessories Specifications 2 Table of contents Dear customer Thank you for purchasing our product For safety it is strongly recommended to read this manual carefully before connecting operating and or adj...

Page 3: ...t twist pull or roast the power cord Please contact the service center immediately if you found that the core is showed in the air or has been broken Please replace the AC outlet if the metal bolt cannot be inserted into the power socket completely or it cannot be fastened even when it was pushed in otherwise any accidents of shocks and fires would happen Never touch the antenna lie or power plug ...

Page 4: ...t If it moves or is tipped over it may be damaged Do not place any fire source such as candlelight close to this product or place it on this product If it is tipped over or fallen down it may cause damage or fire Do not place the unit into closed space of TV for better ventilation it can reduce the product lifetime Keep a space at least 10 cm at above left and right of the TV Please place all the ...

Page 5: ...source has a HDMI output jack you can connect the signal to the unit by HDMI cable not included Mini component input is intended to receive component video signal from the external device Connection is made with the help of supplied YUV connection cable Connect an external device e g VCR DVD recorder to the proper Audio Video output jacks of this unit with AV RCA cable Connect your headphones or e...

Page 6: ...utton 5 STANDBY button 6 IR sensor 7 Power indicator 1 Power switch 2 USB port 3 HDMI x 3 inputs 4 Power cord 5 Audio video output RCA 6 Digital audio output 7 Antenna jack 8 Headphone jack 9 Mini component video input 10 Mini audio video input 11 PC audio input 12 VGA input Back panel 1 2 3 4 5 6 7 8 9 10 11 12 ...

Page 7: ... 26 S MODE button 31 button 27 SLEEP button 32 REVEAL button 28 button 33 SUBPAGE button 29 button 34 Yellow button 30 button 35 Blue button Changing the battery 1 Remove the battery compartment cover on the back of the RC 2 Insert two AAA batteries into the battery compartment making sure that the correct polarity is observed 3 Install the cover back The RC should be pointed at remote sensor with...

Page 8: ...ending on the current signal source Teletext operations option Select a TV channel in order to pick up the picture signal of Teletext Teletext button functions are as follows TEXT Press this button to enter into TEXT mode Press this button again to enter mixed mode Press the button again to return to the channel you are watching HOLD Press this button to stop the move to the next page Press this b...

Page 9: ...e Highlight the needed channel Press green button then press UP DOWN buttons to select a symbol Press LEFT RIGHT buttons to select the next symbol Press green button to confirm Move Highlight the needed channel Press yellow button select the position to put the channel into Press yellow button to confirm Skip Highlight the needed channel Press blue button now this channel will be skipped when you ...

Page 10: ...er setting TIME Clock Off time On time Sleep timer Auto sleep Move Menu Select Exit Clock set the current time Off time set the TV to standby after the time has elapsed On time set the TV from standby to on audtomatically after the set time has elapsed Note in the event of power interruption the clock must be reset Sleep timer select the period until automatic switch off of the unit 10 240 min Aut...

Page 11: ...nd press ENTER button if you want to go back to the previous menu In the content menu press cursor buttons to select folder press ENTER button to enter it then press cursor buttons to select the file you want to watch or to listen to When highlighting the file the file information will appear on the right and picture will be previewed in the center not available for music files Press ENTER button ...

Page 12: ...nnect the audio signal cord properly Set the sound system properly The RC does not work Batteries are improperly installed or exhausted Make sure the positive and the negative polarities are correct Reattach the battery lid Replace the batteries Causes of interference Incorporated in your TV receiver are the most up to date devices to eliminate interference Local radiation however can create distu...

Page 13: ... support Power supply 100 240 V 50 60 Hz Power consumption 73 W Electric shock protection class II Unit dimensions with stand 776 x 189 x 560 mm Net Gross weight 10 2 kg 11 8 kg The LCD panel is a high technology product with many thin film transistors that can give you a fine picture details Occasionally a few non active pixels may appear on the screen as a fixed point of blue green red black or ...

Page 14: ...тавку Подключение Подключение Подключение внешней антенны Прочие подключения Управление устройством Элементы управления Передняя панель Задняя панель Пульт дистанционного управления Установка батареек Общие операции Операции с телетекстом Экранное меню Настройка каналов Настройка изображения Настройка звука Настройка таймера Настройка параметров Настройка экрана Операции с USB Операции воспроизвед...

Page 15: ...ком защищайте шнур питания от возможного нажатия на него или защемле ния особенно рядом с разъемами Не закрепляйте шнур питания метизами Если Вы не пользуетесь устройством длительное время или в случае грозы обязательно отключайте шнур питания из розетки а также отключайте все сигналь ные кабели от входных разъемов При отключении вилки из розетки всег да держитесь за утолщение на вилке не касайтес...

Page 16: ...ки открытого огня например свечи В случае их падения устройство может быть повреждено или может произойти возгора ние Установка телевизора в замкнутое пространство при эксплуатации может со кратить срок службы устройства поэтому необходимо обеспечить минимальную дистанцию между LCD телевизором и внутренними границами приспособления под аппарат для нормальной вентиляции минимум по 10 см свободного ...

Page 17: ...и не входит и приобретается отдельно Производитель не несет ответственности за неправильно выполненный монтаж по влекший повреждение телевизора Установка на подставку Поместите телевизор на твердую пло скую поверхность Прикройте экран мягкой тканью во избежание его повреждения Приложите подставку к корпусу телевизора так чтобы отверситя в задней нижней ча сти корпуса телевизора совпадали с отвер с...

Page 18: ...ения телевизором аудиосигнала с персонального компьютера Если источник видеосигнала имеет HDMI выход подключите его к HDMI входу телевизора используя специальный HDMI кабель не входит в комплект поставки Компонентный видеовход служит для получения компонентного видеосигнала от внешнего источника для подсоединения используется входящий в комплект кабель переходник YPbPr Подсоедините внешнее устройс...

Page 19: ...V AV 5 Кнопка STANDBY 6 ИК датчик 7 Индикатор питания 1 Выключатель питания 2 USB порт 3 Входы HDMI 3 шт 4 Кабель питания 5 Аудио видеовыход RCA 6 Цифровой аудиовыход 7 Разъем для антенны 8 Разъем для наушников 9 Компонентный видеовход 10 Аудио видеовход 11 Компьютерный аудиовход 12 Вход VGA Задняя панель 1 2 3 4 5 6 7 8 9 10 11 12 ...

Page 20: ... AUTO 21 Кнопка 22 Кнопка NICAM 23 Кнопки CH CH 24 Кнопка DISPLAY 25 Кнопка EXIT 26 Кнопка S MODE 31 Кнопка 27 Кнопка SLEEP 32 Кнопка REVEAL 28 Кнопка 33 Кнопка SUBPAGE 29 Кнопка 34 Желтая кнопка 30 Кнопка 35 Синяя кнопка Установка батареек 1 Снимите крышку отсека для батареек на задней части ПДУ 2 Поместите батарейки в отсек для батаре ек с правильным соблюдением полярности 3 Установите крышку от...

Page 21: ...емым каналами Нажмите кнопку FAV для отображения списка любимых каналов создание списка каналов описано ниже в параграфе На стройка каналов Нажмите кнопку DISPLAY для отобра жения информации о канале Нажимайте кнопку ASPECT для выбора формата изображения 16 9 4 3 Панорама Масштаб1 Масштаб2 Набор доступных форматов может различаться в зависимо сти от источника сигнала Операции с телетекстом опция В...

Page 22: ...ить в выберите номер под которым нужно сохранить канал Система цвета выберите систему цветности Система звука выберите систему звука Текущий канал выберите номер канала Поиск нажмите кнопку курсора ВЛЕВО или ВПРАВО для запуска поиска ближай шего доступного канала вниз или вверх по диапазону и сохранения его под выбранным номером Точная настройка выполните точную под стройку текущей частоты Редакто...

Page 23: ... режиме PC Установки ПК Автоконфигурация Гор центровка Вер центровка Размер Фаза сдвиг меню выбор Автоконфигурация автоматическая установка параметров Горизонтальная центровка отрегу лируйте горизонтальную позицию изобра жения Вертикальная центровка отрегули руйте вертикальную позицию изображения Размер отрегулируйте частоту смены изображения Фаза отрегулируйте фазу Настройка звука ЗВУК Режим звук...

Page 24: ...сплее отобразится интерфейс воспро изведения файлов с USB в котором Вы можете выбрать с помощью кнопок курсора ВЛЕВО ВПРАВО и кнопки ENTER воспроиз ведение музыки фото видео или текстов Данное устройство поддерживает видеофайлы с расширением ASF AVI MKV MPG DAT M2TS MP4 TS VOB с ви деокодеками WMV9 DIVX H263 MPEG 4 MPEGII MPEGI XVID и аудиокодеками AAC WMA MP3 DD AC3 Разрешение видеои зображения д...

Page 25: ...изведе ние на паузу или продолжить его Нажмите кнопку для остановки воспроизведения При воспроизведении файлов с изобра жениями видео и аудиофайлов нажимайте кнопку REPEAT для выбора режима повтор ного воспроизведения При воспроизведении аудиофайлов нажимайте кнопки для ускоренного воспроизведения назад или вперед Для выбора предыдущего или следующего файла нажимайте кнопки При воспроизведении фай...

Page 26: ...жения Установите правильную систему звука Изображение заснеженное Сигнал низкого качества Используйте исправный и каче ственный кабель Синий фон Отсутствует видео сигнал или кабель плохо подсоединен не под соединен Подсоедините кабель должным образом Звук отсутствует Отсутствует аудио сигнал или кабель плохо подсоединен не под соединен Подсоедините кабель должным образом Установите правильную сигн...

Page 27: ...нтуров изображения объясняется тем что теле визионный сигнал отражается от окружаю щих построек холмов самолетов и других объектов Свести такой эффект к минимуму можно изменив направление антенны АВТОМОБИЛЬНЫЕ ДВИГАТЕЛИ Работающие неподалеку автомобильные двигатели и электромоторы могут создавать помехи в изображении в виде небольших по лосок или дрожания изображения на экране Комплект поставки 1 ...

Page 28: ...альное напряжение питания 220 В 50 60 Гц Рабочее напряжение 100 240 В Потребляемая мощность 73 Вт Класс защиты от поражения электрическим током II Размеры устройства с подставкой 776 x 189 x 560 мм Вес нетто брутто 10 2 кг 11 8 кг ЖК панель является высокотехнологичным устройством содержащим множество тонкопленочных транзисторов которые дают четкие детали изображения В некоторых случаях могут появ...

Page 29: ......

Reviews: