background image

- 11 -

Load a general disc, upon finishing reading the disc in PBC OFF mode, you can select tracks
or chapters by number buttons (0/10,1-9,10+) and play.
* If the track or chapter number is less than 10, press the number buttons 0/10,1-9.
* If the track or chapter number is over 10, press 10+ button and press the one of the

number buttons 0/10,1-9. (

Note:

 If the track or chapter number over 20, press 10+ button

twice and press the one of the number buttons 0/10,1-9.)

l

If the general disc is recorded in menu, you can set the playback control function to “PBC
ON” mode by pressing the PBC button (

MENU

). The unit read the disc and the menu will

display on the TV screen, then use the number buttons to select the desired track playing.

l

When playing DVD disc, press the root button (

MENU

) to return to the root menu for

previous layer.

l

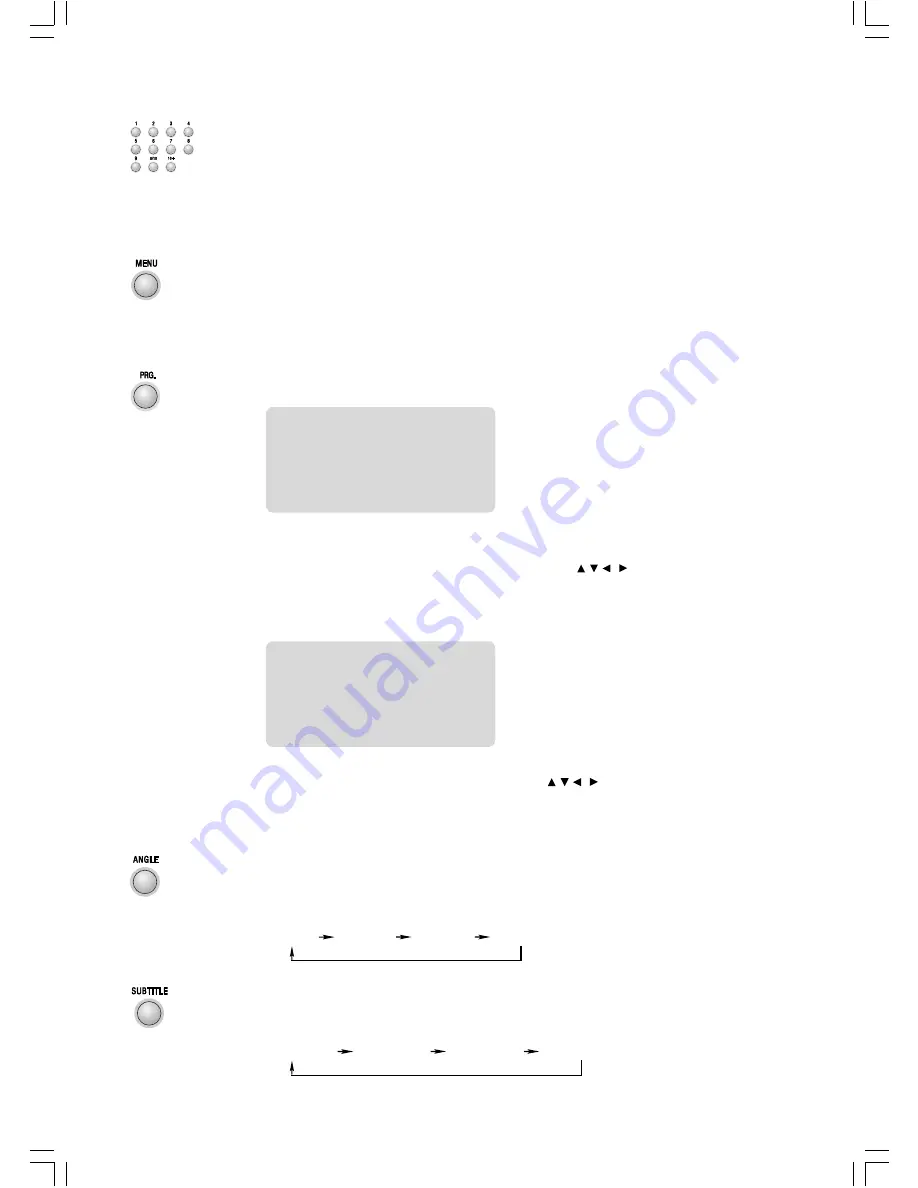
If your DVD disc has one or more music chapters or titles, you can setup playing order for
the disc by this button. Press the program button, TV set display is as following:

* Use the 0/10,1-9,10+ buttons to input the sequence number which you want to

program playing (the first selection is title and the second selection is chapter of the
programs menu.). After finishing program, Press the  , , ,   buttons to select “Start”
then press the 

ENTER

 button to start programmed play. (If you setup disc playing order

over than 10, press the “Next”  to setup.)

l

If you are playing the general disc, the TV display is as following:

* Use the 0/10,1-9,10+ buttons to input the sequence number you want to program

playing. After the program is finished, Press the  , , ,   buttons to select “Start” then
press the 

ENTER

 button to start programmed play. (If you setup disc playing order over

than 10, press the “Next”  to setup.)

You can use this function to view a DVD in different angles, if it has been recorded with this
function.
If the DVD disc which you are playing is recorded by four angles, then you can repeatedly
press the angle select button (

ANGLE

) to select one angle to watch.

When you are playing the DVD disc which are recorded with several subtitles, you can
repeatedly press the subtitle button (

SUBTITLE

) to select one of subtitle to display on the TV

screen. (You can also operate the key “

SUBTITLE

” on the panel of unit.)

01 TT:__

CH:

06 TT:__

CH:

02 TT:__

CH:

07 TT:__

CH:

03 TT:__

CH:

08 TT:__

CH:

04 TT:__

CH:

09 TT:__

CH:

05 TT:__

CH:

10 TT:__

CH:

Exit

Start

Next>>

Note: TT: Title

CH: Chapter

01 --

06 --

02 --

07 --

03 --

08 --

04 --

09 --

05 --

10 --

Exit

Start

Next>>

Angle 1

Angle 2

Angle 3

Angle 4

Subtitle 1/3

Subtitle 2/3

Subtitle 3/3

Subtitle Off

Summary of Contents for H-MS1100

Page 1: ...INSTRUCTION MANUAL H MS1100 ...

Page 2: ...tteries in the Remote Control 9 Turning the Power On and Off 9 Normal playing 9 Use the discs 9 Play picture CD disc 13 Listening to Radio Broadcasts 14 Setting the Clock 15 Setting the Daily Timer 15 Setting the Sleep Timer 15 Function Menu Setting List 16 Menu function setup 16 General Setup Page 16 Audio Setup Page 17 Video Setup Page 18 Preference Page 18 Password Setup Page 18 Protect the Dis...

Page 3: ...stable and slope position Keep this unit in a place with good ventilation surrounding To prevent fire do not cover the ventilation of the apparatus with news papers table cloths curtains etc 6 To prevent fire or shock hazard do not place objects filled with liquids such as vases on the apparatus And don t place lighted candles on the apparatus 7 To prevent fire or shock hazard do not expose this e...

Page 4: ...el Select Forward Button Push downward Fast Reverse Button Channel Select Backward Button Push left Previous Button Tuning Backward Button Push right Next Button Tuning Forward Button 14 Vocal Mode Select Language Select Button MONO Stereo Select Button 15 AUX 1 Input Terminals 16 AUX 2 Input Terminals 17 FM Antenna 18 AM Antenna Socket 19 Coaxial Output Terminal 20 Front Speaker Box Output Termin...

Page 5: ...n Button 23 AUX2 Function Button 24 VFD Display Mode Button VFD Darkness Select Button in standby mode 25 Pro Logic Button 26 Volume Mode Select Button 27 Super Bass Button 28 Fast Forward Button Tuning Forward Button 29 Next Button Channel Select Forward Button 30 Stop Return Button Memory Button 31 Program Button 32 Time Search Button 33 Direction Button 34 Direction Button 35 Direction Button 3...

Page 6: ...the TV connection According to the color system setting of TV select the color system in the TV Display function setting If the unit is connected to wide screen TV then set TV display to Wide in the function setting item If the unit is connected to normal TV then set TV display to Normal PS or Normal LB in the function setting item Terminal board for the player Terminal board for the TV TV ...

Page 7: ...rrectly according to our speaker specification or the loud speaker will be damaged by the heavy volume 2 Before connecting or cutting short the unit power please turn off the power of unit or turn the volume to minimum level first or it may damage the loudspeaker Terminal board for the player Front left speaker box TV Woofer speaker box Center speaker box Left surround speaker box Right surround s...

Page 8: ...quipment Connecting diagram Connection precautions This unit has two groups of audio input terminals you can use signal line to connect audio input terminals of this unit and audio output terminals of assistance equipment respectively then you can hear the sound sources Cautions Press the AUX1 function button to select AUX1 function When you are connecting AUX1 audio terminals please press this fu...

Page 9: ... terminal is for use the system with optical fibre output function only Connecting the AC Power Cord Insert the AC power cord into a wall outlet and your system is at your command Caution Be sure to unplug the power cord from the outlet when going out or the system is not in use for an extended period of time Connect the Headphone Connect a pair of headphones to the phone jacks No sound comes out ...

Page 10: ... it was turned off last time Turning the System Off Press the standby button STANDBY again to turn the system off called Standby Mode the clock will display on the VFD Caution Be sure to unplug the power cord from the outlet when going out or the system is not in use for an extended period of time Normal playing Use the discs In power on mode press the DVD function button DVD to select DVD functio...

Page 11: ...oose STEREO SUR5 1 or DVD5 1 audio output mode to output the audio signal STEREO Stereo audio output SUR 5 1 Analog 5 1 audio output mode it can make the sound with any format to analog 5 1 audio output mode DVD 5 1 Dolby digital or DTS 5 1 audio output mode You can also operate the key SUR MODE on the panel of unit When playing the disc with the Dolby surround Pro Logic sound track and Dolby surr...

Page 12: ...r of the programs menu After finishing program Press the buttons to select Start then press the ENTER button to start programmed play If you setup disc playing order over than 10 press the Next to setup l If you are playing the general disc the TV display is as following Use the 0 10 1 9 10 buttons to input the sequence number you want to program playing After the program is finished Press the but...

Page 13: ...P the screen shows orderly You may directly enter a time title or chapter number to search quickly on a disc The unit will play from this point l When playing DVD disc press the time search button TIME to search a title in a disc or search a chapter in a title Use the 0 10 1 9 buttons to enter the title number or chapter number l When playing general disc press the time search button TIME to searc...

Page 14: ...n the remote control to choose one of the following methods to select a picture playing When the directory and picture display on the TV screen you can first press the buttons on the remote control to move the cursor to illuminate the picture the picture will display on the TV screen then press the ENTER button on the remote control to start playing or press the 0 10 1 9 buttons on the remote cont...

Page 15: ...he well tuned station by pressing the memory button MEM You can preset up to 16 FM stations and up to 16 AM stations l Tune in the desired station then press the memory button MEM l Use the channel select backward button CH or channel select forward button CH once by once to select the preset number l Press the memory button MEM to store the station After 1 second the VFD returns to the broadcast ...

Page 16: ... twice hour indicator will blink Set the hour with the TU button or TU button Press the timer button SLEEP minute indicator will blink Set the minute with the TU button or TU button Press the timer button SLEEP the selected time is set Then set the daily timer to ON daily timer set is in effect or OFF daily timer set is to cancel by pressing the TU button or TU button Note You can set the daily ti...

Page 17: ...k or turning off the system Function Menu Setting List Caution The content of this chart is for reference only If something has changed please take the realistic display for standard Menu function setup If you want to set the function of this unit please press the function setting button SETUP to display the DVD function setting main menu then use the buttons and ENTER button Press the function se...

Page 18: ...are available you can set SPDIF output mode If this item doesn t use Optic output mode then SPDIF output is SPDIF RAW The factory setting was SPDIF RAW l LPCM Channel It is up to you to setup different channels l LPCM Out It is according to setup the audio signal between 48kHz to 96kHz Dolby Digital Setup l Dynamic When you watch disc in the midnight you can setup this function to adjust the volum...

Page 19: ...e adjust it to be light or dark Preference Page Audio Subtitle Disc Menu When disc has subtitle audio disc menu support Play ing type was default You can setup language If not this function is invalidated Parental Setup this system when playing disc which had age control you can through this function Default Restore to factory setting Password Setup Page Password Mode Select this item to set new p...

Page 20: ...ssible Cause Connections are incorrect or loose TV or power amplifier operates wrong The amplifier s receiving signal position is wrong Volume setting to minimum Connect wrong or loose TV Operation and setting is wrong Audio connect wrong Audio output mode setting wrong DVD Player doesn t match the TV system No disc in the tray The disc is upside down The disc is dirty or scratched The unit is fog...

Page 21: ...3dB S N Ratio 65dB TUNER FM Frequency range 65 108 MHz FM Noise limit sensitivity 20µV FM S N 46dB AM Frequency range 531 1602 kHz AM Noise limit sensitivity 3 0µV m AM S N 40dB Speaker Front Impedance 8Ω Input power 30W Sensitivity 85 4dB Frequency response 90Hz 18kHz Dimensions 136 W x 216 H x 198 D mm Surround Impedance 8Ω Input power 30W Sensitivity 85 3dB Frequency response 150Hz 16kHz Dimens...

Page 22: ...300Hz Dimensions 160 W x 317 H x 392 D mm Remote Distance 6m Angle 30O Accessories AM Loop antenna 1 Speaker box connect line 6 Video signal line 1 Rack 1 Remote control 1 Instructions manual 1 Note Design and specifications are subject to change without prior notice 1501LS5DRE404 01 ...

Reviews: