

H-MS1105 (
www.hyundai-electronics.ru
)
43
.
. (
TU+
)
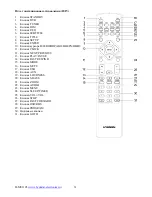
FAST REWIND
.
FAST REWIND
1
.
. (
TU-
)
PROGRAM
. (
16
.)
CH-/CH+
NEXT/PREVIOUS
,
.
:
,
.
NEXT
.
.
PREVIOUS
.
.
MODE,
FM
.
RDS (Radio Data System)
FM
RDS.
.
PS (
)
RDS
RDS
.
PS
OSD/RDS
,
3
CT (
),
PS.
PTY (
)
. (
., News (
), Rock (
), Classical music (
))
CT (
)
CT
,
RDS CT.
“RDS CLOCK”.
PS
OSD/RDS
,
CT, PTY
.
3
,
PS.
.
CLOCK;
.
VOL+/VOL-.
CLOCK;
.
VOL+/VOL-.
CLOCK,
,
.
:
10
,
.
,
.
Summary of Contents for H-MS1105
Page 1: ...H MS1105 DVD MICRO SYSTEM Instruction manual DVD ...
Page 24: ...H MS1105 www hyundai electronics ru 24 24 25 26 26 DVD 28 29 30 30 30 30 31 32 35 39 45 46 ...
Page 25: ...H MS1105 www hyundai electronics ru 25 100 240 1 ...
Page 28: ...H MS1105 www hyundai electronics ru 28 DVD DVD 5 1 Dolby digital surround DTS ...
Page 32: ...H MS1105 www hyundai electronics ru 32 1 2 1 2 3 HDMI ...
Page 34: ...H MS1105 www hyundai electronics ru 34 R L G 1 2 ...
Page 38: ...H MS1105 www hyundai electronics ru 38 1234 ...
Page 45: ...H MS1105 www hyundai electronics ru 45 DVD 8 ...


