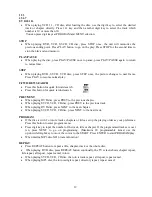
background image

20

A - B

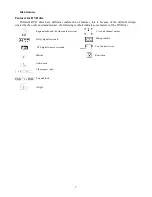
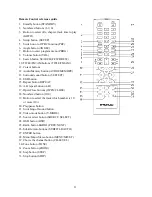
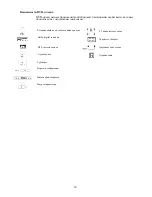
When playing DVD, SVCD, VCD, CD disc, press A-B button to repeat a certain contents.
Press A-B key on the start point (A) and the ending point (B) to select the repeat part.
Press A-B the third time, cancel A-B repeat and return to normal play

ZOOM

When playing DVD, SVCD, VCD disc, press ZOOM to zoom in or zoom out the picture.
In zoom in mode, press up/down/left/right to move the picture for viewing. The picture cannot be
moved in zoom out mode.

S.EFFECT

Press S.EFFECT (or SURR) button to change the surround sound effect.
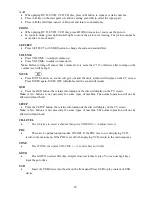
VOLUME

Press  to adjust volume up
Press VOLUME- to adjust volume down

Note

:  Before  turning  off  ensure  that  volume  level  is  more  than  “10”  otherwise  after  turning  on  the

volume level will be high.

MUTE

Press  MUTE  button, no  sound will give out and the  mute  symbol will  display on the TV screen.
Press MUTE again, MUTE OFF will display and the sound will resume.

OSD

Press the OSD button, the relative information of the disc will display on the TV screen.

Note:

A few buttons is not necessary for some types of machine. The normal operation will not be

affected without them!

SETUP

Press the SETUP button, the relative information of the disc will display on the TV screen.

Note:

A few buttons is not necessary for some types of machine. The normal operation will not be

affected without them!

CH-LEVEL

Press this key to select a channel then press /- to adjust its level.
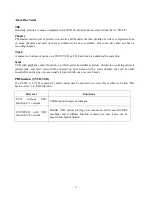
PBC

There are 2 optional output modes: ON/OFF. If the PBC is set on, when playing VCD,

return to the main menu. If the PBC is set off, when playing VCD, return to the main sequence.

TONE

Press TONE, then press /- to control bass and treble.

GOTO

Press GOTO to select title time, chapter time, track time to play. You can use digit keys

input the goto time.

USB

Insert the USB device into the slot on the front panel Press USB to play content of USB

device.

Summary of Contents for H-MS1113

Page 1: ...1 H MS1113 DVD MICRO SYSTEM Instruction manual DVD ...

Page 2: ...of content Table of content 2 For your attention 3 Features 4 Accessories 5 Disk features 7 Front panel and Rear panel illustrations 10 Connection 12 System Setup 14 Play 18 Troubleshooting 23 Specifications 24 ...

Page 3: ...d overload may arise which can entail fire Don t use constant current source Supply line cord protection Make sure that the cord is right connected and does not have any damage Incorrected attachment and damage of cord may cause fire and electrical shock Service Do not try to eliminate breakages by your own Should the sound is out the indicator does not light the smoke appears or any other trouble...

Page 4: ...96kHz 24bit audio digital processor Software intelligent upgrade Support of MPEG4 Standart playback of digital video compressed in DivX 3 11 DivX 4 12 DivX5 11 DivX Pro XviD Note Some files cannot be played due to software features High resolution component video output support future video equipment Professional digital Karaoke function Wide range FM AM Tuner Coaxial digital audio output Multi su...

Page 5: ...enna FM antenna Speaker connect cable Batteries AAA 1 5V Insert the batteries into the cell box Points the remote control at remote sensor within 8 metres and within 30 degree at left or right side Take the batteryout ofthe controller ifit is not used for a long time ...

Page 6: ...ries This unit can play the following types of discs Type of disc Symbol Contents DVD Audio Video SVCD Audio Video MP3 Audio Video CD VCD Audio Video CD DA Audio Kodak Picture CD JPEG Photo CD MPEG 4 Audio Video ...

Page 7: ... design created by the order and manufacturer the following symbols indicate some features of the DVD disc Regional code and the video output system Dolby digital surround DTS digital cinema surround Audio track Video aspect ratio Subtitle Parental lock Angle 5 1 sound channel output Hiding subtitle Two channel stereo Restriction ...

Page 8: ...storage Never store disc in the place with high temperature strong light or humidity Put the disc back to the case after playback Cleaning Wipe the discs from time using a soft cloth Always wipe from the center towards the edge Do not use daily used detergent to clean the disc Protect discs against any fingerprint do not stick or white anything on the surface of the disc ...

Page 9: ...on on which active and stillness picture divided into certain portion is called scene and every scene will be showed on screen menu with a scene number that can be easily found while on playing A scene usually is formed with one or several tracks PBC function SVCD VCD If a SVCD or a VCD is played a content menu may be showed on screen this is what we Called Play back control viz PBC function Disc ...

Page 10: ... USB slot 4 Display 5 DVD Radio 6 Prev 7 Next 8 Play Pause 9 Open Close 10 Headphone 11 Master vol Rear panel 1 Speaker output 2 Video output 3 VGA 4 S video output 5 Audio output 6 Coaxial digital output 7 SCART 8 Component Y Cb Pb Cr Pr 9 Antenna FM 10 Mic vol 11 Mic jack 12 Antenna AM ...

Page 11: ...ORY 13 Surround sound button S EFFECT 14 USB button 15 Repeat button REPEAT 16 A B repeat button A B 17 Open Close buttons OPEN CLOSE 18 Numbered button 0 10 19 Button to select the track which number is 10 or more 10 20 Play pause button 21 Switching off sound button 22 Video mode button V MODE 23 Source select button SOURCE SELECT 24 OSD button OSD 25 Radio button RADIO PREV NEXT 26 Subtitle Aut...

Page 12: ...h progressive scanning S Video Y U Pb V Pr VGA SCART Video Input Input Video and Component VGA SCART S Video video output output output Connection to a television Set DOWNMIX by menu ANALOG AUDIO SETUP PAGE in the position LT RT STEREO 3D SURROUND You will be able to connect Micro System to the TV set with S Video and SCART cables if your TV set equipped with S Video and SCART outputs You will be ...

Page 13: ...ital Audio Use the special coaxial cable to connect the coaxial output of this unit to the coaxial input of power amplifier Speaker output Use the specified cable in the accessories to connect this unit to the input of sound boxes Note The physical connection should accord to the audio output setup of this unit Please refer to Audio Setup in System Setup Connection of FM AM antenna If you would li...

Page 14: ...item when the unit is connected with the wide screen TV set ANGLE MARK It will show the ANGLE mark when playing DVD disc with multi angle view if selecting ON OSD LANGUAGE Select on screen display language CLOSED CAPTIONS This function doesn t work when the disc without caption If the caption is OFF press SUBTITLE key on the remote controller to make caption on The default setup is CAPTION ON SCRE...

Page 15: ...TPUT Select PCM frequency at 48 kHz or 96 kHz Note some amplifier don t support 96 kHz sampling and cause coaxial output abnormal The initial factory setup is 48 kHz DOLBY DIGITAL SETUP DUAL MONO You can choose the following sound modes STEREO L MONO R MONO MIX MONO DYNAMIC If watching large dynamic scope movie program at night to select this mode you can reduce the volume to a very low level at t...

Page 16: ...ting to VGA terminals Notes If the video setting differs with the physical connection the TV set may be without picture In case of no picture you can RESET the machine then keep pressing key V_MODE until the picture is OK again For the 2CH player the V MODE has no function COLOR SETTING You can set the SHARPNESS BRIGHTNESS CONTRAST GAMMA HUE SATURATION LUMA DELAY according to your preference Prefe...

Page 17: ...rks And these settings can be changed respectively by press key AUDIO SUBTITLE when playing PARENTAL The control level is for parental to control playing content and protect your children from violence and erotism The disc the level of which is higher than the setting level can not be played DEFAULT Reset to the initial factory setups PASSWORD SETUP Change the password The initial factory password...

Page 18: ...e than one audio language press AUDIO MEMORY to select you desired audio language In Radio receiving mode use this button to save the current station into the player memory SUBTITLE AUTO When playing the disc with multi subtitle function press SUBTITLE AUTO to select the subtitle language In Radio receiving mode use this button to auto adjust and save all stations with strong signal ANGLE When pla...

Page 19: ...playing DVD disc press PREV to the previous chapter When playing SVCD VCD CD disc press PREV to the previous track When playing DVD disc press NEXT to the next chapter When playing SVCD VCD CD disc press NEXT to the next track PROGRAM If the disc is with 2 or more tracks chapters or titles set up the playing order as your preference Press this button to enter program menu Press digit key to input ...

Page 20: ...ess MUTE again MUTE OFF will display and the sound will resume OSD Press the OSD button the relative information of the disc will display on the TV screen Note A few buttons is not necessary for some types of machine The normal operation will not be affected without them SETUP Press the SETUP button the relative information of the disc will display on the TV screen Note A few buttons is not necess...

Page 21: ...ize another radio stations If you want to listen radio station that you have memorized press RADIO button and choose the necessary channel KARAOKE Karaoke disc should be in DVD VCD format This disc should content music and subtitles Karaoke disc should show to the users the fragments and when one s should sing song It is necessary to use a microphone doesn t apply to the unit Connect microphone to...

Page 22: ... the following functions STOP entering picture preview mode PREV previous picture NEXT next picture PLAY to play picture UP mirror image in vertical DOWN mirror image in horizon LEFT rotate 90 degrees anticlockwise RIGHT rotate 90 degrees clockwise ZOOM change zoom mode UP DOWN LEFT RIGHT move zoom center select CONTINUE to exit ...

Page 23: ...re that the unit is connected directly to the television and is not connected through a video cassette recorder Microphones Microphones don t work Microphones aren t connected The level of volume is too low Unit display No play Check disk You inserted a disk the unit cannot play insert one it can Disc is dirty Wipe the disc clean You haven t inserted a disc insert one You haven t inserted the disc...

Page 24: ... Ch audio out Coaxial audio Optical audio AUX audio RCA Line out Composite video S Video Component YUV SCART VGA Jacks USB Progressive scan Karaoke MPEG 4 DivX Support of subtitle for MPEG4 Yes English and Russian Support of color systems PAL NTSC 16 9 and 4 3 two screen size for selection Digital equalizer with preset settings Children lock Multi shooting angles Functions Should read DVD disks of...

Page 25: ...25 25 26 27 28 DVD 30 33 35 37 40 41 SEARCH 42 47 48 ...

Page 26: ...26 220 1 ...

Page 27: ...27 DVD DVD Hyundai Dolby AC 3 LPCM Hi Fi 96 24 MPEG4 DivX 3 11 DivX 4 12 DivX5 11 DivX Pro XviD Karaoke AM FM DVD DVCD Super VCD VCD HDCD CDDA MP3 WMA Kodak Picture CD JPEG USB ...

Page 28: ...28 2 AAA 1 5V 8 30 ...

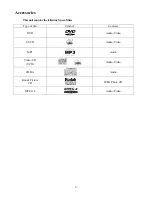
Page 29: ...29 DVD SVCD MP3 Video CD VCD CD DA Kodak Picture CD MPEG 4 ...

Page 30: ...30 DVD DVD Dolby digital surround DTS 5 1 ...

Page 31: ...31 DVD ...

Page 32: ...32 DVD 1 2 3 VCD PBC SVCD VCD SVCD VCD VCD PBC 1 1 SVCD VCD PBC 2 0 VCD ...

Page 33: ...33 1 Power 2 3 USB 4 5 DVD 6 Prev 7 Next 8 Play Pause 9 Open Close 10 11 VOLUME 1 2 3 VGA 4 S Video 5 6 7 SCART 8 9 FM 10 11 12 AM ...

Page 34: ...TITLE FM AM 11 UP DOWN LEFT RIGHT 12 AUDIO MEMORY 13 S EFFECT 14 USB 15 REPEAT 16 A B 17 OPEN CLOSE 18 0 10 19 10 20 PLAY PAUSE 21 MUTE 22 V MODE 23 SOURCE SELECT 24 OSD 25 NEXT PREV RADIO 26 FM AM SUBTITLE AUTO 27 ENTER 28 MENU MONO STEREO 29 CH LEVEL 30 TONE 31 ZOOM 32 STEP 33 STOP ...

Page 35: ...r SETUP VIDEO SETUP PAGE P RGB P YUV S Video Y U Pb V Pr VGA Scart Video Video VGA Scart S Video DOWNMIX ANALOG AUDIO SETUP PAGE LT RT STEREO S VIDEO SCART S VIDEO SCART RGB Scart Y Cb Cr MIXED AUDIO OUT DVD TV AUDIO IN ...

Page 36: ...36 DVD FM AM SOURCE SELECT AM ...

Page 37: ...37 SETUP SETUP ENTER T 4 3 PS 4 3 LB 16 9 DVD DVD DVD 20 STANDBY ...

Page 38: ...38 Lt Rt DOLBY Pro LOGIC SPDIF SPDIF SPDIF SPDIF RAW SPDIF PCM LPCM 48 96 96 48 Dolby Digital ...

Page 39: ...39 HDCD 1 2 1 YUV Y U V P YUV YUV Y U V RGB SCART P RGB RGB RGB VGA VGA STOP ...

Page 40: ...40 PAL NTSC NTSC PAL PBC PBC AUDIO SUBTITLE 136900 136900 136900 EXIT ...

Page 41: ...ANDBY STANDBY STANDBY POWER SOURCE SELECT SOURCE SELECT TITLE AM FM AM FM DVD TITLE AM FM TITLE AM FM AM FM V MODE V MODE YUV RGB VGA AUDIO MEMORY DVD AUDIO MEMORY 40 SUBTITLE AUTO DVD SUBTTITLE AUTO ANGLE ANGLE DVD MENU MO ST DVD MENU MO ST MENU MO ST ...

Page 42: ...42 RADIO SEARCH SEARCH VCD 1 1 CD 10 10 STOP DVD SVCD VCD CD STOP PLAY PAUSE STOP PLAY PAUSE PLAY PAUSE STEP DVD SVCD VCD STEP PLAY PAUSE PREV NEXT DVD PREV SVCD VCD CD PREV DVD NEXT SVCD VCD CD NEXT ...

Page 43: ...XT 20 UP DOWN LEFT RIGHT START REPEAT REPEAT DVD REPEAT CHAPTER TITLE ALL SVCD VCD CD TRACK ALL REPEAT ONE FOLDER SINGLE DVD SVCD VCD CD ZOOM DVD SVCD VCD ZOOM S EFFECT S EFFECT VOLUME VOL VOL VOLUME 10 10 MUTE MUTE OSD OSD ...

Page 44: ...44 SETUP SETUP CH LEVEL CH LEVEL VOL PBC 2 PBC PBC OFF VCD PBC PBC VCD 0 9 TONE TONE VOL GOTO GOTO USB USB USB USB ...

Page 45: ...45 SOURCE SELECT TITLE FM AM FM AM SEARCH AUTO SUBTITLE SUBTITLE AUTO 80 FM AM Radio DVD VCD MIC MIC VOLUME DVD MP3 MP3 JPG ENTER ENTER PLAY PAUSE MENU ...

Page 46: ...46 CD STOP MENU ENTER STOP NEXT PREV PLAY LEFT 90 RIGHT 90 ZOOM FAST FORWARD ZOOM FAST REWIND ZOOM UP DOWN LEFT RIGHT FAST REWIND FAST FORWARD EXIT MENU ...

Page 47: ...47 V MODE DVD 8 DVD 5 10 ...

Page 48: ... 2 AM FM 80 FM 64 108 DVD R RW DVD R RW CD R RW DVD DVCD Super VCD VCD HDCD CDDA MP3 WMA Kodak Picture CD JPEG Dolby Digital AC 3 2 0 AUX RCA S Video YUV SCART VGA USB MPEG 4 DivX MPEG4 PAL NTSC 16 9 4 3 0 220 50 ...

Reviews: