background image

4. PREPARATION BEFORE USE

The machine is shipped without oil - You MUST add oil before using this machine. 

4.1.


Oil type – SAE15W40. 

4.2.


Adding oil. 

4.2.1.


Place the generator on a flat, level surface. 

4.2.2.


Clean area around oil filler and 

remove oil cap and 

dipstick. Wipe the dipstick clean. 

4.2.3.


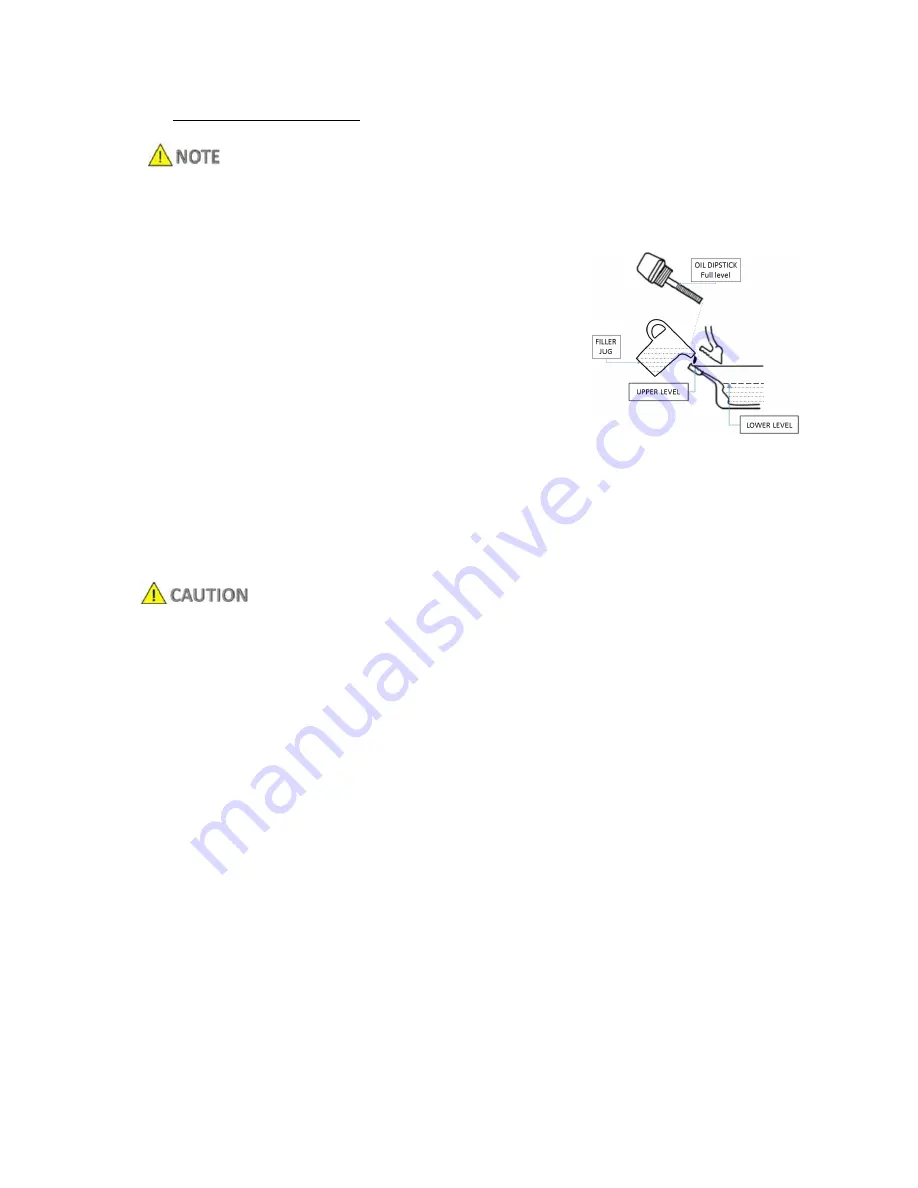
Slowly fill the engine with oil through the oil 

filler until it reaches the upper thread of the 

filler hole or to the full mark on the dipstick. 

4.2.4.


Stop filling occasionally to check oil level. DO 

NOT over fill. 

4.2.5.


Refit the oil filler cap and make sure the cap

 is 

 tightened. 

4.2.6.


You MUST check engine oil level before starting every session. 

4.3.


Fuel type Unleaded Petrol. 

4.4.


Adding fuel. 

Do not overfill the fuel tank you MUST allow space for fuel expansion. If the fuel tank is 

overfilled, fuel can overflow onto a HOT engine and cause FIRE and/or EXPLOSION. If fuel 

does spill, wait until it evaporates before starting engine. Check fuel lines, tank, cap and 

fittings frequently for cracks or leaks. Replace as required. 

4.4.1.


DO NOT light cigarettes or smoke when filling the fuel tank. Fuel is 

highly FLAMMABLE and it

'

s vapo

u

rs are EXPLOSIVE. 

4.4.2.


NEVER fill fuel tank when engine is running or hot. Turn generator engine OFF 

and allow engine to cool entirely before filling fuel tank. 

4.4.3.


Avoid spilling petrol on

to

 HOT engine. 

4.4.4.


Keep fuel away from sparks, open flames, pilot lights, heat, and other source

s


of ignition. 

4.4.5.


D

O NOT

 mix oil with 

petrol

4.4.6.


Once fueling has finished refit the fuel cap and fully tighten. Wipe up any 

spilled fuel before starting machine. 

Page 11

Ver 2 - December 2016

Summary of Contents for HY10000LEK-2

Page 1: ...OPEN FRAME PETROL GENERATORS Models HY2800L 2 HY3800L 2 HY3800LEK 2 HY7000LEK 2 HY9000LEK 2 HY10000LEK 2 User Manual ...

Page 2: ...Page 2 Ver 2 December 2016 ...

Page 3: ...IONS 10 4 PREPARATION FOR USE 11 12 5 STARTING STOPPING MACHINE 13 16 6 MAINTENANCE 17 20 7 STORAGE TRANSPORTATION 21 8 SPECIFICATION 22 9 RECYCLING PRODUCT DISPOSAL 23 10 DECLARATIONS of CONFORMITY 24 11 CONTACT DETAILS 25 12 MANUAL UPDATES 25 Page 3 Ver 2 December 2016 ...

Page 4: ...o their warning s Failure to do so may result in personal injury to yourself or those around you The FOLLOWING safety notes will help avoid or reduce risk of injury ordeath Indicates a hazard which if not avoided could result in serious injury or death Indicates a hazard which if not avoided could result in serious injury Indicates a hazard which if not avoided might result in minor or moderate in...

Page 5: ...following This list is not exhaustive and if you are in any doubt contact yourdealer 1 2 3 If you think you have or someone around you has been affected by carbon monoxide poisoning 1 2 3 1 Get them fresh air immediately by leaving the affected area or by opening doors and windows If safe and practical to do so make sure that the machine is turned off DO NOT enter a room you suspect of having carb...

Page 6: ...pose of waste fuels correctly 1 4 Fueling De fueling where applicable ALL FUELS ARE FLAMMABLE 1 4 1 ALWAYS fuel and defuel in a well ventilated area outside ofbuildings 1 4 2 ALWAYS wear correct suitable and fit for purpose Personal Protective Equipment PPE suggested items are but not limited to safety gloves and overalls 1 4 3 When fueling de fueling ALWAYS avoid inhaling fumes 1 4 4 When de fuel...

Page 7: ...n liquid or gel form 1 6 2 Should you come into contact with electrolyte you should 1 6 2 1 Remove all clothing contaminated with electrolyte If you cannot remove then saturate in water 1 6 2 2 Get medical assistance as soon as possible You must advise the medical staff of the type acid 1 6 2 2 1 Lead acid battery dilute sulphuric acid 1 6 2 2 2 Nickel cadmium potassium hydroxide alkali electrolyt...

Page 8: ...f conformity 2 UNPACKING ASSEMBLY 2 1 Unpacking 2 1 1 Place the carton on a firm flat surface 2 1 2 Remove everything from the carton except the generator 2 1 3 Open the carton by carefully cutting the carton down each corner being careful not to cut the machine 2 1 4 Leave the generator on the carton while you install the wheel kit N B The HY2800L 2 HY3800L 2 versions DO NOT come with wheel kits ...

Page 9: ...axle through the flat washer 3 and through the frame 2 3 3 2 Once axle is passed through the frame put the P clip 4 through the axle hole 2 3 4 To fit the rubber feet 2 3 4 1 Pass the bolt 9 through the rubber pad 8 and support 7 2 3 4 2 Pass the end of the M8 bolt 9 through the frame and secure it in place with the M8 nut 6 Page 9 Ver 2 December 2016 ...

Page 10: ...3 PARTS LOCATIONS 3 1 Generic locations locations may vary slightly between models Page 10 Ver 2 December 2016 ...

Page 11: ...ill the fuel tank you MUST allow space for fuel expansion If the fuel tank is overfilled fuel can overflow onto a HOT engine and cause FIRE and or EXPLOSION If fuel does spill wait until it evaporates before starting engine Check fuel lines tank cap and fittings frequently for cracks or leaks Replace as required 4 4 1 DO NOT light cigarettes or smoke when filling the fuel tank Fuel is highly FLAMM...

Page 12: ... electric shock in the event of ground fault condition in the generator or in connected electrical devices 4 5 3 Proper grounding also helps dissipate static electricity which often builds up in ungrounded devices 4 6 Floating earth portable generator use 4 6 1 This range of generators adopt a floating earth configuration which means that the Neutral of the alternator is not connected to the Earth...

Page 13: ...is OFF down position before starting the engine 5 1 Starting the engine Recoil start 5 1 1 On HY2800L 2 HY3800L 2 models press the engine switch 2 position switch to ON position on HY3800LEK 2 HY7000LEK 2 HY9000LEK 2 HY10000LEK 2 models press the engine switch 3 position switch to ON then to START position 5 1 2 Turn the fuel tap to the ON position 5 1 3 Move the engine choke lever to the START po...

Page 14: ...ine fails to start after 3 pulls or if unit shuts down during operation Make sure the unit is on a flat level surface and check for proper oil level in crankcase This engine is equipped with a low oil level protection device 5 2 For electric start If battery is discharged or unavailable use manual starting instructions as above 5 2 1 Follow steps 5 1 1 To 5 1 3 5 2 2 Press and hold the switch at t...

Page 15: ...cuit breaker rating of the output socket supplying the power or 5 3 1 2 2 The rated wattage current capacity of the generator Connect all electrical loads in the OFF position then turn ON for operation Turn all electrical loads OFF and disconnect from generator before stopping generator Exceeding generators wattage current capacity could damage generator and or electrical devices connected to it D...

Page 16: ...load for several minutes to stabilise the internal temperatures of engine and generator 5 5 3 Move the engine switch to the OFF position 5 5 4 Close the fuel valve 5 6 Low oil level system shutdown 5 6 1 The engine is equipped with a low oil level sensor that shuts down the engine automatically when the oil level drops below a specified level 5 6 2 If the engine shuts down by itself and the fuel t...

Page 17: ...son Follow the requirements in the Maintenance Schedule IMPORTANT Once a year replace the spark plug and the air filter A new spark plug and a clean air filter helps the engine run better and last longer 6 2 3 Generator maintenance 6 2 3 1 Generator maintenance consists of keeping the unit clean and dry Operate and store the unit in a clean dry environment where it will not be exposed to excessive...

Page 18: ...ructed 6 3 Engine Maintenance When working on the generator you MUST always disconnect the spark plug HT cable from the spark plug and keep the cable away from the spark plug The fuel tap should also be in the OFF position 6 4 Oil change Hot oil may cause burns Allow engine to cool before draining oil Avoid prolonged or repeated skin exposure to used oil Thoroughly wash exposed areas with soap 6 4...

Page 19: ...park arrestor located on the back of the muffler 6 4 3 2 Remove the clamp and spark arrestor screen 6 4 3 3 Clean the spark arrestor screen with a small wire brush 6 4 3 4 Replace the spark arrestor if it is damaged 6 4 3 5 Refit the spark arrestor 6 4 4 Air filter service 6 4 4 1 The engine will not run properly and may be damaged if using a dirty air filter Replace the air filter once a year Cle...

Page 20: ...may reach an open flame spark or pilot light as on a furnace water heater clothes dryer or other gas appliance Drain the fuel into an approved container outdoors away from open flame Make sure that the engine is cool DO NOT smoke in the vicinity NEVER cover the generator while the engine and exhaust areas are HOT 6 4 7 DO NOT store petrol from one season to another 6 4 8 Replace the petrol contain...

Page 21: ...ead and spark plug and pour about 1 2 ounce 15 ml of engine oil into the cylinder Cover the spark plug hole with rag Pull the recoil starter a couple times to lubricate the piston rings and cylinder bore 7 1 2 5 Install and tighten the spark plug Do not re connect spark plug HT lead 7 1 3 Clean the generator outer surfaces 7 1 4 Check that cooling air slots and openings on generator are clear of a...

Page 22: ...0v 1 x 16A 115v 1 x 16A 230v 1 x 16A 115v Digital meter Hours Volts Frequency MODEL HY7000LEK 2 HY9000LEK 2 HY10000LEK 2 ENGINE Engine hp 13 14 16 Displacement cc 389 420 459 Engine speed rpm 3000 Fuel tank capacity l 25 25 25 Fuel type Straight unleaded petrol Oil type SAE15W40 Oil capacity ml 1100 1100 1100 Start method s Recoil Electric Recoil Electric Recoil Electric Battery size volts 12 12 1...

Page 23: ...ccordance with your local authority or recycling centre 9 4 Battery recycling certain products contain batteries which should not be disposed of in your domestic waste 9 4 1 You MUST recycle batteries in accordance with your local authority or recycling centre 9 5 Unwanted packaging materials should be sorted and taken to a recycling centre so it can be disposed of in a manner which is compatible ...

Page 24: ...W HY7000LEK 2 6 5 kW HY9000LEK 2 7 5 kW HY10000LEK 2 Kevin Stanley c o Genpower Ltd Isaac Way Pembroke Dock Pembrokeshire SA72 4RW The conformity assessment procedure followed was in accordance with annex V or VI of the Directive Notified Body Certificate Nos Test report N0 Measured Sound Power Level Guaranteed Sound Power Level AV Technology Ltd Unit 12 Easter Court Europa Boulevard Warrington Ch...

Page 25: ... co uk 11 5 WEBSITE www hyundaipowerequipment co uk 12 MANUAL UPDATES 12 1 Our manuals are constantly being reviewed and updated However if should you find an error omission or something you find unclear please contact your dealer for assistance 12 2 Our latest manuals are also placed online 12 3 We reserve the right to make any modifications without prior notice whenever necessary Page 25 Ver 2 D...

Page 26: ...Page 26 Ver 2 December 2016 ...

Page 27: ...Page 27 Ver 2 December 2016 ...

Page 28: ...www hyundaipowerequipment co uk GENPOWER LTD Isaac Way London Road Pembroke Dock UNITED KINGDOM SA72 4RW T 44 0 1646 687 880 F 44 0 1646 686 198 E info hyundaipowerequipment co uk ...

Reviews: