background image

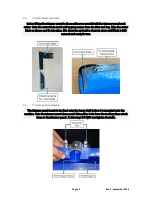
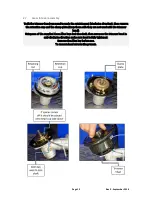
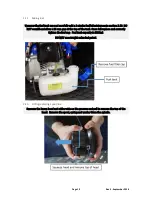
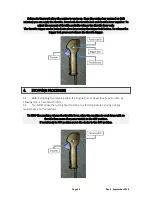
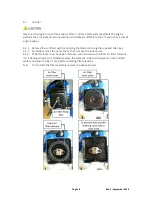
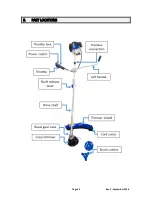
2.10.  Head shield/Ear defender assembly. 

Rotate to align the tags on the helmet to match the holes on the top of the visor. Place the 

visor over the tags, then rotate the tags 180° to secure into place. Place the ear defenders over 

the outside of the headband on the helmet and place into the clips.

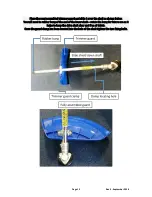
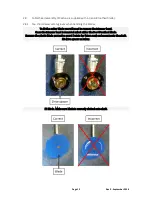
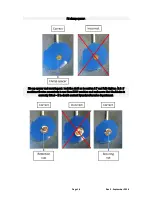
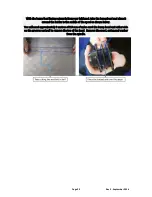
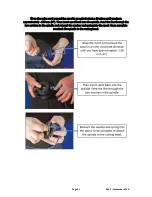
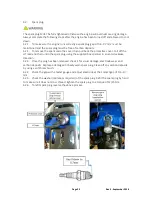
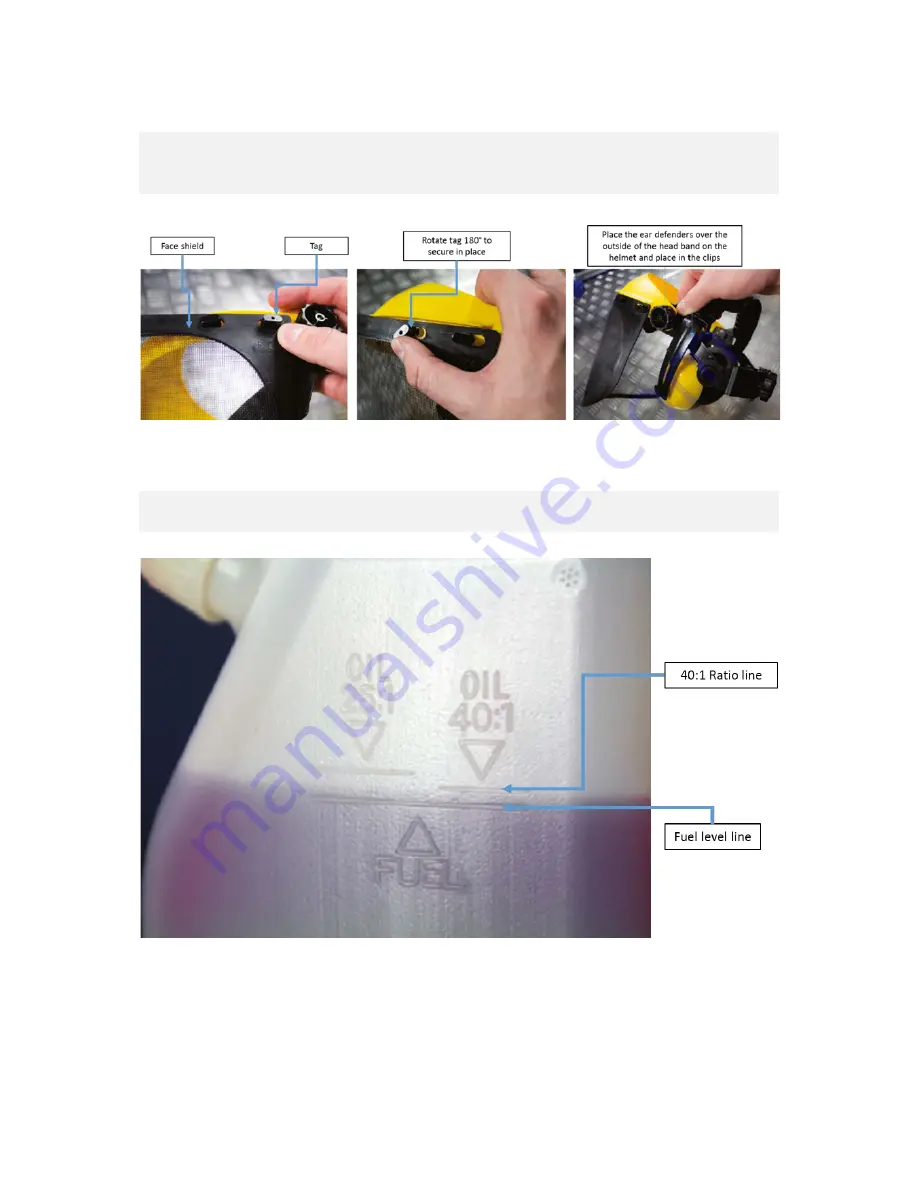
2.11.  Mixing 2 stroke oil. 

Fill the mixing bottle with fresh unleaded petrol to the fuel marker line use a 40:1 ratio. Then 

top up with 2 stroke oil to 40:1 ratio line shake until fuel/oil has mixed.

Page 18

Rev 3 - September 2016

Summary of Contents for HYBC5200

Page 1: ...BRUSHCUTTER Model HYBC5200 User Manual Licensed by Hyundai Corporation Korea...

Page 2: ...Page 2 Rev 3 September 2016...

Page 3: ...START 3 STARTING PROCEDURE 4 STOPPING PROCEDURE 5 USING THE MACHINE 6 MAINTENANCE 7 TROUBLESHOOTING 8 SPECIFICATION 9 PART LOCATIONS 10 DECLARATIONS OF CONFORMITY 11 RECYCLING PRODUCT DISPOSAL 12 CON...

Page 4: ...READ and keep the manual safe and pass it on if the machine is loaned or sold to another user You MUST fully read instructions to make sure you use and operate machine safely Appropriate Personal Pro...

Page 5: ...es 1 4 4 When de fueling ALWAYS use a propriety fuel retriever 1 4 5 ALWAYS carry fuel in the correct and clearly marked container 1 5 Electrical safety where applicable 1 5 1 Electricity can kill NEV...

Page 6: ...and may cause nerve damage and circulatory tissue death 1 7 2 Not all factors that lead to white finger disease are known but cold weather smoking and other diseases that affect blood vessels and bloo...

Page 7: ...r use the engine and exhaust will be very HOT you must keep all your all parts of your body and clothing including all combustible materials clear of the engine and exhaust 1 10 4 DO NOT use the machi...

Page 8: ...ush cutter for trimming trees 1 10 12 DO NOT wear rings and jewelry or loose dangling clothing that could get caught in the machine DO NOT wear footwear with unprotected toes and DO NOT work barefoot...

Page 9: ...HT lead from spark plug when checking machine or changing parts 2 2 This product includes Main unit Operators handle Trimmer head Bump feed nylon trimmer head 3 tooth steel blade 8 tooth steel blade S...

Page 10: ...gger assembly over the handle bar locate the hole and refit the screw and bolt through the trigger assembly N B Note orientation of trigger assembly power switch should be towards user Page 10 Rev 3 S...

Page 11: ...bolts and remove the cover place handle bar into cradle and align hole in shaft and refit the four Allen bolts once positioned to suit user tighten the bolts Handlebar and trigger assembly Page 11 Rev...

Page 12: ...as shown and fix into place N B Keep the protective sleeve in place until blade is fully secured and ready for use 2 6 Trimmer guard assembly The trimmer guard needs to be fixed onto the lower shaft b...

Page 13: ...low You will need to rubber bung of the end of the lower shaft retain the bung for future use as it helps to keep the drive shaft clear and free of debris Once the guard clamp has been located into th...

Page 14: ...ion cup and the clamp plate Keep these safe they are not used with the trimmer head Using one of the supplied 4mm Allen keys lock the shaft then screw on the trimmer head in anti clockwise direction m...

Page 15: ...fit the cutter blade you will need to remove the trimmer head Once the trimmer head is removed select either the 3 or 8 toothed blade Remove the plastic blade protective guard retain for future use a...

Page 16: ...nut Lock the shaft as in section 2 7 and fully tighten N B if machine vibrates excessively in use then STOP machine and make sure that the blades is correctly fitted If in doubt contact Hyundai afters...

Page 17: ...tter assembly remove the protection bung retain for future use undo the locking hand wheel press the locking trigger and insert the cutter assembly into the drive assembly until it locates with the sh...

Page 18: ...ate the tags 180 to secure into place Place the ear defenders over the outside of the headband on the helmet and place into the clips 2 11 Mixing 2 stroke oil Fill the mixing bottle with fresh unleade...

Page 19: ...t the top of the tank Once full replace and correctly tighten the fuel cap Fuel tank capacity is 1200ml DO NOT use straight unleaded petrol 2 13 Fitting replacing spool line Squeeze the bump head unit...

Page 20: ...around the holder in the middle of the spool as shown below You will need approximately 3 metres of 2 5 mm of nylon cord the bump head unit either side on the grooves and pull to remove the top of th...

Page 21: ...until you have approximately 150 mm 6 Then insert spool back into the spindle Feed the line through the two notches in the spindle and reinsert the washer and spring into the spool Once complete re a...

Page 22: ...with fuel oil mixture make sure the fuel cap is secure see section 2 11 Set the power switch on the handle to the ON position Pump the primer bulb about 8 to 10 times until fuel shows in the bulb Pag...

Page 23: ...resistance then pull briskly Repeat until machine starts When the engine starts move the choke to the OFF position DO NOT let go of the recoil handle instead allow the recoil cord to return gently On...

Page 24: ...the trigger lock press and release the throttle trigger 4 STOPPING PROCEDURE 4 1 Before stopping the machine allow the engine to cool down for a few minutes by allowing it to run without throttle 4 2...

Page 25: ...and damage to the machine 5 3 Wearing the shoulder harness When you use this machine always wear the provided harness Make sure that the machine is securely hooked onto the strap If you do not you wil...

Page 26: ...at the same level for an even depth of cut 5 4 7 Nylon trimming head is only to be used for trimming grass 5 4 8 Metal blade head is only to be used for cutting brush 5 4 9 To prevent overheating NEVE...

Page 27: ...must wear appropriate Personal Protective Equipment PPE Suggested PPE Sturdy footwear work gloves especially when working near blade long trousers and hearing protection Maintenance cycle Component Ea...

Page 28: ...undoing the Allen bolt using the supplied Allen key 6 1 2 Carefully remove the outer cover then remove the inner cover 6 1 3 Once the inner cover has been removed you can remove the foam air filter el...

Page 29: ...ad and then undo the spark plug using the supplied box spanner in an anti clockwise direction 6 2 3 Once the plug has been removed check it for visual damage electrode wear and carbon deposits Replace...

Page 30: ...ting head 6 4 3 Remove all fuel from the fuel tank 6 4 4 After all the fuel has been removed from the fuel tank Start the engine Allow the engine to run in idle until engine stops alone This allows th...

Page 31: ...actions 1 Replace or adjust NORMAL FUEL SUPPLY AND POOR SPARK Possible causes 1 Poor contact between spark plug cap and spark plug Possible corrective actions 1 Check or exchange MOTOR DOES NOT COME...

Page 32: ...oil Fuel type ratio Fresh unleaded petrol Semi synthetic 2 stroke 40 1 Drive type MACHINE Bevel gear grease type qty ml High temperature gear grease 25 Head line length diameter mm 3000 2 5 Cutting di...

Page 33: ...9 PART LOCATIONS Page 33 Rev 3 September 2016...

Page 34: ...Page 34 Rev 3 September 2016...

Page 35: ...at these Hyundai products conform to the following CE Directives 2006 42 EC Machinery Directive 2004 108 EC EMC Directive 2000 14 EC Amended by 2005 88 EC Noise Emissions Directive 97 68 EC_2010 26 EC...

Page 36: ...ng materials should be sorted and taken to a recycling centre so it can be disposed of in a manner which is compatible with the environment 11 6 The following symbol means that you should Reduce Reuse...

Page 37: ...ic warranty and warranty exclusions details for your product please visit our Customer services section on our website at www hyundaipowerequipment co uk If you require a hard copy of Warranty details...

Page 38: ...Page 38 Rev 3 September 2016...

Page 39: ...Page 39 Rev 3 September 2016...

Page 40: ...www hyundaipowerequipment co uk GENPOWER LTD Isaac Way London Road Pembroke Dock UNITED KINGDOM SA72 4RW T 44 0 1646 687 880 F 44 0 1646 686 198 E info hyundaipowerequipment co uk...

Reviews: