CZ-4
ENG-25
ENG
Radio Controlled Clock
-
After registered new channels or press “CHANNEL” button (B8) to stop scanning, the clock
will then scan the DCF time signal (“ ” flashes on the LCD ). Buttons will not function while
scanning for DCF or Thermo sensor’s signal unless they are well received or stopped
manually.
-
The clock automatically scans the time signal at 3.00 a.m. everyday to maintain accurate
timing. For failed reception, scanning stops (“ ” on the LCD disappear ) and repeats again
at 4.00 a.m. 5.00a.m. and 6.00a.m.
-
The clock manually scans the DCF time signal by holding “ ” button (B4) for 3 seconds.
For failed reception, scanning stops. (“ ” on the LCD disappear ).
-
Press “ ” button (B4) to stop scanning when receiving DCF time signal.
“ ” flashes indicate now is receiving DCF time signal
“ ” turns on indicate signal received successfully
-
“
DST
” is shown on the LCD if it is in Daylight Saving Time mode
Manual Time Setting
-
Hold “MODE” button (B5) for 3 seconds to enter Clock/Calendar setting Mode .
-
Press “+” (B2) or “-” (B4) buttons to adjust the setting and press “MODE” button (B5) to
confirm each setting.
-
The setting sequence is shown as follow: Hour, Minutes, Second, Year, Month/Day sequence,
Month, Day, Time Zone, Day-of-week language.
-
8 languages can be selected in Day-of-week, they are: German, English, Russian, Denmark,
Dutch, Italian Spanish and French,. The languages and their selected abbreviations for each
day of the week are shown in the following table.
-
The zone is used for the countries where can receive the DCF signal but the time zone is
different from the German time.
-
When the country time is faster than the German time for 1 hr, the zone should be set to 1.
Then the clock will automatically set 1 hour faster from the signal time received.
12/24 Hour Display mode
-
Press “+(12/24)” button (B2) to select 12 or 24 hours mode.
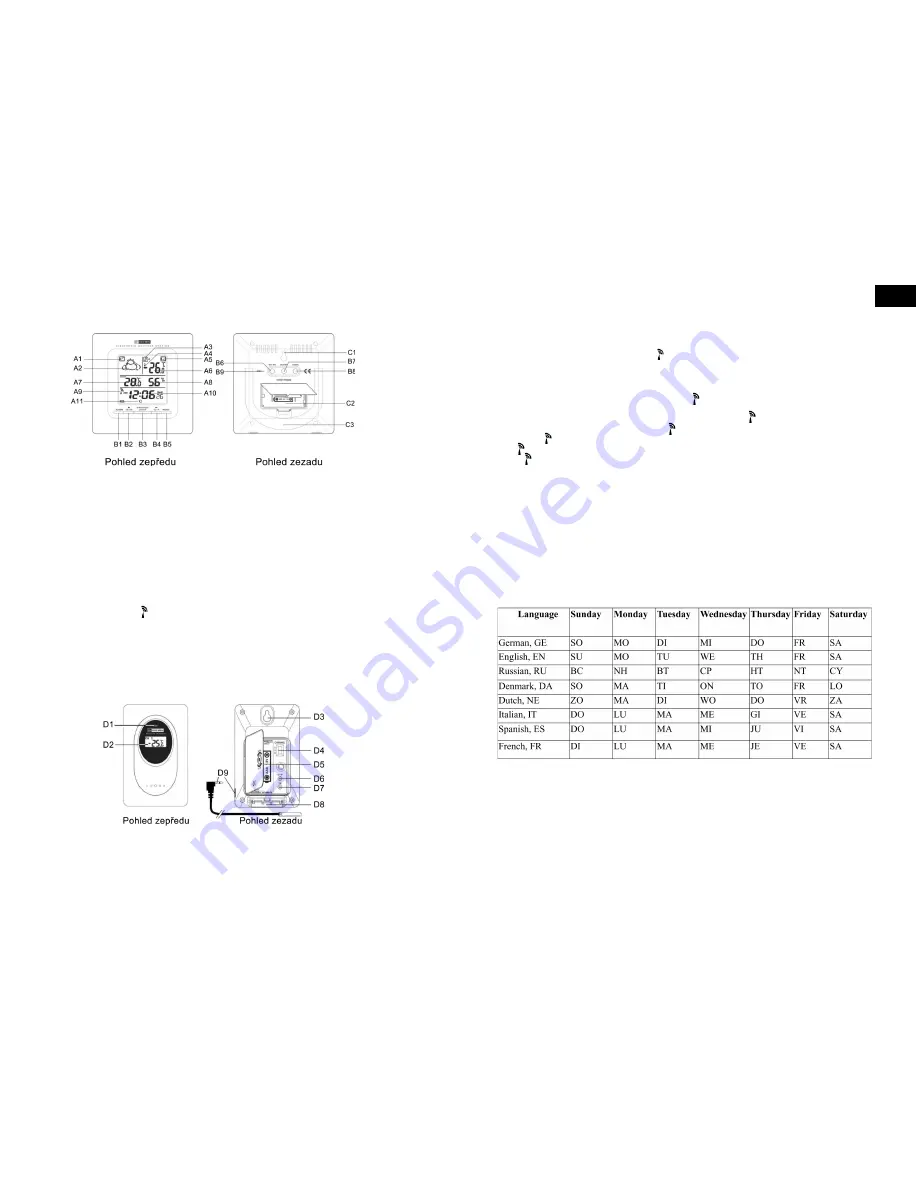
Vzhled hlavní jednotky
Část A - LCD
A1:
Tendence barometrického tlaku
A7:
Pokojová teplota
A2:
Předpově počasí
A8:
Pokojová vlhkost
A3:
Vybraný kanál
A9:
Ikona kontroly rádiem
A4:
Ikona vybité baterie
A10: Zobrazení času kontrolovaného rádiem
A5:
Tendence venkovní teploty
A11: Fáze měsíce
A6:
Venkovní teplota
Část B - Tlačítka
B1:
Tlačítko „BUDÍK“
B6:
Tlačítko „MAX/MIN“
B2:
Tlačítko „+/(12/24)“
B7:
Tlačítko „POČASÍ“
B3:
Tlačítko „PŘISPÁNÍ/SVĚTLO“
B8:
Tlačítko „KANÁL“
B4:
Tlačítko „-/(°C/°F)/ “
B9:
Tlačítko „RESET“
B5:
Tlačítko „REŽIM“
Část C - Struktura
C1: Otvor pro upevnění na ze
C3: Stojan
C2: Prostor pro baterie
Vzhled jednotky teplotního senzoru
D1: Dioda indikace vysílání
D6: Tlačítko „°C/°F“
D2: Venkovní teplota
D7: Tlačítko „TX“
D3: Otvor pro upevnění na ze
D8: Stojan
D4: Přepínač kanálů
D9: Zdířka a konektor teplotní sondy
D5: Prostor pro baterie
Summary of Contents for WSC 1909
Page 10: ...CZ 10 SK 19 SK...


