background image

4

Quick Start / Password / Settings

Operating Instructions

Quick start 

Turning On

Plug the unit into the electricity or insert a fully charged battery. The Display 

will automatically load its content and play. (To go to the Home screen and exit 

the movie being played, press the Search button or Home button. Please note, 

pressing the Home button will require a password to be inserted).

Turn the device on

Press and hold the power button for 3 seconds until the loading logo appears. 

The unit will play the content stored within its internal memory or on the Micro SD 

Card (if applicable). This can take up to 30 seconds to load.

Password  

The content being played on your unit cannot be tempered with, changed, 

deleted from the unit without inserting an authorized password. The default 

password for this product is “iicore”. 

When inserting the code to go to home screen you will have the option to

change it.


Settings

To enter the Settings Press the “search” button --> press        --> Settings.

You can use this icon at anytime to go back to a previous screen or to enter the 

home page.

To set the wireless network go to settings (from home page press        --> from 

application screen press        ).Touch ”wireless & networks” --> touch “Wi-Fi settings” 

--> choose the network that you wish to connect to and insert the network key  

--> touch connect.

Note:


Once the unit is connected to the network you disconnect it by touching 

the “Wi-Fi” in the “wireless & network settings”.

To set the sound, double click on sound settings.

Within the sound settings page you can select silent mode and adjust the volume.

To set the Display setting, double click ‘Display’. 

Double clicking the brightness allows you to adjust the brightness of the screen.

Within the Display settings you can also choose to auto rotate the screen, select 

which animation will display on the screen (if any) and to adjust the delay before 

Summary of Contents for i VIEW

Page 1: ...User Manual iVIEW ...

Page 2: ...ation screen 8 Auto play 9 Playing content 10 Reccommended formats Overview 11 Components 11 Front View 11 Side A 13 Side B 14 Back Safety and Warning 17 Main Supply 17 Main Adaptor 18 FCC Radiation Statement 18 Warning Accessories 19 Troubleshooting 19 Power Supply Unit Electrical Data 19 ...

Page 3: ...s manual in a safe place for future reference In the interest of continually improving our products i Display reserves the right to update or modify information contained in this manual The screens and the illustrations shown in this manual were produced during the development stage and may differ from the actual product unless otherwise specified For further information or support please contact ...

Page 4: ...en inserting the code to go to home screen you will have the option to change it Settings To enter the Settings Press the search button press Settings You can use this icon at anytime to go back to a previous screen or to enter the home page To set the wireless network go to settings from home page press from application screen press Touch wireless networks touch Wi Fi settings choose the network ...

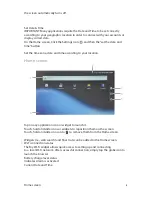
Page 5: ...o your location Home screen Tap on any application icon or widget to launch it Touch hold and slide icons or widgets to reposition them on the screen Touch hold and slide icons onto to remove them from the Home screen Widgets i e web search and Shortcuts can be added to the Home screen Wi Fi connection status The My Wi Fi widget allows quick access to setting up and connecting to a local Wi Fi net...

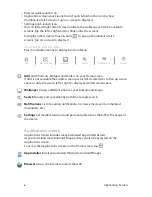
Page 6: ...ons screen Applications screen includes many preloaded apps listed below As you download more AndroidTM apps they can also be accessed on the Applications screen To access the Applications screen on the Home screen tap AppInstaller Install and uninstall third party AndroidTM apps Browser Access the Internet and surf the web Manage apps Wallpaper Search Notifications Settings Add Browser quick laun...

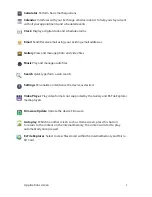
Page 7: ...eo files Music Play and manage audio files Search Quickly perform a web search Settings Personalize and enhance the device as desired Video Player Play video formats not supported by the Gallery and ES File Explorer media players Firmware Update Update the device Firmware Auto play Whilst in another screen such as Home screen press this button to return to the content on the Internal Memory the cont...

Page 8: ...al memory If the user chooses NO the content in the folders of the USB will be copied to the internal memory root folder Content in USB folder 0 will be copied to folders 0 in i view root folder If the root folder does not have these folders the i view automatically opens such folders and copies the content from the USB User chooses to delete old content in i view internal memory If the user choos...

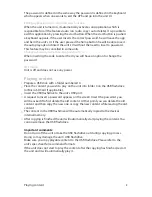
Page 9: ...t is off and does not use any power Playing content Prepare a USB stick with a folder numbered 0 Place the content you wish to play on the unit into folder 0 on the USB flashdrive or Micro SD Card if applicable Insert the USB flashdrive to the unit s USB port A request to insert a password appears on the screen Insert the password you will be asked if to first delete the old content At that point ...

Page 10: ...ed content format Recommended content format Resolution 1920X1080 Video Format XVID AVI Frame Rate 23 frames per second Up to 30 frames Rate 7 MB Up to 38 4Mbps Audio code MP3 160Kbps Image format JPEG PNG GIF BMP ...

Page 11: ...s available Landscape Portrait positioning screwdriver Landscape Portrait positioning screw Remote control User Manual 1 1 2 3 4 5 6 Side A Setting buttons Use to increases the volume Use to decrease the volume Use to go back to previous screen Search Use to go to home screen for search options You will ...

Page 12: ... the setting menu see page 15 In applications it can offer other functions per application design Please note when a movie is being played the Menu button is disabled Menu In the home screen this button uses to open a bottom bar which enables you to add features to the home screen manage apps select the wall paper search in Google see notification and enter the setting menu In applications it can ...

Page 13: ...de application mode Once you exit the auto play by pushing the home or search button and insert a USB stick the content will not play automatically Micro SD card slot If you wish to play content from a Micro SD Card insert the relevant Micro SD card into the slot of the device The content needs to be placed into the correct folder format as describes further on in this manual A request to insert p...

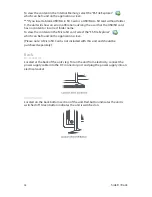
Page 14: ...ntent on the Micro SD card select the ES File Explorer which can be found on the application screen Please note A Micro SD Card is not included with this unit and should be purchased separately Back DC connector Located at the back of the unit s leg To run the unit from electricity connect the power supply cable into the DC connector port and plug the power supply into an electrical socket On Off ...

Page 15: ...Back Rechargeable battery slot Used to house the rechargeable battery The rechargeable battery needs to be placed as shown in these images Removing the Rechargeable Battery Placing the Rechargeable Battery ...

Page 16: ...Back Rotating screen to horizontal position 16 ...

Page 17: ...ding interference which may cause undesired operation This equipment has been tested and found to comply with the limits for a Class B digital device pursuant to Part 15 of the FCC Rules These limits are designed to provide reasonable protection against harmful interference in a residential installation This equipment generates uses and can radiate radio frequency energy and if not installed and u...

Page 18: ...s in the literature accompanying this equipment The main plug shall be the main disconnect device and shall remain operable at all times Never let anyone push objects into holes and ventilation slots Do not expose this product to dripping or splashing or place any objects filled with liquids on or near the product Do not place a naked flame source such as lighted candles on or near this product Do...

Page 19: ...ery Desk Mount clip Security cable Docking station 1 or 6 batteries Troubleshooting For further information or support please contact support_iView i display com Power Supply Unit Electrical Data Display Input 12 V 3000mA Power Adaptor Input 100 240V 50 60 Hz 0 8A Output 12V 3000mA ...

Page 20: ...For further information or support please contact support_iView i display com ...

Reviews: