background image

PAGE 2

2. SAFETY NOTICE

2.1 BEFORE DRIVING

The user needs to be familiar with the operation of this power chair before driving. 
Therefore please always keep the following safety notices in mind.

The same traffic rules apply to the use of this power chair as apply to pedestrians

For your safety, please therefore follow the rules that apply to pedestrians. 


»

Drive on the pavement, single carriage roads, or pedestrian areas only.  
Never drive on motorways or dual carriageways.


»

Please do not drive your power chair after consuming alcohol  
or when you are tired.


»

Please be careful when driving your power chair in low light. It has  
not been designed for use at night.


»

The power chair may only be used on the pavement or pedestrian  
areas at 4mph. 
 

Practice operating your power chair

Before using the power chair in busy or potentially dangerous areas, familiarize yourself 
with the operation of your power chair. Practice in an open area like a park. In order to 
avoid accidents with your power chair while driving, please bear in mind the different 
driving motions, such as accelerating, stopping, turning, reversing, driving up and down 
ramps. 


»

Please turn the speed dial to value 1 for your initial practice.


»

Be sure someone accompanies you for safety when driving on the roads for the 
first time.


»

Only use higher speed setting when you are confident that you can easily  
operate and control your power chair.

The Crest CSS Power Chair is only to be used by one person at a time

Do not carry passengers on your power chair. (including children)

Do not use this power chair to carry or haul goods 


»

The maximum weight that can be carried is advised in the ‘Specification’ section 
under “MAX LOAD WEIGHT”

Summary of Contents for Crest CSS

Page 1: ...PAGE 1 U S E R M A N U A L CareCo UK Ltd Hubert Road Brentwood Essex CM14 4JE by ...

Page 2: ...the seat 5 4 Adjusting the footrest 5 5 How to set to freewheel mode 5 6 Circuit breakers 6 BATTERY CHARGING AND CARE 6 1 Battery 6 2 Charging the battery 7 INSPECTION AND MAINTENANCE 7 1 Inspection 7 2 Regular checking record 7 3 Battery fuse and tyre 7 4 Storage 8 TROUBLE SHOOTING AND SPECIFICATION 9 WARRANTY DECLARATION 1 2 6 2 3 6 10 10 13 15 16 16 21 22 22 23 17 17 7 8 9 10 16 17 20 21 23 24 ...

Page 3: ...nty information Please keep it in a safe place If someone else uses the power chair please make sure that you provide them with the instruction manual for their consideration We reserve the right to make design modifications As designs change some illustrations and pictures in the manual may not correspond to the power chair that you have purchased Power Chairs have been designed and manufactured ...

Page 4: ...ractice operating your power chair Before using the power chair in busy or potentially dangerous areas familiarize yourself with the operation of your power chair Practice in an open area like a park In order to avoid accidents with your power chair while driving please bear in mind the different driving motions such as accelerating stopping turning reversing driving up and down ramps Please turn ...

Page 5: ...ake erratic turns Do not take the power chair onto escalators UNDER NO CIRCUMSTANCES SHOULD THE POWER CHAIR BE USED AS A SEAT ON MOVING TRANSPORT E G CARS BUSES TRAINS ETC Mobile Phones and other electrical equipment Do not use a mobile phone or other wireless communication device while driving Always switch off the power chair and remove the ignition key before using a mobile phone Do not charge ...

Page 6: ...ge the batteries before departure 5 Set the speed dial to a position with which you feel safe and comfortable 6 Check the joystick lever works correctly 7 Make sure the electromagnetic brake works correctly 8 Make sure it is safe around you before you drive onto the street Warning Do not set in freewheel mode when driving on a gradient Always re engage the anti freewheel device before use Fail to ...

Page 7: ... power chair 6 Do be careful while driving in heavy traffic or crowded areas 7 While reversing the power chair beware of people or objects behind you Attention When climbing an incline do not zigzag or drive at an angle up the face of the incline Always drive your power chair straight up the incline This greatly reduces the possibility of a tip or a fall Always exercise extreme caution when negoti...

Page 8: ...you anticipated or desired it would allow the chair to come to a complete stop by releasing the joystick Push the joystick slightly forward and continue travelling slowly down the incline Maximum recommended incline The Crest CSS Power Chair has undergone extensive incline testing Our results show that the maximum incline it can safely climb is 6 degrees at maximum weight capacity 6 degrees is the...

Page 9: ...nsity of the interfering EM energy can be measured in volts per meter V m Each power chair can resist EMI up to certain intensity this is called its immunity level The higher the immunity level the greater the protection At this time current technology is capable of achieving at least a 20 V m immunity level which would provide useful protection from the more common sources of radiated EMI This po...

Page 10: ...recommended to prevent possible interference with the control system of the power chair Warnings 1 Do not operate hand held transceivers receivers such as citizens band CB radios or turn ON personal communication devices such as mobile phones while the power chair is turned ON 2 Be aware of nearby transmitters such as radio or TV stations and try to avoid coming close to them 3 If unintended movem...

Page 11: ...PAGE 9 4 PARTS INTRODUCTION 1 2 3 4 5 6 7 8 9 1 Joystick Controller 2 Armrest 3 Seat back 4 Seat 5 Armrest fixed knob 6 Drive Wheel 7 Caster Wheel 8 Footrest 9 Battery Box Parts Description ...

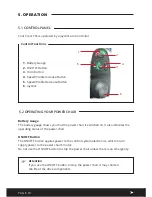
Page 12: ...e battery gauge shows you that the power chair is switched on It also indicates the operating status of the power chair ON OFF Button The ON OFF button applies power to the control system electronics which in turn supply power to the power chair s motor Do not use the ON OFF button to stop the power chair unless there is an emergency 5 OPERATION 1 2 3 4 6 5 Attention If you use the ON OFF button t...

Page 13: ...nction of the joystick is to control the speed and direction of the power chair The further you push the joystick from the center position the faster the power chair will move When you release the joystick the brakes are automatically applied Joystick Depth Adjustment Your power chair may be equipped with an adjustable joystick This function enables you to move the joystick from the armrest to the...

Page 14: ...with time Therefore when the battery s range has reduced by about 50 from when it was new it is time for it to be replaced Please contact your dealer about replacement batteries If an old battery continues to be used it can lead to a rapid decline in performance 6 The battery range will be reduced when driving frequently on slopes or rough terrain as this requires a greater consumption of power 7 ...

Page 15: ...t of armrests 1 Lift up the armrest 2 Loosen the hex nut 3 Adjust the socket screw up or down to the desired arm angle position 4 Tighten the hex nut 5 To determine the same angle for the opposite armrest count the exposed threads after the hex nut has been tightened 6 If necessary repeat the steps for the opposite armrest 1 Loosen knob on handle 2 Move armrest to required position 3 Tighten knob ...

Page 16: ...the height adjustment pin from each of the four posts 5 Raise or lower each post to the desired position 6 Reinstall the seat height adjustment pin through the seat post and armrest post Bend the end of the pin lock and position it over the end the pin 7 Reinstall the shroud 8 Reinstall the seat 9 Plug the connectors into the electronics tray To rotate the seat 1 Turn the power OFF 2 Make sure the...

Page 17: ...THE FOOTREST 5 OPERATION To adjust the footrest angle You can adjust the angle of the footrest with a hex wrench M6 1 Loosen the screw under the footrest 2 Adjust hex nut to set the footrest angle and then tighten the screw ...

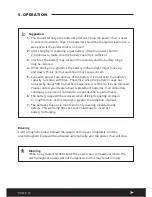
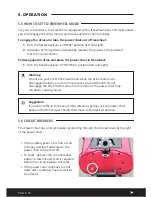
Page 18: ...hair has a circuit breaker protruding through the shroud cover at the right of the power chair Warning Do not use your Crest CSS Power Chair while the drive motors are disengaged unless you are in the presence of an attendant Do not disengage the drive motors when on an incline as the power chair may roll down causing injury Suggestion If a lever is difficult to move in either direction gently roc...

Page 19: ... BATTERY CHARGING CARE 6 2 CHARGING THE BATTERIES The battery charger is essential in providing long battery life Located underneath the utility tray it is designed to optimize your Crest CSS s performance by charging safely quickly and easily The power chair ammeter and charger plug are located on the utility tray for easy viewing The ammeter indicates the rate of charge being administered to ful...

Page 20: ...hile charging as the battery may release hydrogen gas Always charge the battery in a well ventilated space 3 Avoid electric shock Never connect or disconnect the plug or cord with wet hands while charging Do not connect or disconnect the plug or cord when they are wet Attention Please follow the rules below to avoid accidents while charging 1 Please use the manufacturer s supplied charger only and...

Page 21: ...ging the batteries off board using the charger The Crest CSS has a removable battery box 1 Remove the Seat 2 Lift the battery box out of the shroud and take this to the closest power outlet Plug the charging cable into the wall outlet and connect to your battery box 3 When your batteries are fully charged unplug the charging cable from the wall outlet Cleaning the battery If the batteries are cont...

Page 22: ...arning Be sure the battery wires are connected to their right battery terminal Replacing the battery 1 Turn the Crest CSS power switch to OFF 2 Remove the seat 3 Remove the battery box from the Crest CSS shroud 4 Remove the screws from the underneath of the battery box to open the battery box unit 5 Disconnect the negative terminal black wires first then the positive terminal red wires by removing...

Page 23: ...Seat and back upholstery Inspect for rips or sagging Seat Seat secured to the power chair frame Inspect seat release latches Drive wheel Mounting bolts are secure No excessive side movement or binding when lifted and spun when disengaged free wheeling Caster assemblies Bolts are tight Inspect caster assembly for proper tension by spinning caster assembly caster assembly should come to a gradual st...

Page 24: ...onths Your dealer may charge a fee for this Service Dates Upholstery Seat Back Armrests Electrics Connections condition Utility tray Test run Forwards Reverse Stop Left turn Right turn Slope test Over obstacles List Items repaired YEAR 1 2 3 4 Service Dates Controller On off switch Joystick Braking Recharge point Batteries Levels Connections Discharge test Wheels and Tyres Wear Pressure Bearings W...

Page 25: ...our power chair Inspecting Tyre Tread Please check the tread depth regularly Replace the tyres when the tread depth is less than 0 5 mm Suggestion 1 Do not splash water onto the power chair as this could cause the electronic system to malfunction 2 Do not use petrol solvents or aerosols as these may deform or damage the shrouds 3 Do not use wax Attention When tread depth is below 0 5mm it can easi...

Page 26: ...y Contact dealer Replace charger Battery indicator flashes the charge level is low too soon after being recharged Have charger checked Service or replace charger Contact dealer Replace batteries Weak batteries Wheel chair will not drive Motor release levers disengaged Batteries require charging Engage motor release levers Charge batteries Make sure setting on charger is correct Unplug charger from...

Page 27: ...ect to change without notice Item Dimension L W H Weight Batteries Without batteries Seat weight Total weight Battery Caster wheel Rear wheel Motor Charger MAX Speed Climbing angle Controller Anti tip wheel Charging time hours Weight capacity Crest CSS 850 585 885mm 33 5 23 34 8 inches 30 8lbs 14 Kg 72 6lbs 33 Kg 15 8lbs 7 2 Kg 120lbs 54 2 Kg 20AH 12Vx2 8 2 Solid 200x50mm 9 3 3 Solid 230x75mm 250W...

Page 28: ...ote Network or configuration error 2 Check cables and connectors Check Bluetooth pairing Reconfigure the system Recharge the battery Check charger Replace modules Contact supplier 3 Left motor error Check cables and connectors Replace Power Module Check and or replace left motor 4 Right motor error Check cables and connectors Replace Power Module Check and or replace right motor Left park brake er...

Page 29: ...nty Controllers One year limited warranty Electronic Components and Charger One year limited warranty Batteries 6 month limited warranty Warranty Exclusion The following items are not covered by warranty Motor Brushes Wheel Tyres Arm Pads Seat Cushion Fuses and Bulbs Tiller Cover Rear Shroud Front Shroud and Consumable Parts Any damage or defect of any nature occurring from the misuse abuse of the...

Page 30: ...PAGE 28 NOTES ...

Page 31: ...PAGE 29 NOTES ...

Page 32: ......

Reviews: